![]()
![]()
![]()
![]()
![]()
![]()
![]()
![]()
![]()
![]()
![]()
![]()
![]()
![]()
![]()
![]()
![]()
![]()
![]()
![]()
![]()
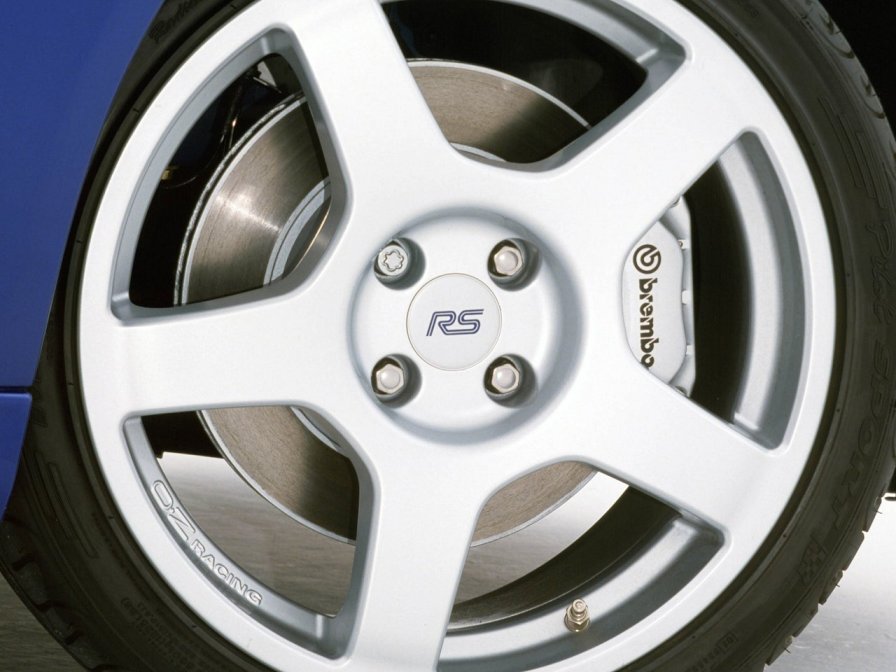
Brakes & Wheels
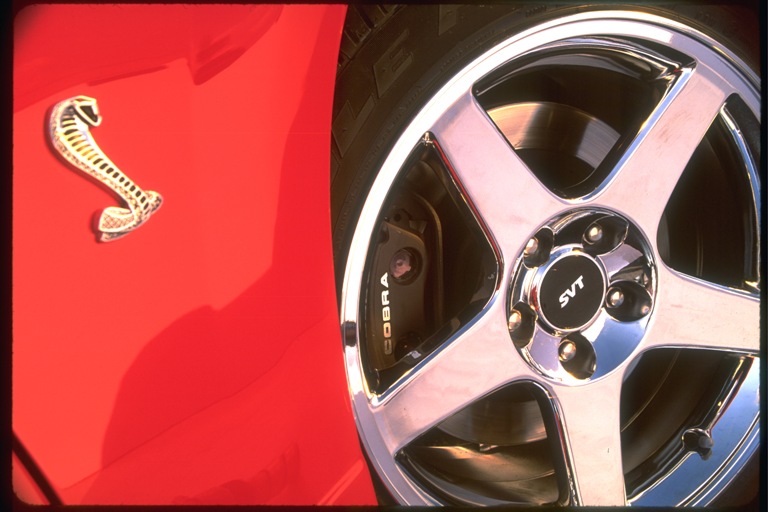
Featured
 The factory brakes on the Cobra models have
changed only slightly since 1994. The two-piston
PBR front
calipers used 38mm pistons from '94-'98, then stepped up to 40mm pistons from
'99-'04, all while retaining the 13" Brembo-sourced rotors (and with
upgraded pads for the Terminator). In the rear, Varga
iron calipers with a single
38mm piston grip 11.65" rotors. While most drivers will find them sufficient for spirited street driving as well as
high-performance driving events (HPDE's), there are plenty of options if you
are looking for more bite. If you've added more go power to your car, it
only makes sense to add more whoa power as well.
The factory brakes on the Cobra models have
changed only slightly since 1994. The two-piston
PBR front
calipers used 38mm pistons from '94-'98, then stepped up to 40mm pistons from
'99-'04, all while retaining the 13" Brembo-sourced rotors (and with
upgraded pads for the Terminator). In the rear, Varga
iron calipers with a single
38mm piston grip 11.65" rotors. While most drivers will find them sufficient for spirited street driving as well as
high-performance driving events (HPDE's), there are plenty of options if you
are looking for more bite. If you've added more go power to your car, it
only makes sense to add more whoa power as well.
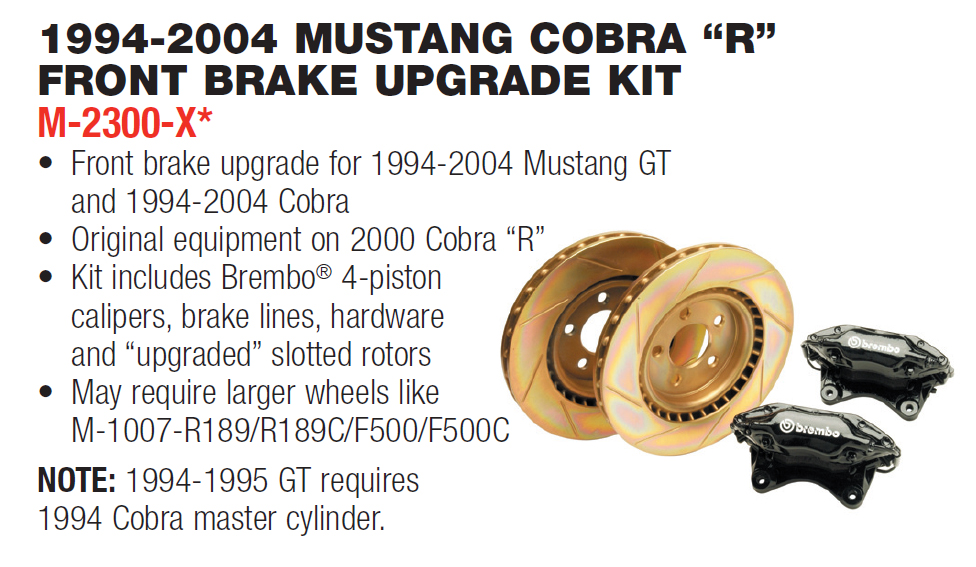
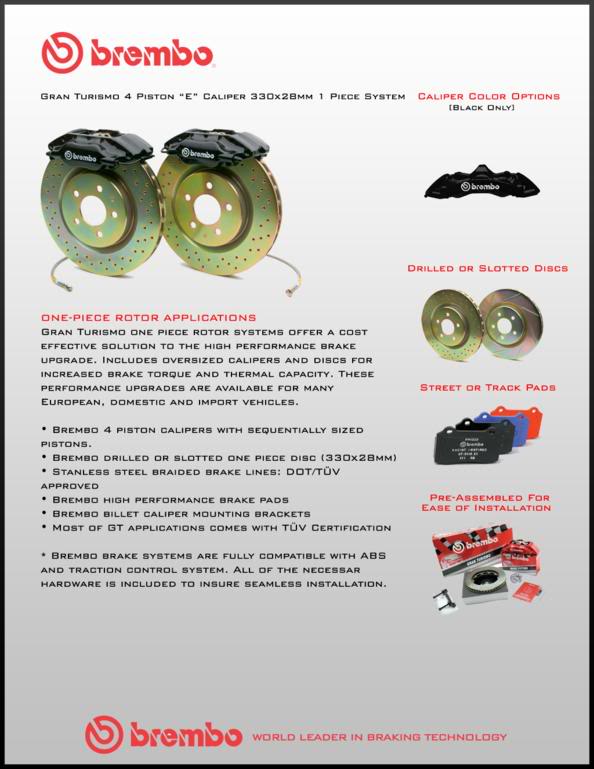
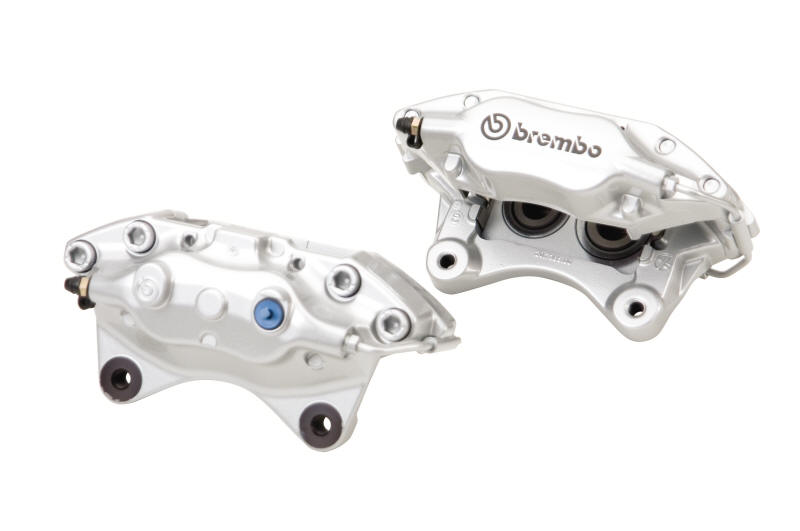
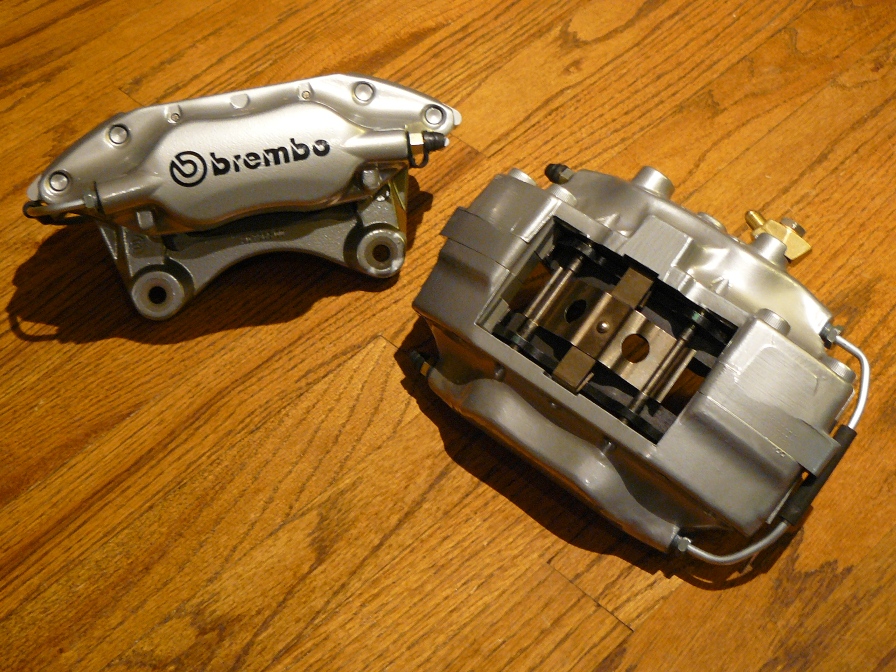
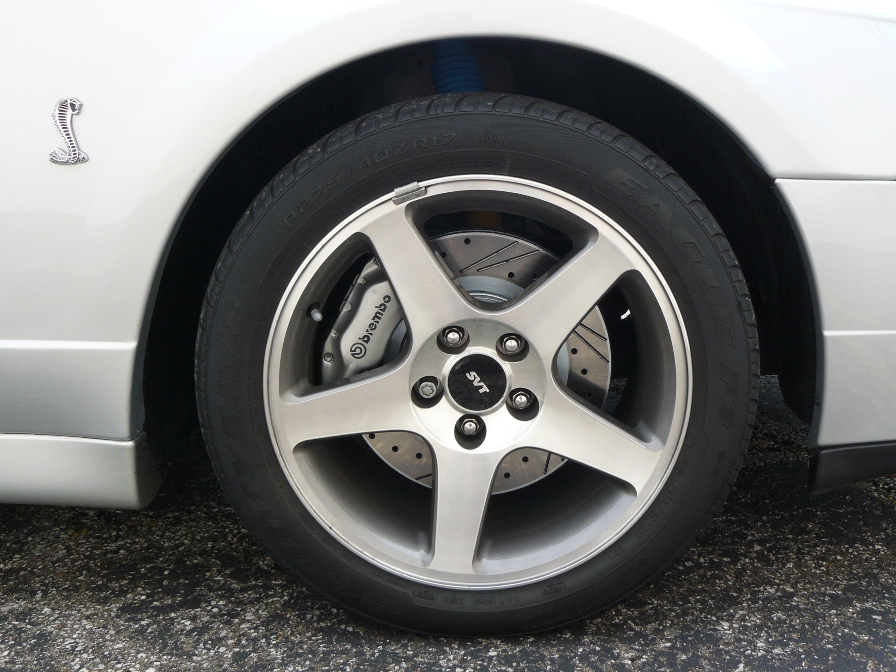
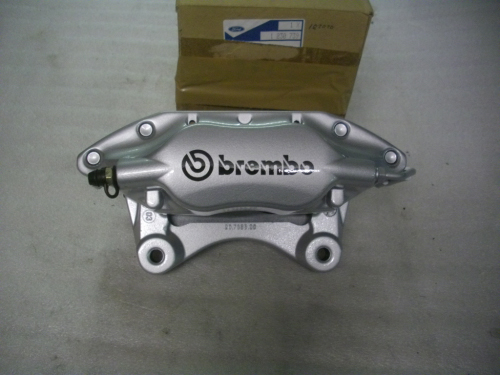
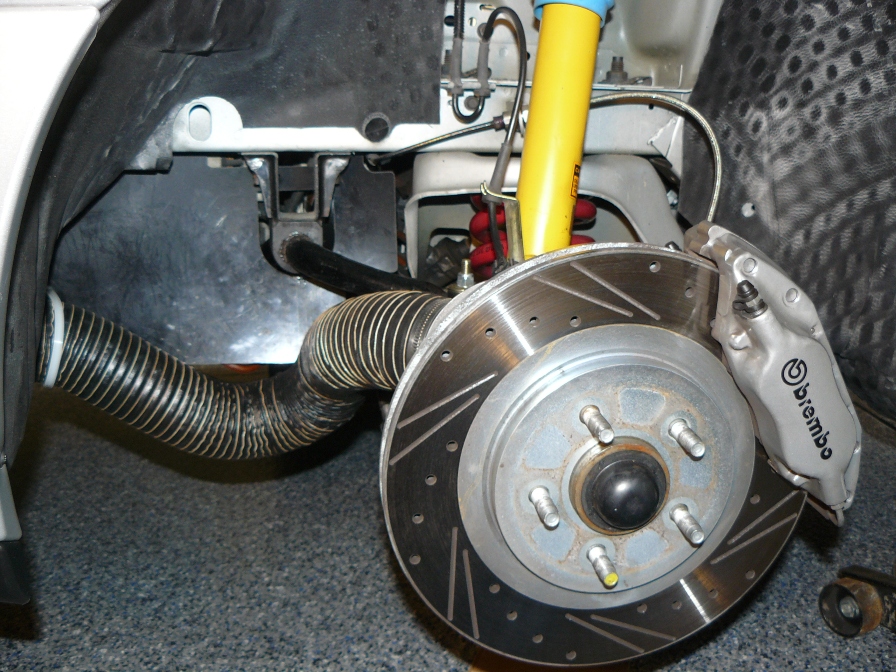
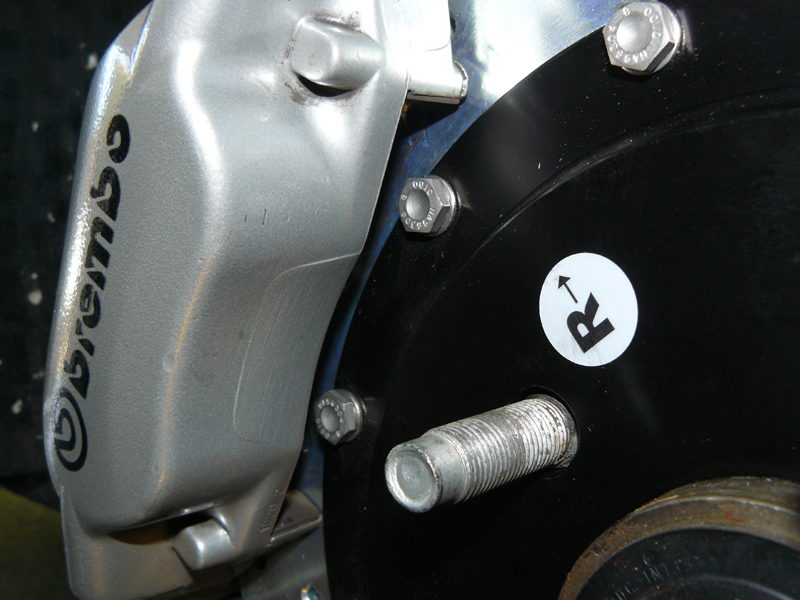
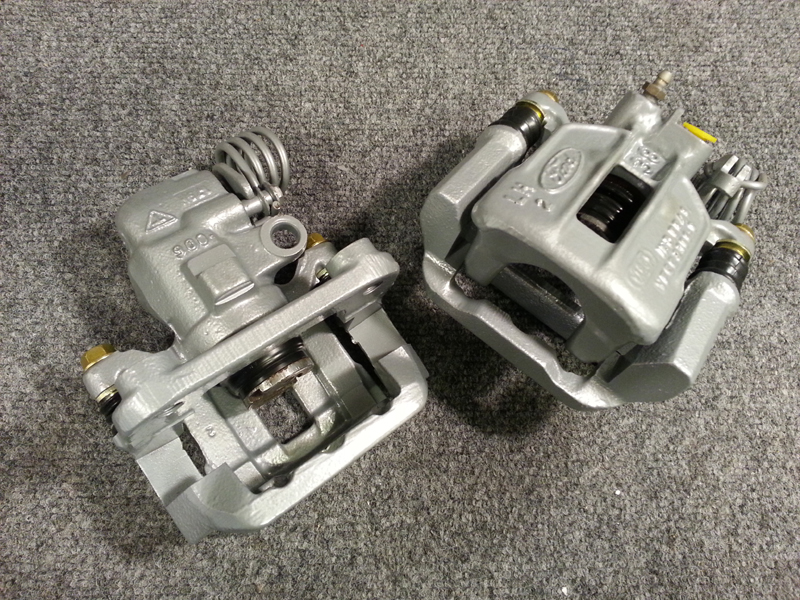
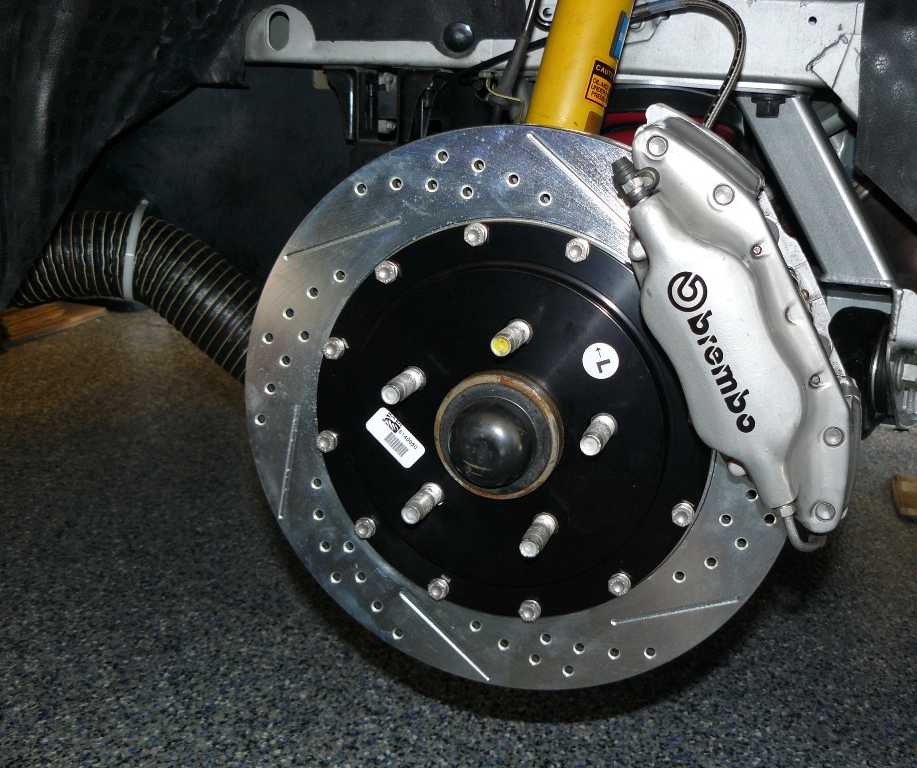
In my case, I went right to the fantastic-looking 2000 Cobra R four-piston calipers, which is the same kit sold by Ford Racing as M-2300-X (Brembo Gran Turismo). I was fortunate to score a lightly used set right off an actual R, complete with new pads and stainless steel lines. The caliper mounts rigidly to the spindle in an "Axial" fashion (the bolts are 90° to the rotor face) rather than sliding, and with 36 & 40mm pistons - two of each - they have an incredibly solid feel and more resistance to fade. In addition, they fit right over a factory-sized rotor and under the OEM wheel, which makes for an easy swap.
My calipers didn't look that bad when they arrived, but my intention was to have them powder coated for an as-new look before I bolted them on. With a silver car, I wanted them to match the European 2002-2003 Focus RS Mk1 kit that Ford Racing used to sell as M-2300-B (other than the color, the Focus RS caliper was the same as the Cobra R caliper). In the pictures below, you can see them ready to install, as well as their perfect fit behind the 17" factory wheel along with the original 18" OZ Racing wheel of the Focus, just for the heck of it. Pretty cool!
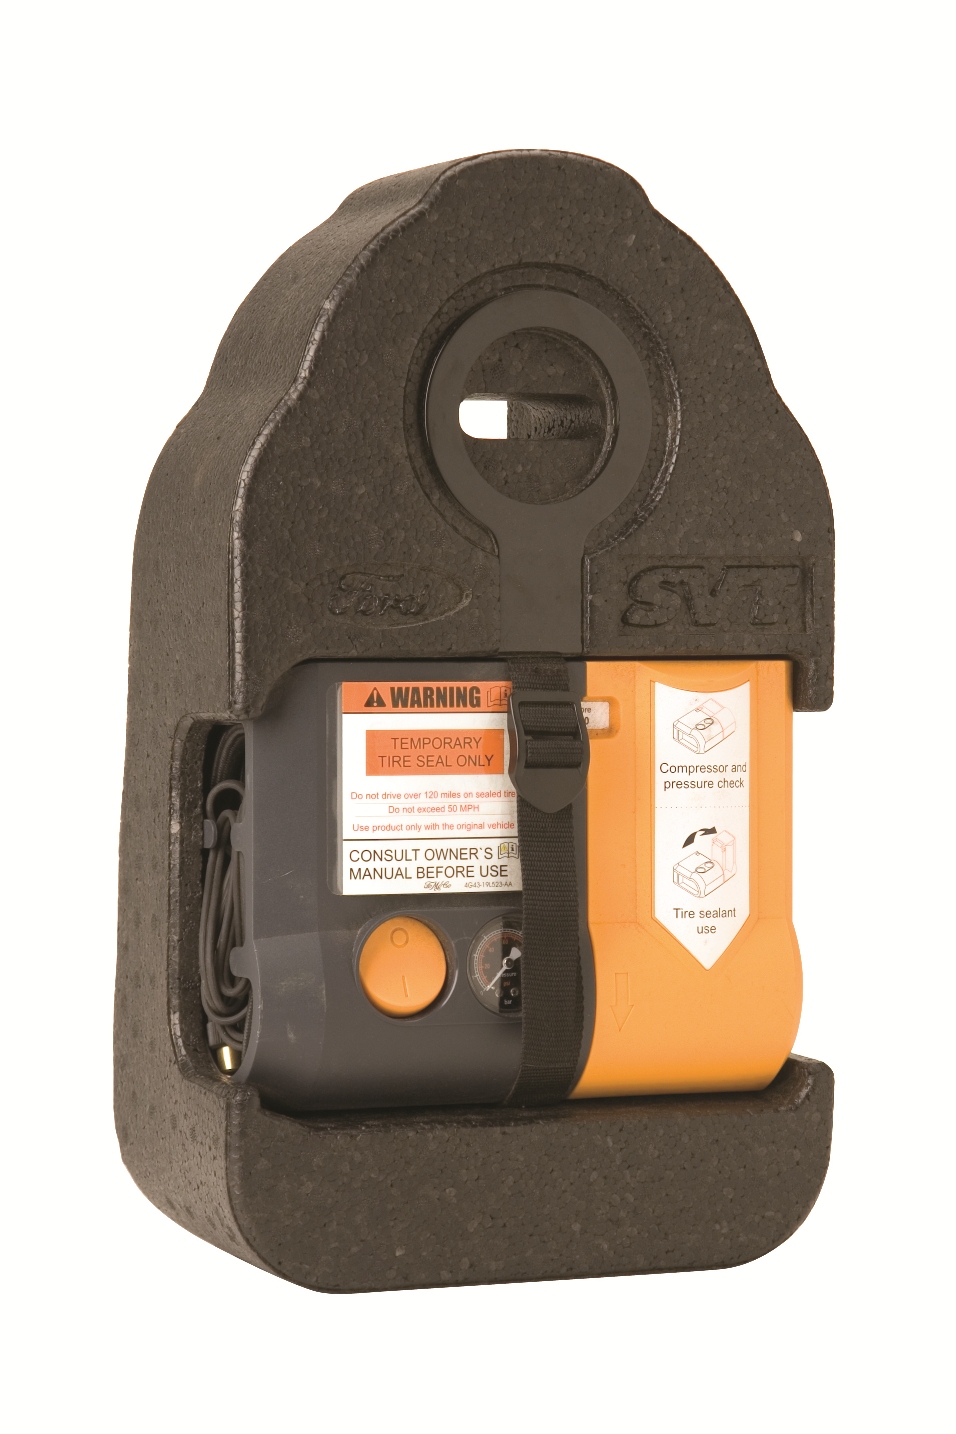
One issue that needs to be mentioned when it comes to big brakes has to do with the factory spare tire: it will no longer fit on the front hub. It's really not that big of a deal since many cars now come with an "inflator kit" instead of a spare, but it's just something that you will need to consider. I actually added one of the Sheby inflator kits to my trunk, which was formerly sold by Ford Racing as M-19543-C. For all the details and a parts list, see the blurb a bit farther down the page.
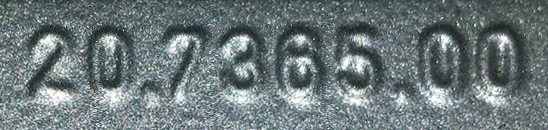
Note: Although the Focus RS Brembo kit has disappeared from the Ford Racing catalog, you can still purchase the individual calipers through Ford of Europe if you are so inclined - and able. The part numbers are 1230739 for the left caliper, and 1230746 for the right caliper. Otherwise, you are left with the option of scouring the used market or buying the other kits through Ford Racing or Brembo. Additionally, if you do acquire used calipers and want to verify they are correct, look for a casting number on the caliper of 20.7365.00. If you happen to find a set that turn out to be from a Dodge Viper, they may look the same, but they definitely won't fit.
Before bolting everything up, I also went ahead and replaced the small parts: boots, seals, pad guides, pins, bleeder screws, etc. If you happen to have the same calipers, feel free to save their parts list for reference. Adding to that, Brembo has plenty of literature that goes with the Gran Turismo/FRPP kit that can be downloaded by clicking on each picture or file name below.
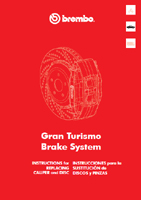
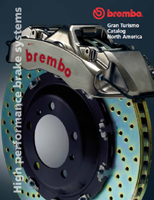
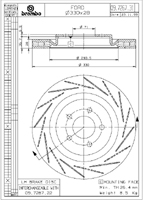
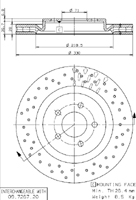
Gran Tursimo manual Brembo catalog Slotted rotor drawing Drilled rotor drawing

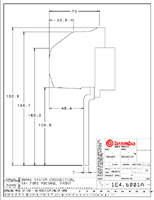
Gran Turismo parts Gran Turismo tech Caliper cross-section Brembo bedding
When new binders are added, it also makes sense to flush and re-fill the brake fluid. As long as one doesn't suck the master cylinder dry, you can bleed an ABS system just fine with normal methods. At the time of my brake upgrade, I happened to have three bottles of the Motorcraft PM-1 DOT-3 fluid on hand (the Motorcraft fluid has been "updated" to PM-1-C with a boiling point 50F lower, at 500F, so be advised) but I eventually made the switch to Motul RBF-600 DOT-4 synthetic fluid. Fortunately enough, I had just picked up a Motive Products Power Bleeder, which makes the bleed ridiculously easy. I completely flushed the system, replaced the fluid, and had them bled in record time. The pedal has been rock-hard ever since. Needless to say, I can't recommend the Power Bleeder enough - it really is that good.
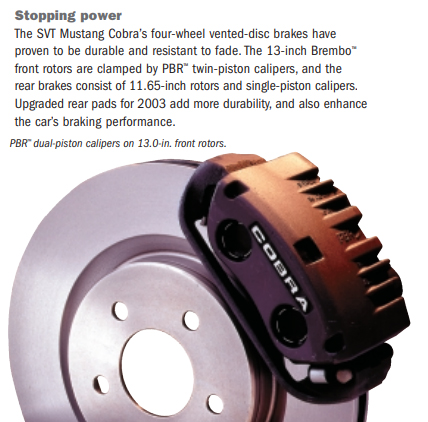
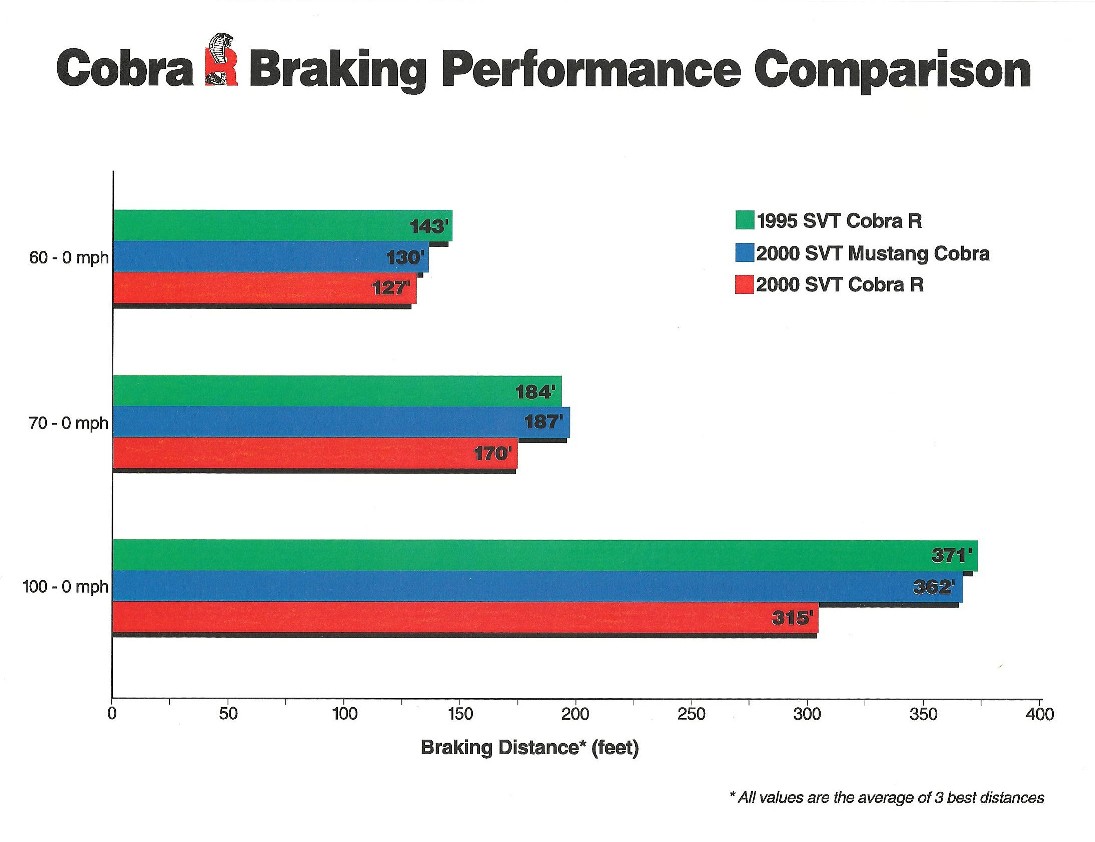 With the new calipers and associated hardware, there is a
noticeable
improvement in braking. Although the stopping distances haven't
been radically decreased, the Brembo calipers are much more solid, thanks, in
part, to their rigid mounting. Since I essentially have duplicated the 2000 R
brakes on my car, the chart in the thumbnail makes for good reference to illustrate the
differences in braking distances compared to earlier Cobras referencing both
versions of the PBR caliper (note the use of "2000 Cobra", which essentially
references the '99-up versions). Even though this chart
didn't specifically include the Terminator, the 70-0 MPH number that is
generally used there is 182'.
With the new calipers and associated hardware, there is a
noticeable
improvement in braking. Although the stopping distances haven't
been radically decreased, the Brembo calipers are much more solid, thanks, in
part, to their rigid mounting. Since I essentially have duplicated the 2000 R
brakes on my car, the chart in the thumbnail makes for good reference to illustrate the
differences in braking distances compared to earlier Cobras referencing both
versions of the PBR caliper (note the use of "2000 Cobra", which essentially
references the '99-up versions). Even though this chart
didn't specifically include the Terminator, the 70-0 MPH number that is
generally used there is 182'.
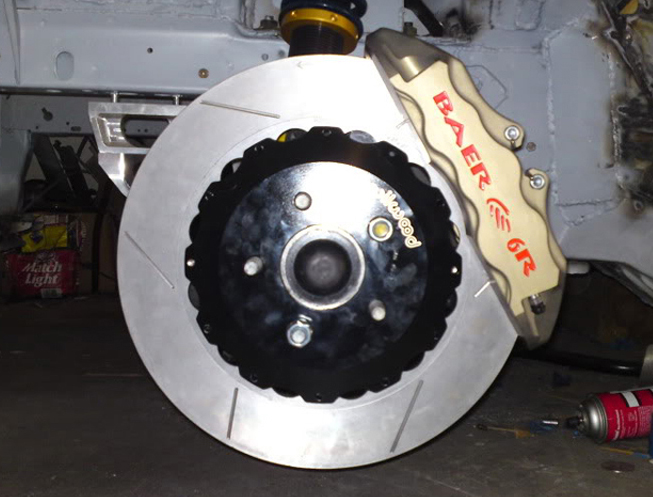
Now that I've played up the big brakes, and especially Brembo, I couldn't resist giving a plug to Baer and some of their front upgrade kits (see the new rotors in the next section). If you can't get your hands on the Italian gear for whatever reason, there are real nice four-piston and six-piston upgrade kits available that not only use easily acquired pads and parts, they also fit behind the OEM wheels (they do also have 14" kits, but those will require larger wheels). After having had the opportunity to see their Phoenix, AZ facility firsthand a few years back, I was definitely impressed. I do love my Brembo gear, but if you want to improve your own braking, don't forget some of the other companies out there!
Note: When mounting brake calipers, please pay attention when it comes to the bleeder screw position - they will always be near the top of the caliper. Since the brake fluid cannot be compressed, the bleeder needs to be higher so you can force any air up and out of the system. You definitely will have problems if you bolt them on like this! It's a simple concept, but I'm always amazed when it goes over so many heads.
Since I didn't initially have any hard-core driving plans on the horizon, I decided to go easy on my wallet after splurging for the Brembo calipers. My first new set of rotors were a custom drilled and slotted variety. They actually started out as Centric blanks, which I was comfortable with since I understood them to be of a better quality than some of the eBay stuff, and they didn't disappoint.
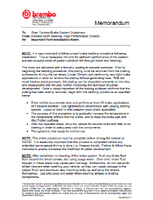
I could have just stayed with OEM solid rotors, but despite the internet rumors, cross-drilled rotors provide a more aggressive surface for braking, and as such, shorter stopping distances. No, I didn't actually conduct any scientific comparison tests, but these rotors served me well and gave me no reason to think my braking performance would have been better with solid rotors. In any case, the picture above left shows a front and rear rotor brand new, and the picture on the right shows the front left rotor after about 2,000 miles - still looking good. Now before you decide to write and tell me they are on backwards, don't bother. This is the correct way to install a slotted rotor. If you still have doubts, you can read a memo right from Brembo that should set you straight.
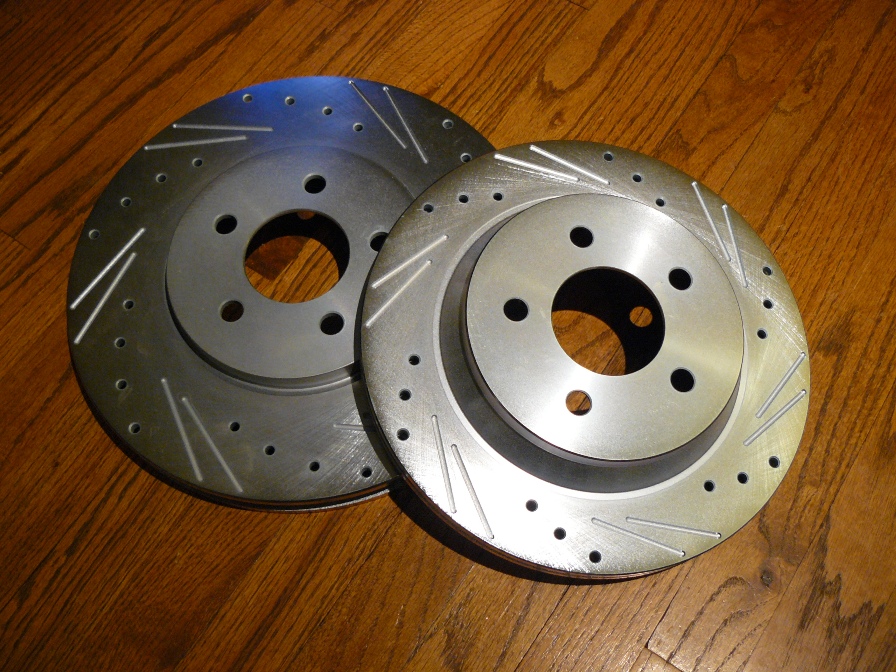
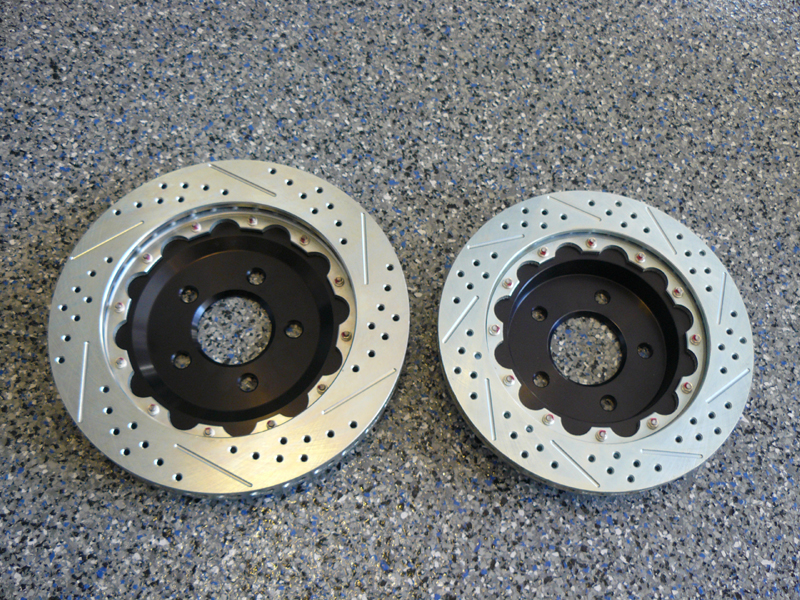
Although the custom discs didn't give me one hint of trouble, fast forward a couple more years and I was ready to upgrade. Since I got a great deal on a set of Baer EradiSpeed Plus two-piece drilled, slotted, AND lightweight rotors, I couldn't say no to the swap. These also came in the standard sizes of 13" for the front, and 11.65" for the rear, but even better, they weighed in about 3 pounds less each. Below are two pictures showing a front and rear rotor (both for the right side) before the were ready for installation. If you ever get your hands on them, you'll really appreciate how much of a work of art they are! In addition to the above memo from Brembo about rotor orientation, there is also a similar note from Baer that addresses this - both worth the read.

Note: With cross-drilled rotors, it is extremely important to season the rotors and bed the pads in an appropriate manner before any serious use to minimize the risk of cracking. Baer actually has a very specific - and lengthy - break-in process, which is quite necessary. Just for reference, you can download the memos for both rotor seasoning and pad bedding, so feel free to read up if you want to do it right. As my buddy Tony said about his own, "...I beat the hell out of my first set on the road course, and there still wasn’t a single stress fracture to be seen on any of them when it was time for replacements". So if you go out and do a couple panic stops on drilled rotors, then consider them good to go, you'll be in for quite the surprise. No wonder so many ill-informed people buy in to the hysteria that these are bad. It's a good thing no real high-end performance cars come with them!
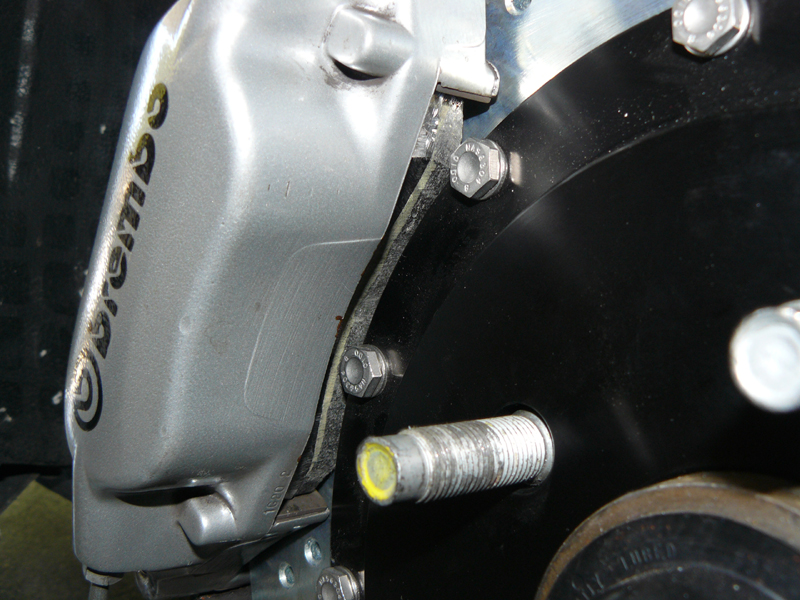
Before going any further, I'll confess that the transplant of these new rotors came with one hitch: the front pair were technically not meant to fit with Brembo calipers. Actually, the caliper itself fit fine, but the taller pad was the problem since its lower edge contacted the mounting ring and bolts on the outside of the rotor. Being someone who doesn't like to take No for an answer, I discovered the solution was actually pretty simple (other than buying a new set of calipers from Baer): remove some of the backing plate and friction material from the bottom of both outside pads. The center picture below shows a "modified" pad on top of an original, with about 1/4" of material taken off. It was actually slightly more than what was needed, but I decided to play it safe and they worked perfectly. The other two pictures give you an idea of the fit with the Brembo caliper, both with and without the modified pads.
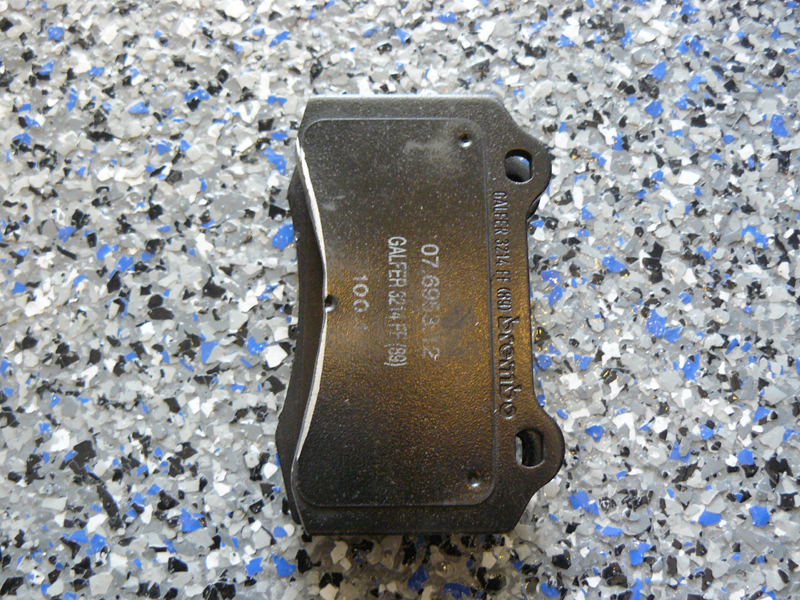
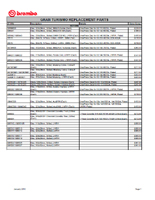
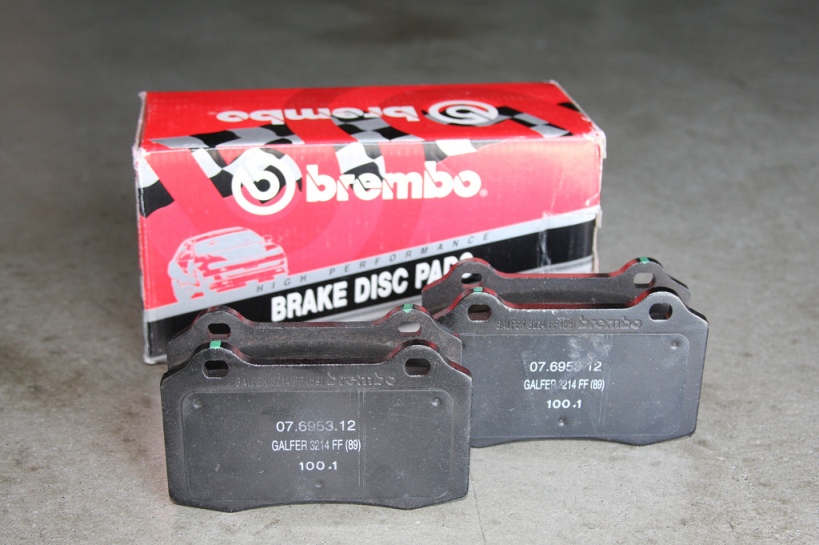
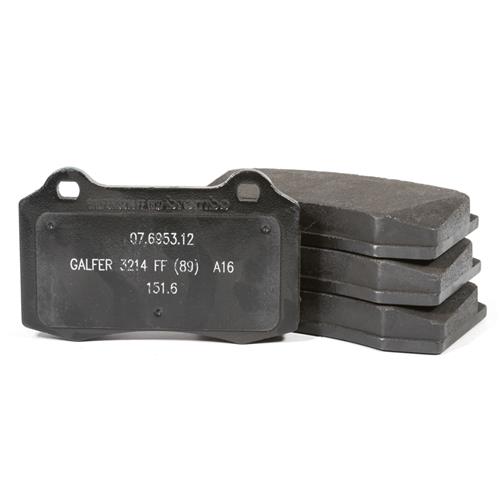
On the subject of pads, I didn't get very extravagant. The front pads are the standard Brembo 107.6953.12 (available again through Ford racing as M-2300-XP), and the rear set is a heavy-duty ceramic compound from Monroe, back when they had a brake division. The Brembo pads are fantastic and completely noise-free, but I do pay a bit of a price when it comes to brake dust - there is a lot. Just for reference, diagrams of the Friction Materials Standards Institute (FMSI) outlines are show below for the Cobra R front pads as well as the OEM rear pads. If you would like to have the information for the factory front pads, they can also be found on the Centric website.
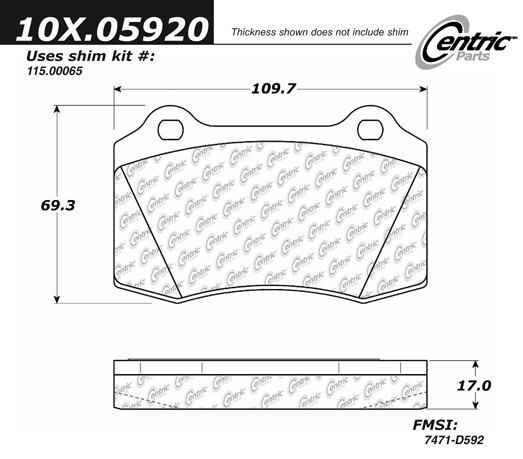
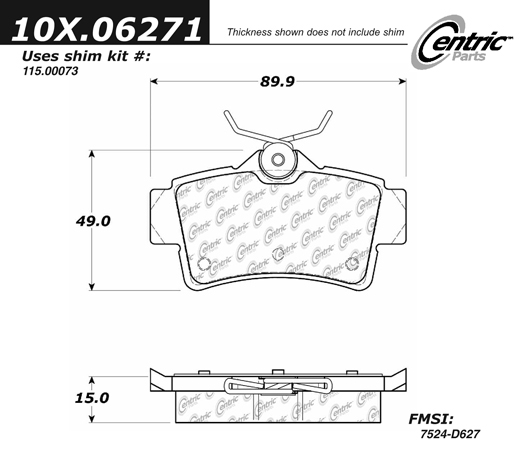
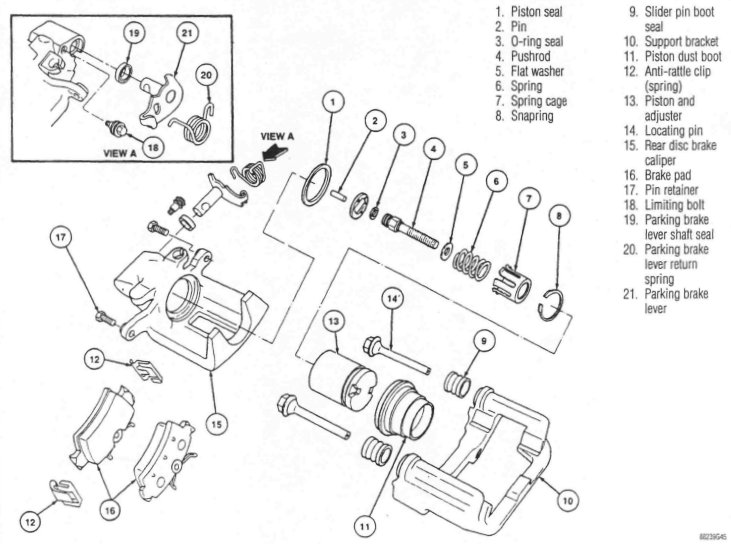
Note: When it comes to choosing rear pads for your Cobra, be aware they have a thickness of 15mm as shown above. Other Mustangs use a rear pad with a 17mm thickness (due to thinner rotors), but it seems that fact escapes many DIY types and parts-store employees. If you can't seem to get that rear caliper back on, your "new" pad might be the culprit. Adding to that, those rear pistons do not push in, they screw and push in. If you are scratching your head wondering why your monster C-clamp isn't working - get a service manual...and the necessary tool kit!
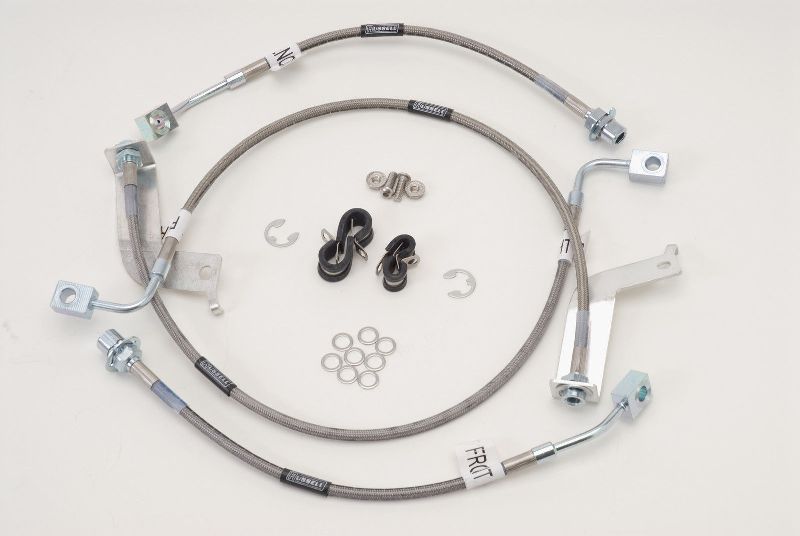
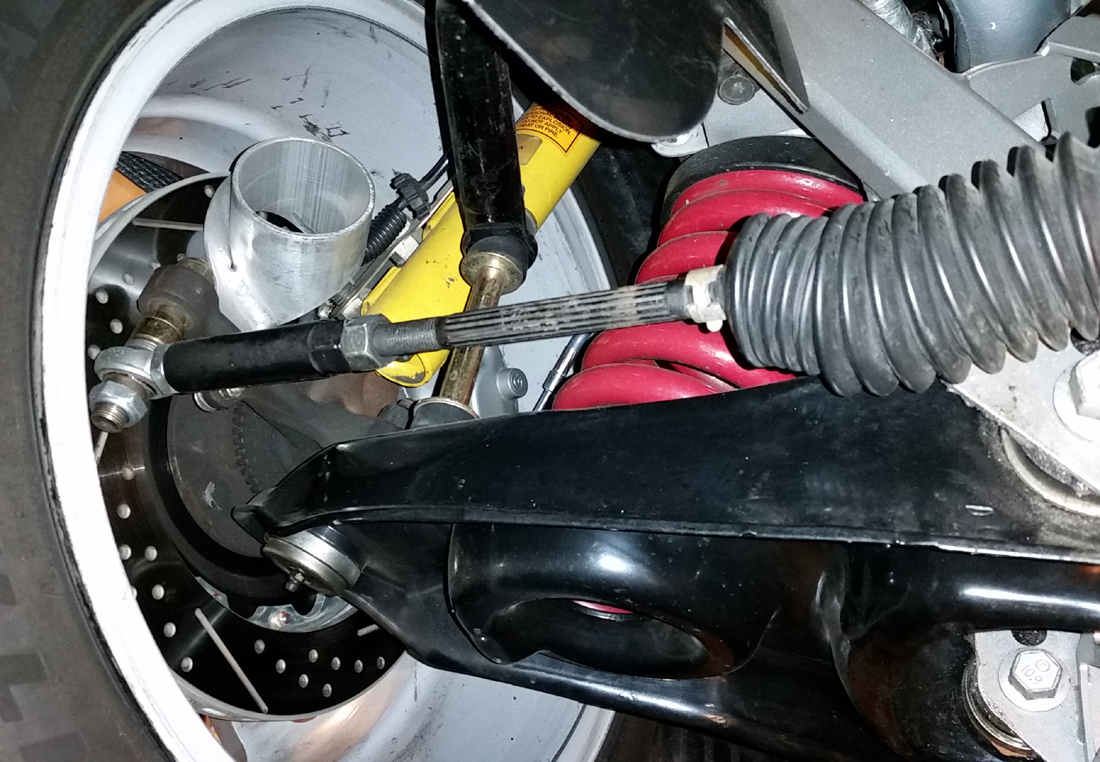
Just prior to upgrading to the Baer rotors, and during the K-member & differential project, I decided to replace all of the brake lines with the Russell Performance 693270 braided stainless steel kit (not that they are related - I just had the suspension apart again). I picked up the kit brand new for around $100, so it was hard to pass, especially since I could upgrade the rear lines now. There was absolutely nothing wrong with the Goodridge lines I had up front, but being picky, I went ahead and installed the matched set of four. I also finally got to use the Motul fluid, and once again, the Power Bleeder made this process incredibly simple.

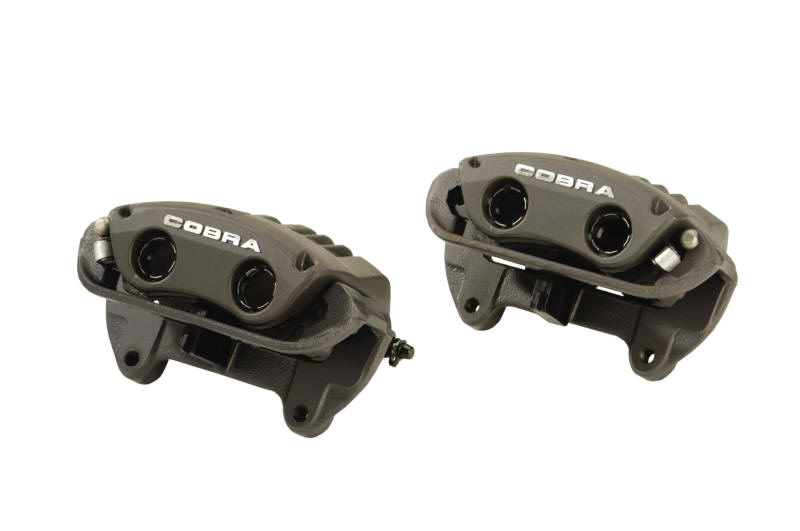
Since I was cracking the brake lines open now anyway, I also splurged and updated the rear calipers to a set that were powder coated. I had initially used a silver paint by G2 USA - which held up real well - but I figured it was worth going for an exact match of all the calipers while I was at it. Since I just happened to stumble upon a small company called that offered a nice exchange program for Cobra owners, I dove in. Unfortunately, that shop went out of business in 2016, but my timing worked out perfectly.
The deal then was that you buy a "new" set, coated to your specifications, then you send your original calipers back for a core refund once their replacements have arrived. Not a bad way to go, especially since you minimize the time with the brake lines open. Adding to that, you don't have to mess with re-assembly of the calipers since they show up ready to bolt on. If you've ever attempted to re-build a Varga caliper, you'll know it is a real pain - leave it to someone who has the right tools!
 As already mentioned, there was a
slight dilemma when it came to the spare tire once Brembo came in to play: it would now never fit over the
larger calipers. Sure, if I ever got a flat in one of the front tires, I could go through
the hassle of swapping a rear tire to the front while putting the "donut" on the
back, but that just wasn't on my list of preferred options. Ford, and
many other auto-makers actually had a different idea that has become quite
common over the last several years: an inflator kit in lieu of a spare tire.
As already mentioned, there was a
slight dilemma when it came to the spare tire once Brembo came in to play: it would now never fit over the
larger calipers. Sure, if I ever got a flat in one of the front tires, I could go through
the hassle of swapping a rear tire to the front while putting the "donut" on the
back, but that just wasn't on my list of preferred options. Ford, and
many other auto-makers actually had a different idea that has become quite
common over the last several years: an inflator kit in lieu of a spare tire.
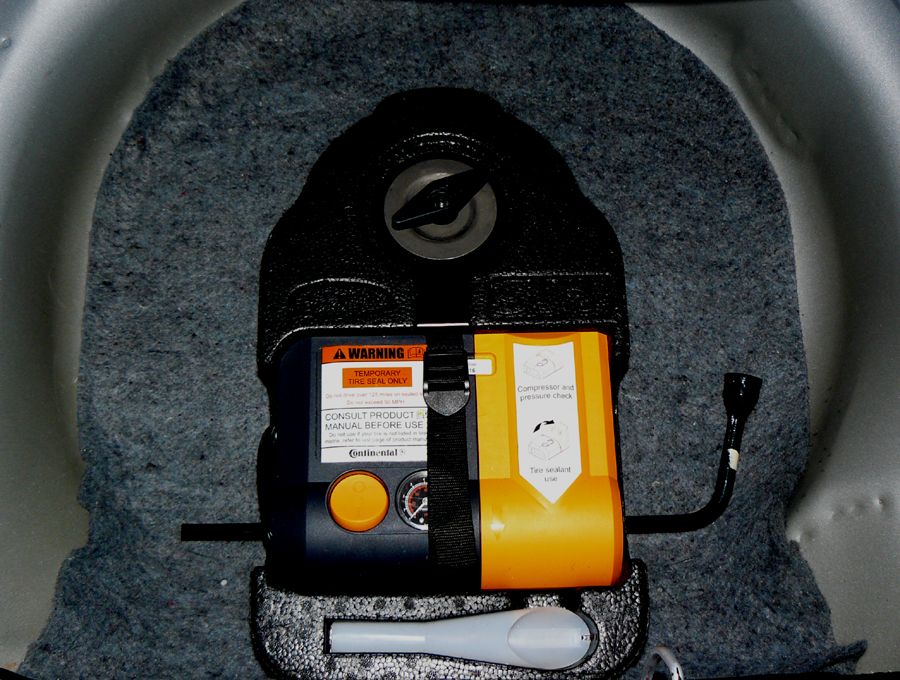
For a Mustang, it's a no-brainer: the Shelby inflator kit (formerly sold by Ford Racing as M-19543-C) also known as the ContiComfortKit. The kit actually has its roots in the Ford GT program, but has since migrated in one form or another to many other vehicles. It was easily pieced together through my local Ford dealer and not only fits perfectly in the spare tire well, it frees up a bunch of space for even more storage (shown in thumbnail).
I've never actually been a real big fan of the "Fix-a-Flat" goo, but I went out on a limb as assumed this stuff would be of a higher quality if I ever needed it. Besides, it was preferred to the idea of calling a tow truck. As a bonus, the kit also includes a portable air compressor that you can power through any aux power outlet. If this appeals to you, a parts list is already put together to make it even easier to round up!
On an unfortunate note, the kit weighs in at just a few pounds - right in a location that is exactly where you don't want to REMOVE weight. In any case, I have seen some pretty bizarre options for guys that chose to completely toss the spare tire in the interest of "lightening the load". Personally though, I'd never want to be without any way to add air or temporarily fix a puncture.
Note: The earlier trays lacked the small recess that is shown on the bottom. The newer kits that were standard in most Ford vehicles included this cut-out to hold a small fuel funnel, which is meant for the new Easy Fuel caps. If you happen to assemble this kit and would like to add it, the part number is 8U5Z-17B068-B.
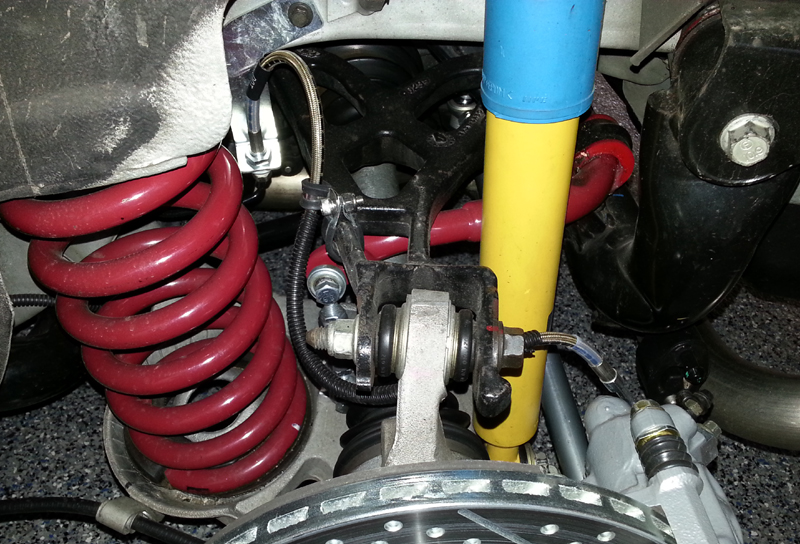
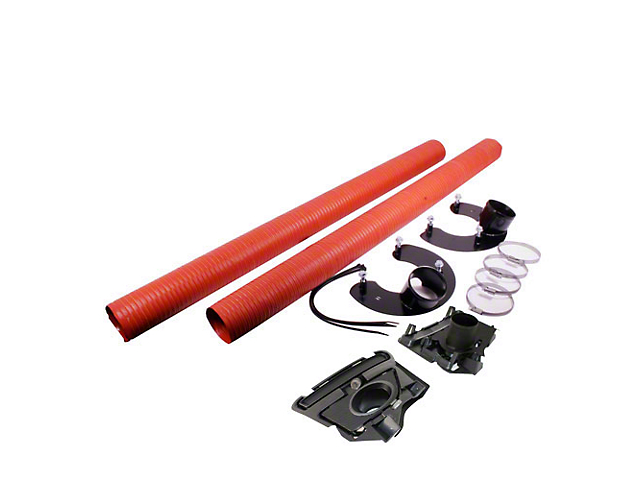
Back to my obsession for anything that relates to the Cobra R, I decided to add a set of front brake cooling ducts in anticipation of any HPDE's. The original '00R kits, once made by Multimatic Motorsports, are nonexistent, but fortunately, there was another option at the time. The kit I scored was made by the former Quantum Motorsports, then sold for a while by Lambert Automotive Performance. I can't say they are absolutely necessary, even for street driving, but they sure don't hurt. When it came time to seasoning the new rotors, I was definitely glad they were there to provide some much needed cooling.
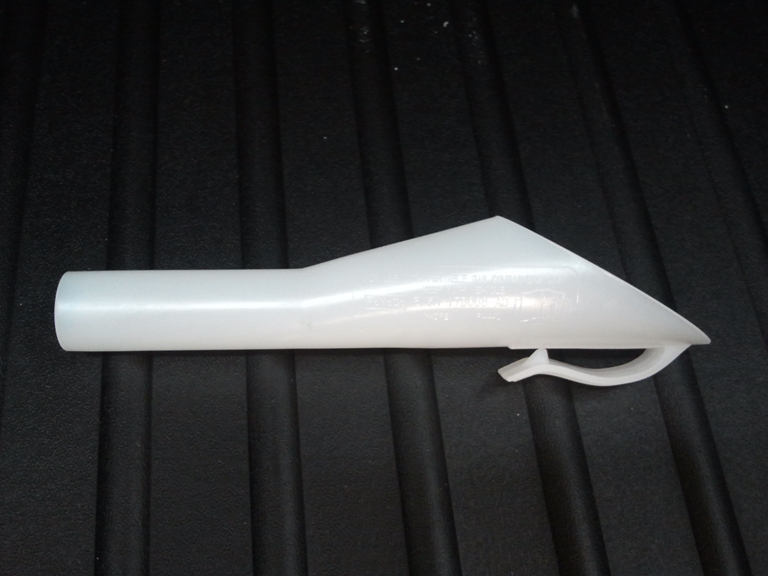
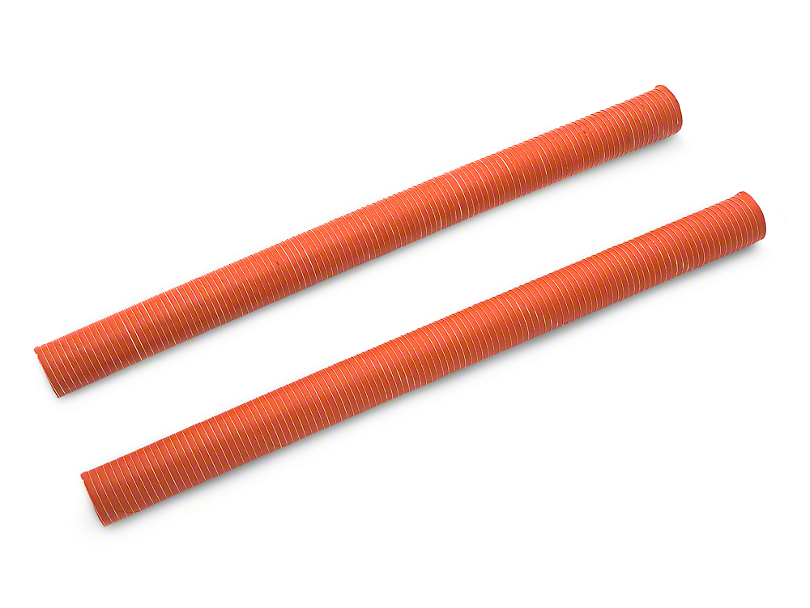
The supplied ducts are made of a 3" wire-lined silicone which run from the fog light cup to their aluminum backing plates. The air is then directed across the rotor and in to the hub - right where it is needed to take advantage of internal vanes that act as a centrifugal pump. The pictures below show the backing plate and hose, which was also perfect for a bling shot of the new front brake rotors. You can also see it more clearly towards the middle of this page (although with the first set of new rotors). They are just one of those things that is better to have and not need all the time, rather than find out too late that you could have used them!
Note: One of my early 2016 projects was the replacement of the ducting that came with the newer Lambert kit. Unfortunately, when they took over for Quantum, a different ducting was included that was not as durable as what they used to use. I was aware of it when I installed the parts initially, but went with it anyway. Since the original hose is definitely on the stiffer side, I had some issues with it contacting the inner edge of my wheels, which wore through it in a few spots. Not a big deal since replacing it is easy enough: simply look for aircraft SCAT ducting, which is rated for temperatures of 550°F+ (definitely higher than what I had originally). I ended up ordering a section from Jegs, which was one of the better deals out there, but it can be found just about anywhere. This is also the same "orange" tubing that came with the FRPP Boss kit, and can also be replaced through any number of vendors.
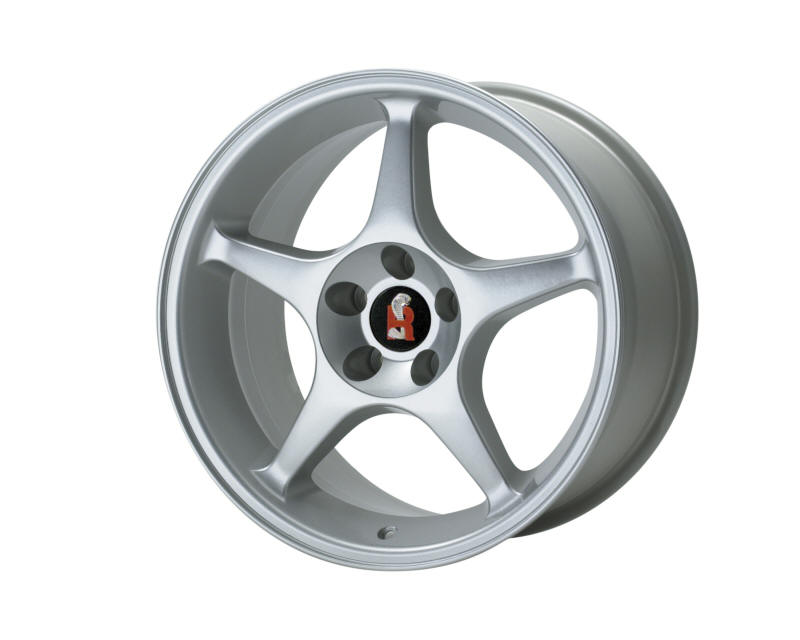
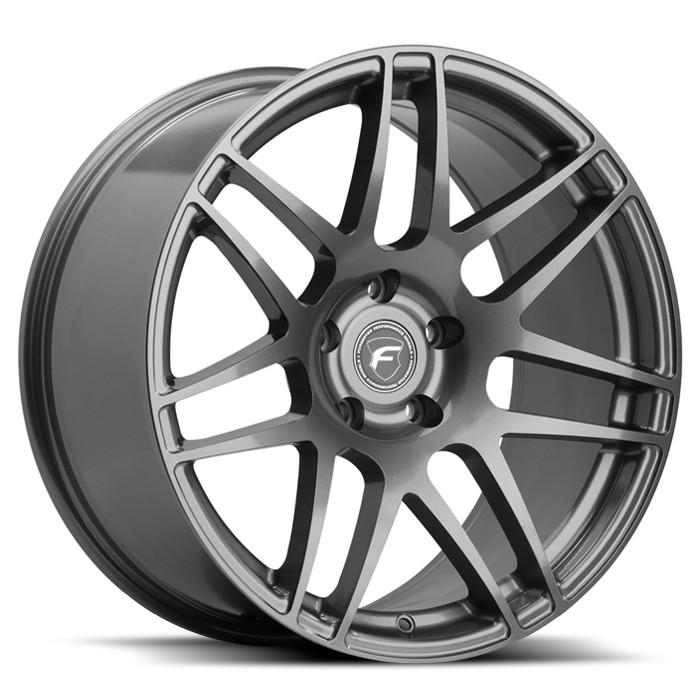
While the OEM 17x9" SVT wheels (formerly FRPP p/n M-1007-S179) are fantastic looking, I think the '00R wheels are even nicer. It also helped that I scored a mint-condition set off an original '00R for a price I couldn't pass up. While I did love the idea that the new wheels would go great with the rest of my R parts, I knew I was going to pay a price in the weight department. Unfortunately, the 18x9.5" wheels (formerly FRPP p/n M-1007-R189 or M-1007-R189C) topped the scales at just over 28 pounds each. Had I been a serious racer, these wheels would definitely not be an option due to their weight, but for street driving, they were going to work fine (my next favorites are the Forgestar F14 - incredible looking and light!).
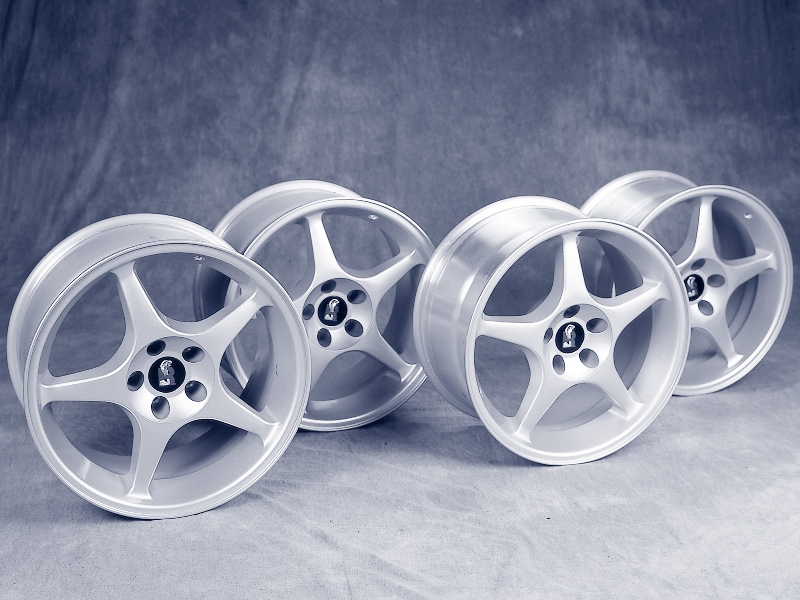
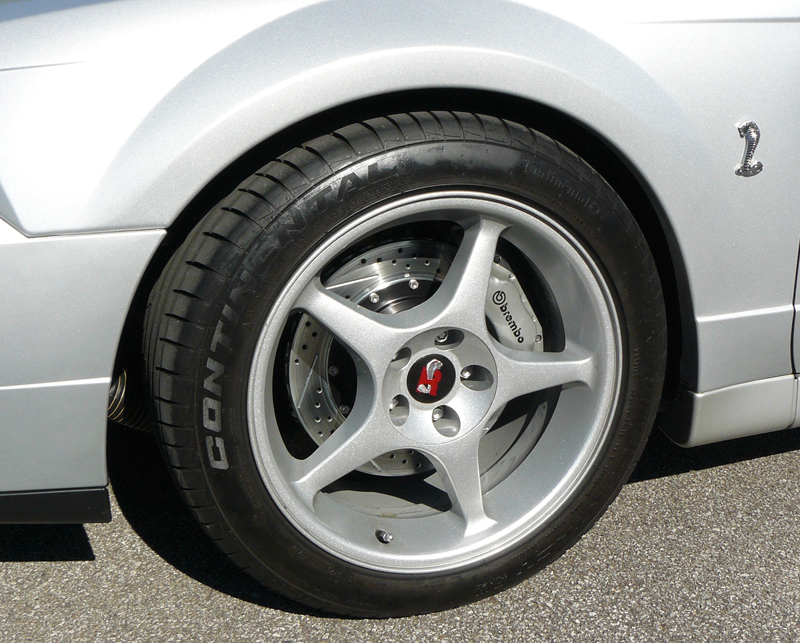
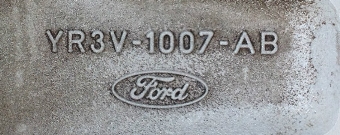
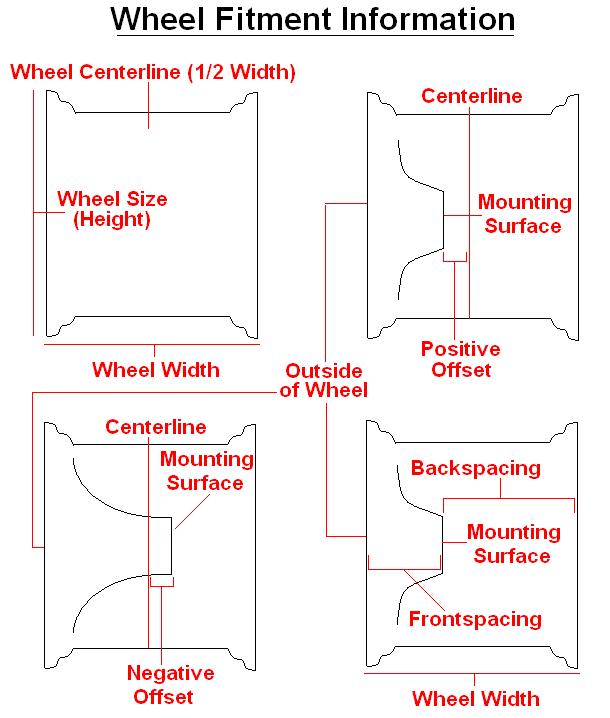
If you ever come across a supposed set of 2000 Cobra R wheels and aren't sure if they are real, it is easy enough to tell. On the back, you will see the casting number of YR3V-1007-AB (whether silver or chrome), as well as a stamp with the dimensions. Overall, these fit much nicer due to not only their extra width, but different offset compared to the original wheels. Since the backspacing is the same, they have an identical amount of clearance inside the fender well, but with slightly less offset (wheel centerline to mounting face) the R wheel is pushed out just a bit more, which is perfect. For a quick comparison of the wheel specs, see the table below.
|
Wheel: |
OEM | Cobra R |
| Diameter: | 17" | 18" |
| Width: | 9" | 9.5" |
| Backspacing: | 6.12" | 6.12" |
| Offset: | 26mm | 20mm |
| Bolt circle: | 5-lug, 4.5" | 5-lug, 4.5" |
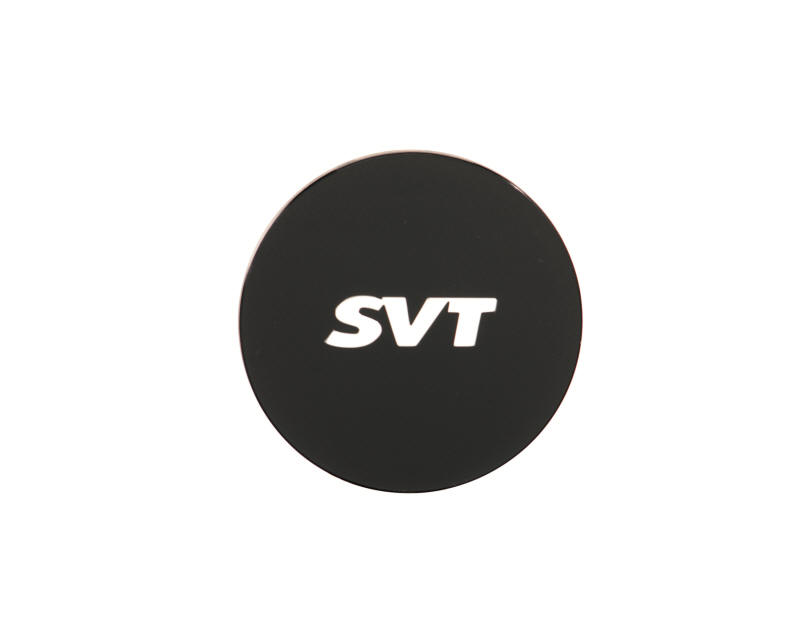
They really are a great looking wheel, and as an added bonus, they are ridiculously easy to keep clean. They also came with the original 2.5" center caps which are another nice touch (not to be confused with the 2.25" caps from the '95 R wheels). Fortunately, for anyone else that owns these, the caps are still available after all these years from FRPP as M-1096-J, but I made sure to stock up on an extras just in case. Along those lines, the standard "SVT" caps will also fit and are still available as FRPP M-1096-N or through Ford as 2M5Z-1130-AA. Oddly enough, those caps cost about half as much through Ford, so grab them while they are still around.
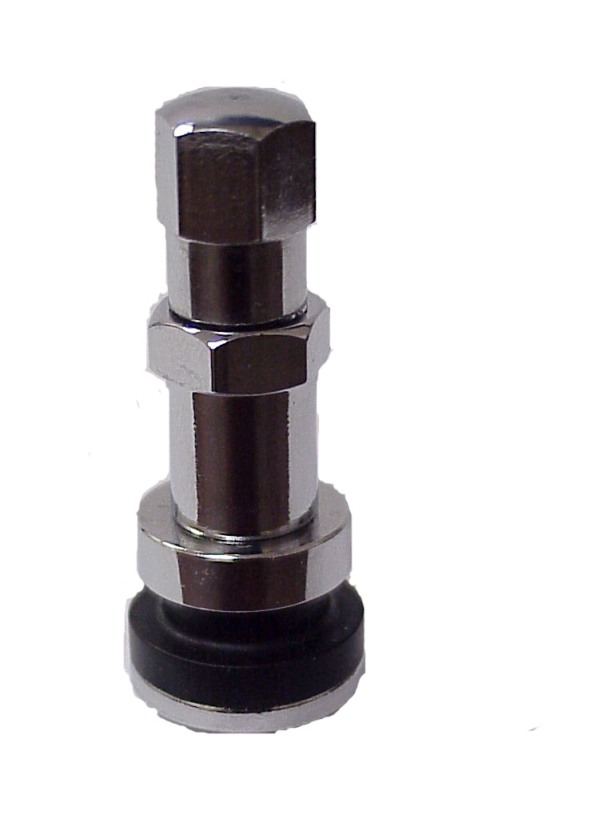
Note: An often overlooked item when it comes to wheels are the valve stems. The 2000R was supposedly supplied with a high-pressure, clamp-in stem from Dill Air Controls, their model VS-902-W which was originally sourced from a Ford truck program. These high-pressure stems are generally good for pressures up to 200PSI which is probably overkill for most other than the serious track types or those with a very heavy right foot. While standard stems are fine for cold pressures up to about 70PSI, the upgraded versions are inexpensive insurance, plus they just look extra cool!
 With new wheels came the need for a new set
of tires. Fortunately, I had been prepared and was doing plenty of research
thanks to the TireRack. I went right to their
Max Performance Summer category, and while there are
some great performance summer tires out there, I settled on the
Continental
Extreme Contact DW. I was glad to see the DW getting high
marks on their surveys, and the more I read there and on the internet, the more I liked them. After some use of the tire, I can
attest that they have fantastic grip, handle well, and are relatively
noise-free. On top of all that, they look great.
With new wheels came the need for a new set
of tires. Fortunately, I had been prepared and was doing plenty of research
thanks to the TireRack. I went right to their
Max Performance Summer category, and while there are
some great performance summer tires out there, I settled on the
Continental
Extreme Contact DW. I was glad to see the DW getting high
marks on their surveys, and the more I read there and on the internet, the more I liked them. After some use of the tire, I can
attest that they have fantastic grip, handle well, and are relatively
noise-free. On top of all that, they look great.
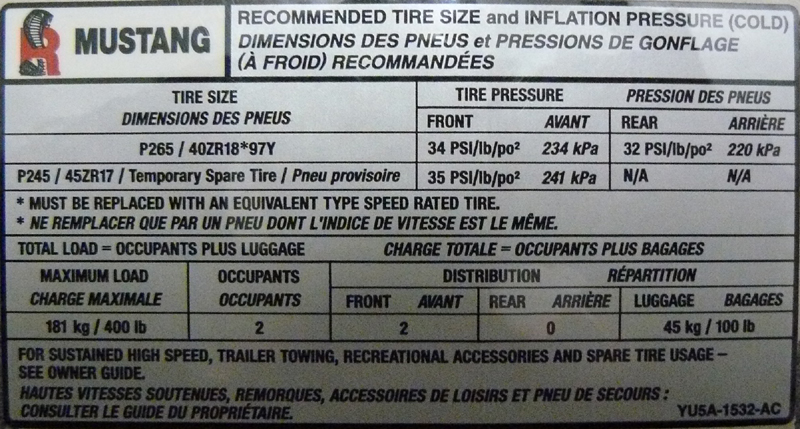
When it came time to choosing a size, I decided to go with a slightly taller tire: a 275/40-18, which has a diameter of 26.65" compared to the OE diameter of 25.65". This extra inch not only filled up the wheel well, but it gave me a slight boost in ground clearance that is perfect to avoid scraping. With that in mind, the DW's were turning a bit slower (roughly 757 revs/mile vs. 787), but the speedometer was easily corrected with my SCT tuner.
Note: When searching for tires, there are numerous factors to consider as part of the Uniform Tire Quality Grade (UTQG) standards, one of them being Treadwear. Unfortunately, you can't always assume that a lower Treadwear Rating means better grip, so it's prudent to do your research. As an FYI, the DW's have a rating of 340 and hold the road amazingly well in contrast to some other tires out there with much lower numbers.
Since I placed a premium on handling, the idea of slapping a set of drag radials or overly wide tires on the back to pursue straight-line "traction" was not an option. If that is your thing, then more power to you, but fat tires on the rear of an understeer-prone car only exacerbates the issue. No, thanks. For real-world driving and handling, the uniform sizes were just perfect.
While I can't recommend the DW's highly enough, I was disappointed to find out the size I chose had been discontinued shortly after my purchase. When new rubber is due, my best option would be a switch to the original Cobra R sized tire which come in a hair smaller, at 265/40-18 (26.35" tall). Since the DW's are still available in that size, I would seriously consider them if nothing else interested me. They really are that great of a tire!
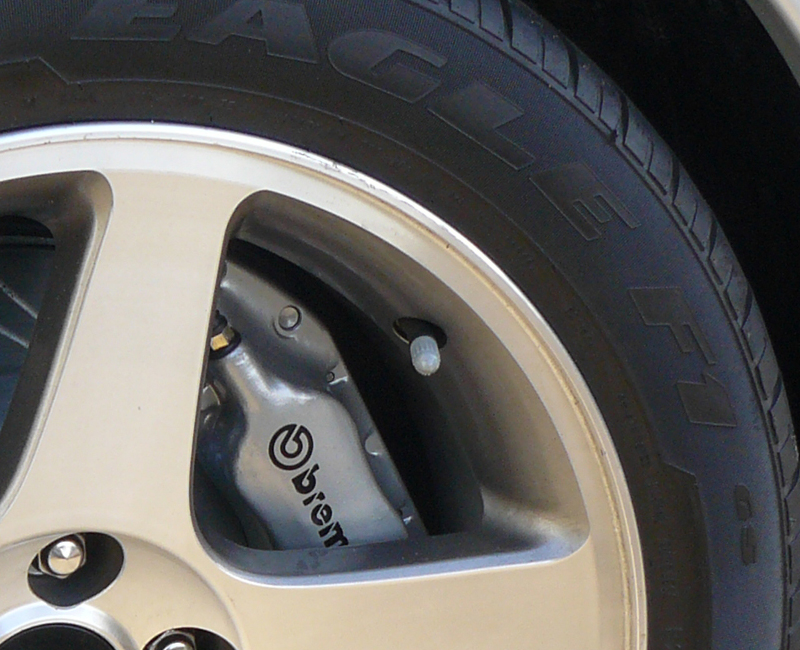
Note: If you are one of the really picky types about OEM appearances and factory parts, you may have noticed the original grey valve stem caps that came on the Terminator (also shown on the picture at the top of this page). Unfortunately, most owners of these cars went through their first set of tires in short order, and probably ended up without the unique, and rare, cap. Not to worry though, I have plenty of these, which are also made by Dill (and usually a bit difficult to come by). If you are meticulous and would like a set, shoot me an e-mail and I'll be glad to set you up. Nothing like DAP originality, right down to the smallest item!