Engine
Featured
 The Terminator's
4.6L Dual Overhead Cam
(DOHC) V-8 engine went through quite the process before it was finally signed off for
the masses.
Although it was the first production Mustang with a supercharger, it was not the
first Mustang to be developed by SVT with forced induction. Actually, before the Special
Vehicle Team, there was Special Vehicle Engineering, or SVE, and
it was their development mule in the late-90's known as the
Super Stallion that gave enthusiasts a
glimpse of the future for the Cobra (you can also see it in action on
YouTube!). Its 5.4L V-8 was a bit optimistic, but the
supercharger, IRS, and big brakes - among many other refinements - were definitely
a hint of what was in store. When it came to the newest Cobra, one thing
was for certain: customers wanted more power, and SVT delivered.
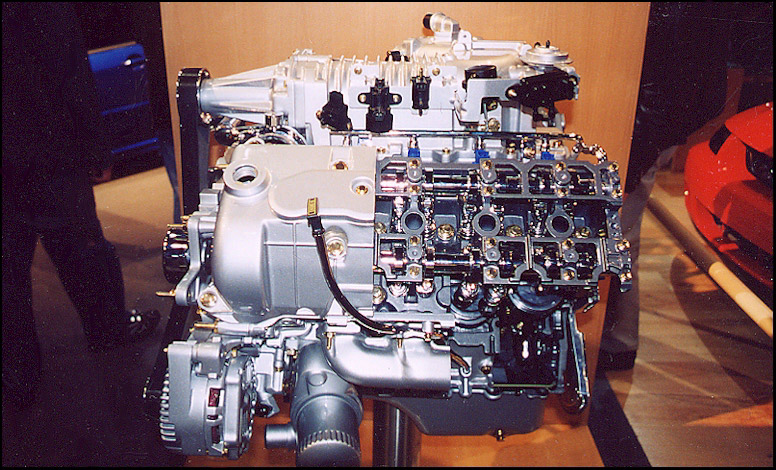
After unsuccessful attempts to improve the Cobra's performance in a naturally-aspirated fashion, the decision was made to supercharge the 4.6L engine - no surprise - and it was accomplished in record time. Adding to that, these engines had to meet the higher power levels and they, along with the vehicles, had to be built on current assembly lines - not always a small task for a niche vehicle. Early on, the first engines were assembled using the previous aluminum block and powdered metal rods, along with an Eaton supercharger that was a derivative of what was being used on the 1999-2004 F-150 Lightning. With deadlines looming, existing heads were also chosen rather than developing new ones. For more information on those heads (and blocks), be sure to visit my Castings page, or click on the image of the display engine at the top of the page.
As it is commonly known, the existing rods turned out to be the weak link, leading to the saving grace of the forged Manley "H-beam" version after many of the test engines were destroyed (remember the picture of John Coletti with the new "trophy"?). The forged steel - and essentially indestructible - "C38 micro-alloy" Kellogg crankshaft, which had been the norm since it went in to service with the '96 Cobra, was also thankfully retained (formerly FRPP M-6303-S46, and also available from Manley). This was all in conjunction with new 343 gram forged aluminum pistons, utilizing Sealed Power rings, with a supercharger-friendly 8.5:1 Compression Ratio - also an off-shoot from the Lightning program. The decision was then made to use the current - and heavy - iron block for "durability", especially since "time constraints" would not allow the development of a new aluminum block.
Interestingly enough, the Manley 4340 alloy steel forged rods look identical to those made by Carrillo, which were used in the 2000 Cobra R. With that program, the engine was actually developed separately by Ford's Engine Manufacturing Development Operations (EMDO), whereas with the Terminator, it was essentially "in-house" (as a friend who worked at SVT mentioned, "...politics"!). Nonetheless, the new rods gave Manley a bump in recognition, making their name synonymous with Terminator power. It also cannot be overlooked that the rods were equipped with ARP 8740 Chrome Moly bolts - yet another premium part right from the factory!
Note: The new pistons had their roots in a company called Zollner. Back then, however, they had been bought by Karl Schmidt Unisia and were manufactured in Ft. Wayne, Indiana. While many believe the original supplier was Mahle, that is the case only for the Ford remanufactured engines and some produced by Ford Racing. For more trivia, the late Fred Zollner, founder of Zollner Pistons, also founded the Ft. Wayne Zollner Pistons professional basketball team in 1941. The team was eventually expanded and moved to southeast Michigan in 1957, where they still remain today as the Detroit Pistons.
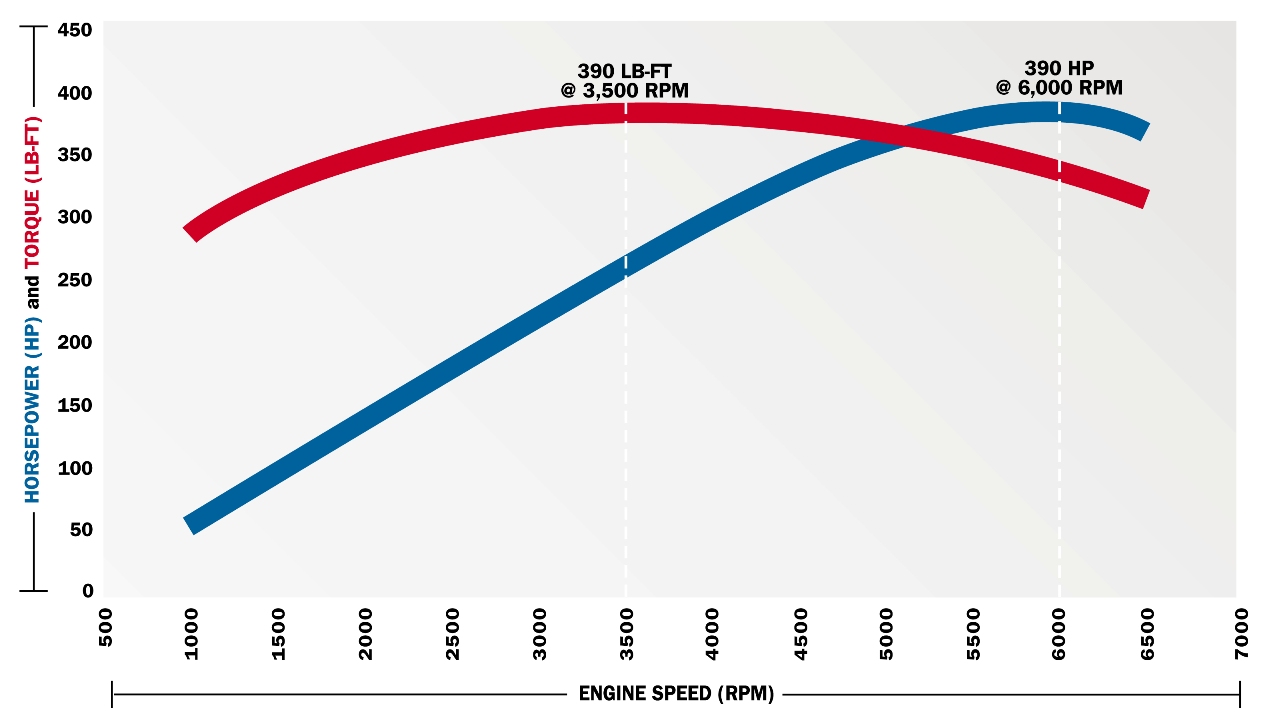
At the time, the 390 horsepower and 390 lb/ft of torque rating was definitely a step up to old-school muscle-car days, especially with the flat torque curve. With a specific output of almost 85 HP/Liter, the Terminator engine was almost twice as powerful as the 1993 Cobra (see both charts below) and had 70HP more than the 2001 model. Ironically, modern engines have surpassed these power levels without forced induction, but it still doesn't detract from the Terminator being an absolute hit - then, and still to this day. Not only was the performance phenomenal, it was an absolute bargain. As John Coletti mentioned when comparing it to the previous Cobra, "...the cost for a user to upgrade a 2001 Cobra to the level of the Terminator—rebuilding the engine with competition quality components, adding an Eaton supercharger, improving the independent rear suspension—would be substantially over $10,000...", which was more than double the increase in price from 2001. A bargain for sure.
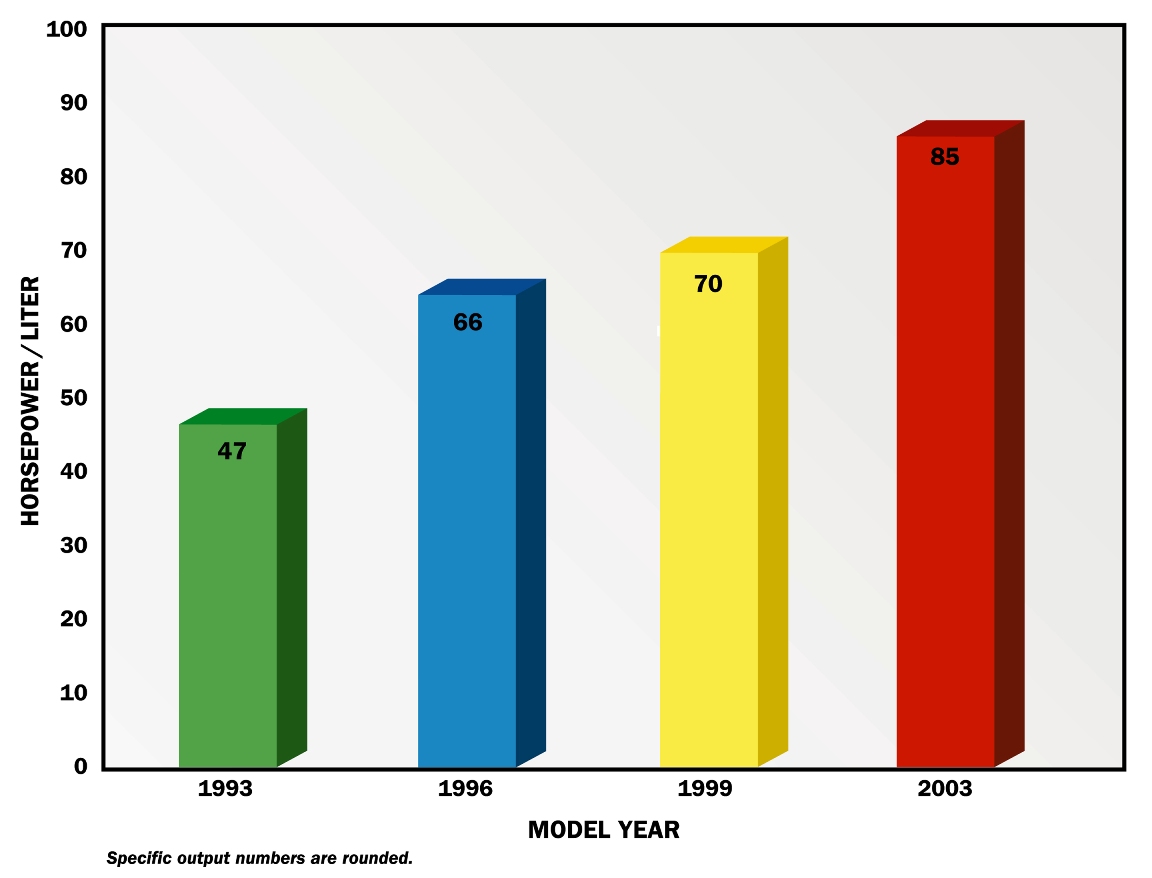
As fantastic as the Terminator engine turned out, especially since so many are still in service with some high miles, there is no doubt that some owners can't resist turning wrenches. As most of us have discovered, we've taken an already amazing car and customized to our own liking, usually with new-found power levels. Mine has been no different, but even with modifications that wouldn't necessarily be deemed exotic, the power has jumped considerably and made a car that is already a blast to drive, even more so.
For more depth (and more than I can ever cover here), be sure to pick up Iron Fist, Lead Foot, especially to see some great pictures of the Romeo Niche Line where the engines were hand built north of Detroit. For another neat look at the assembly of the engine, also check out Romeo Must Supply. Also, don't hesitate to grab the old press releases and tech data from my SVT Documents page, along with the Press Kit to see more of the details from back then.
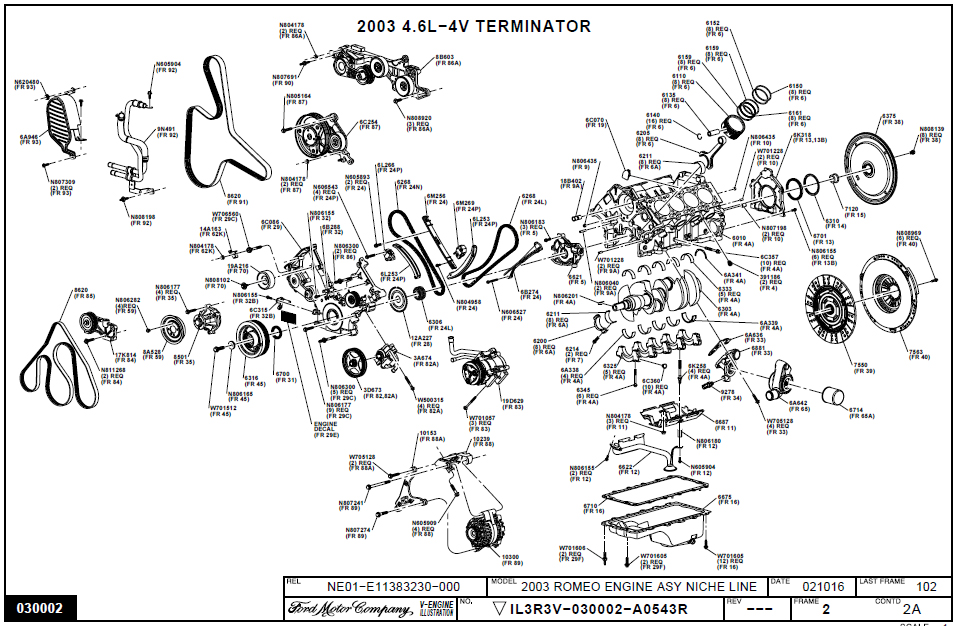
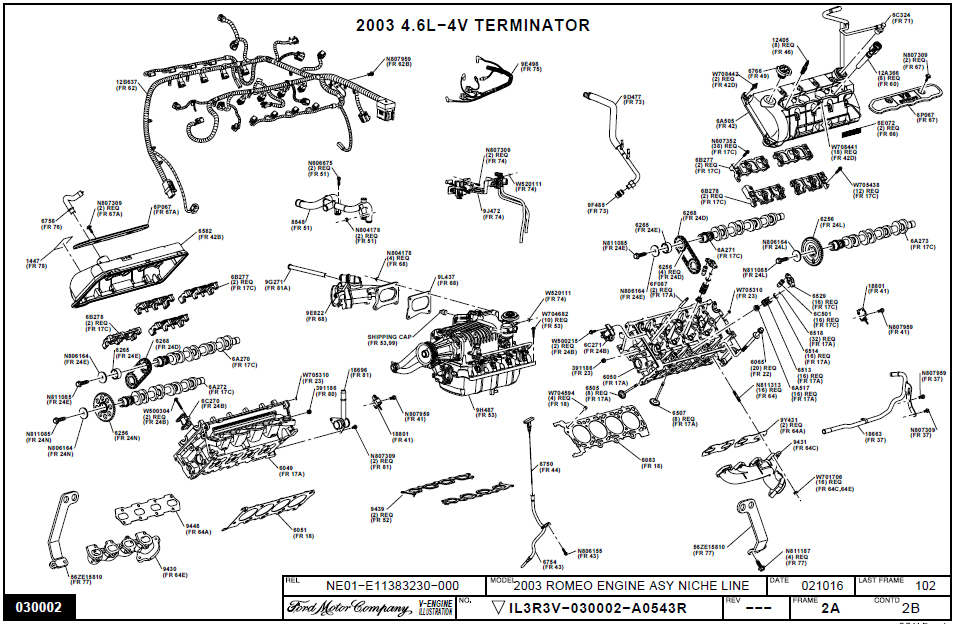
Incidentally, you could actually buy the complete engine at one point new from Ford Racing as M-6007-SC46, or even remanufactured from Ford as 2R3Z-6006-AARM, but both have been discontinued. If you need a complete engine, you are left sourcing one used or tackling the re-build yourself. If you are up to working on it, be sure to have a Ford service manual (see my SVT Documents page as well). Otherwise, the excerpts listed below will make for some light reading to get you started, along with a couple cool drawings of the engine - just for the heck of it.
Cobra Engine General Cobra Engine Assembly Cobra Engine Disassembly
Cobra Auxiliary Crank Pulley Cobra Heads Assembly & Disassembly
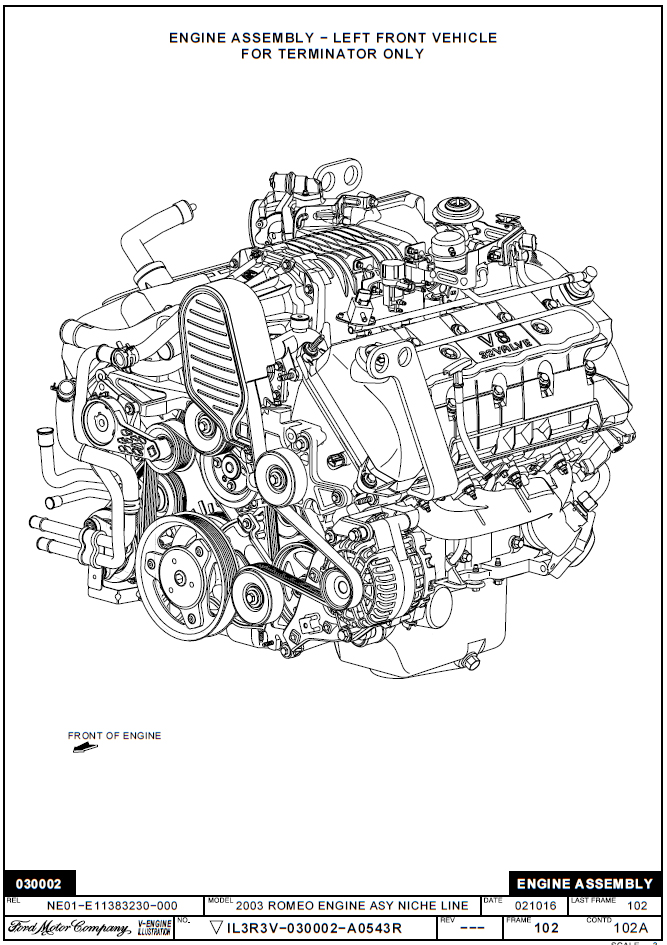
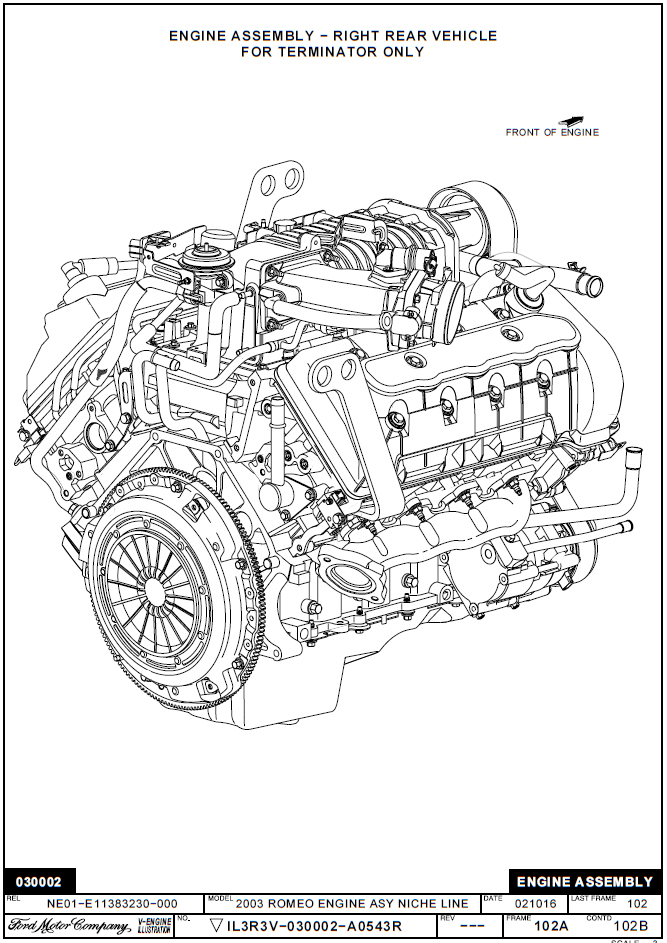
Note: If you're serious about building a DOHC engine, or just working on one, there are also a bunch of "Special Service" tools listed in the service manual that make the process much easier. For my Aluminator build, I picked up a cam tools kit (#6498) from OTC Tools, along with their flywheel holding tool. Also, there are the engine lift brackets under the Rotunda part numbers 303-D087 and 303-D088 (which differ from the DAP lift brackets) - a nice score, but not a must-have. Another recommended item is a universal valve spring compressor from Freedom Racing that is a necessity to re-install the cam followers after dialing in the cams (more stuff to buy there!). If you are going to put any time and money in to your engine, there is no sense in cutting any corners when it comes to equipment!
 The
Eaton supercharger was first used on
the Thunderbird Super-Coupe
in the late 80's and has traveled quite the distance since then. Even though the
previously mentioned Super Stallion was headed in the right direction with a
Garrett supercharger, it was Eaton for the Terminator. The new version,
adapted from the Lightning, is the "M112", for 112 cubic inches: the
volume of air that fills the cylinders with each rotation (approximately 1.9 Liters
in this case). These positive displacement, or
"Roots" superchargers take the intake air and move it within the case, actually along the outside of the two
counter-rotating three-lobe rotors, and force it in to the engine - literally a
"blower". Boost is built because more air is being pumped in than out. Simple,
effective, and economical. If you are a fan, check out
U.S. Patent 5,083,907 for some neat
trivia.
Since I initially wanted to retain an OEM look, and was not on a quest for huge power, a perfect option was porting of the stock case as a first upgrade. Actually, a buddy of mine had been dabbling with the "home port" method with success, so he did his thing for me with great results. Granted it is not machine precise, but it sure made a big difference, and I would imagine it is somewhat close to matching the flow of a "professional" porting job. If you are curious how this would stack up to one of those, a comparison shows how similar they really are. Additionally, the "drops" at the back came out great, and the inlet was also smooth as glass. Not bad at all.
Along with port work, the factory 3.65" (93mm) drive pulley was replaced by a 2.93" (74mm) pulley which was stock on the Lightning. Here, the original 8PSI rating has been bumped to a max of about 14PSI in conjunction with the stock 7.65" lower pulley, which really woke up the engine. While there are plenty of pulley combinations, I liked the idea of staying with an "OEM" part that would still provide an increase in performance without running off the efficiency map. Overall, it made the car quite the beast compared to the day it left Dearborn.
Note: When it comes to removing and installing the snout pulley, it helps to have the right tool (no, that is not a three-jaw puller from AutoZone). Probably the best one out there comes from BilletFlow, although there are others that are similar and probably work just fine. If you happen to have the snout off, a press can also be used, which is how the Ford GT Power Upgrade Kit instructions would have you go about it. It's a bit different, but it does the trick! There are also plenty of kits that have hubs that use bolt-on pulleys, so those are also a decent choice if one wants to experiment with different boost levels.
 As for the efficiency, or "performance" map of the M112,
one is shown in the thumbnail. This graphic tops out at a "Pressure Ratio" of 2.0, which
equates to approximately 15 PSI of boost (14.7+15 / 14.7 = 2.02). The rings
represent Thermal Efficiency, the smallest being 62%, and expanding outward,
indicating an increase in temperature with both boost and RPM (green dashed
lines) based on intake air flow. The red lines I added indicate the Pressure
Ratio with the factory 8 PSI pulley along with the new one, which in my opinion
is perfect. From the chart linked in the above paragraph, at an engine RPM of 6,500, the
maximum blower speed is almost 17,000 RPM - off the map and hot! There is just
no escaping the fact that it puts out decent amount of heat when run hard. They
don't call it the
Heaton for nothing.

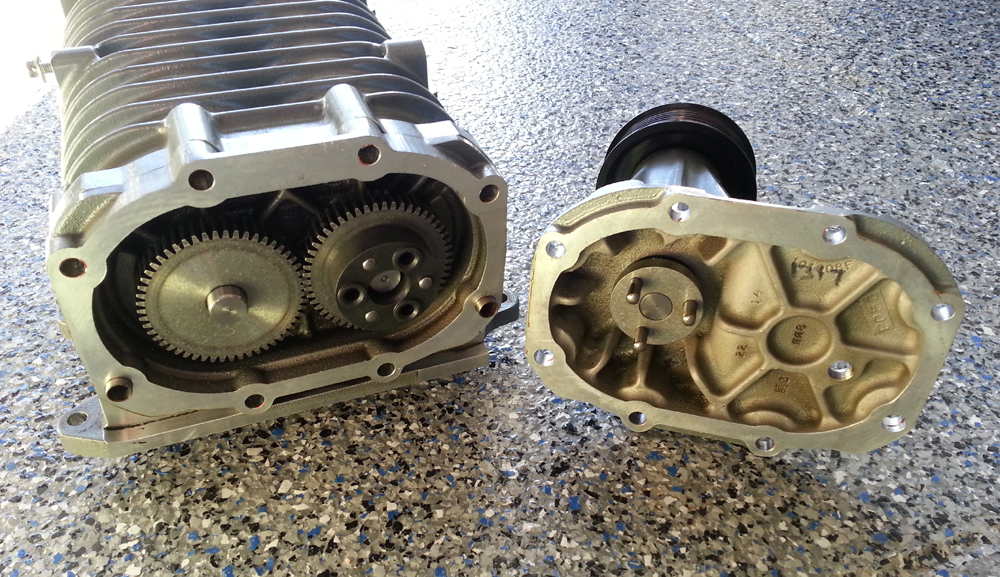
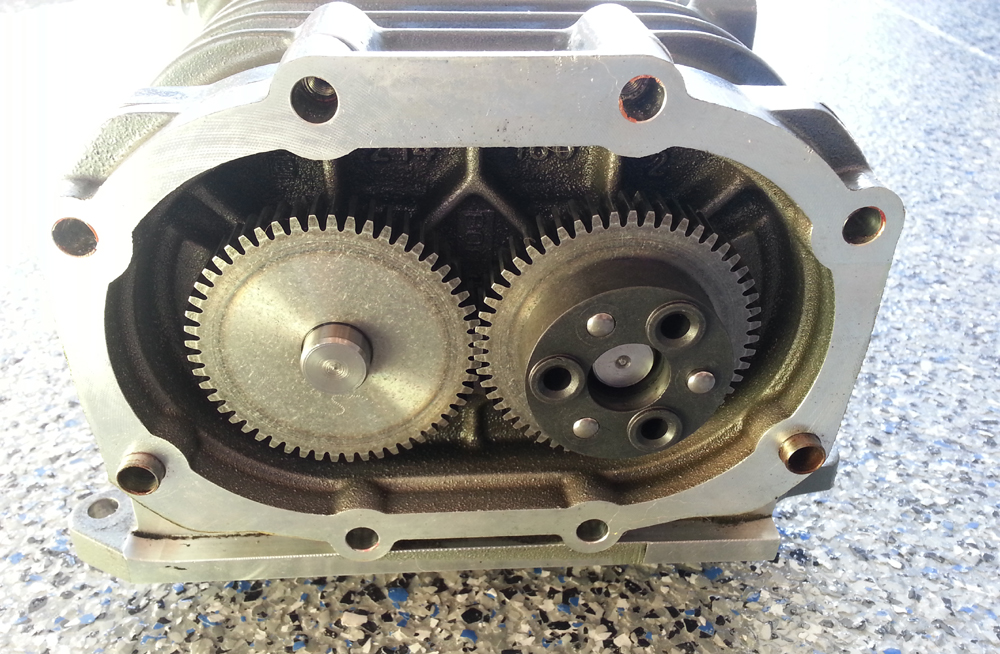
Since I made it a point to praise the home-porting job, it's also worth bringing up some details that involve taking the case apart, although it really isn't too complicated of a process. The snout comes off first (eight bolts), then the gear and rotor pack assembly pulls out separately and leaves you with the empty case. In order to put the housing back together, you just use an anaerobic sealant such as Loctite 518 or Motorcraft TA-16 to form a gasket between the snout and rotor pack (do not use silicone - any excess squished inside can gum up the gears!) and torque the bolts in an alternating fashion. There are also two bearings in the back of the case that support the rotors, so be sure to keep them clean and add new grease before re-installation (Mobil1 for me, as usual).
I've disassembled a few of these, and have found that the internal components are quite stout - including the coupler (the plastic-like disc that mates the snout shaft to the rotors). Not to worry, though, replacement parts are easily acquired from places like ZZ Performance, or Superchargers Online if necessary. If a complete overhaul is in your future and you aren't the DIY type, I've heard good things about Jon Bond Performance, and I believe Magnuson also provides this service. By the way, if you are fiddling with the snout in any way and lose the fill plug, they can also be purchased from any of the above vendors or through Ford as XL3Z-6A828-AA. Also, take a look at the gears in the Eaton housing and notice they are straight cut: there's your source for the unique under-hood "whine" the Terminator is known for. This is in contrast to those in the TVS or Twin-Screw, which are helical, with more on those blowers further down in this section.
Note: The original oil in the snout is produced by Nye Lubricants, of Fairhaven, MA. It is listed as their "605" oil, which is the EXACT same fluid that can be purchased through GM as their part number 12345982 (AC Delco 10-4041), or through Ford as the Motorcraft XL-4 - which is about twice the price. This ester oil, which is similar to jet engine oil, has the approximate viscosity of a 20-Wt motor oil, although its properties are not the same. Some guys still insist that regular 30-Wt motor oil is the way to go, but ask an Eaton engineer, and they'll tell you different. Also, it is considered lubed for life, but chances are, most will change it out at least once, if not on some sort of a regular interval. Why be cheap - the required TWO bottles (approximately 8 Oz.) of the fluid from GM is only about $20!
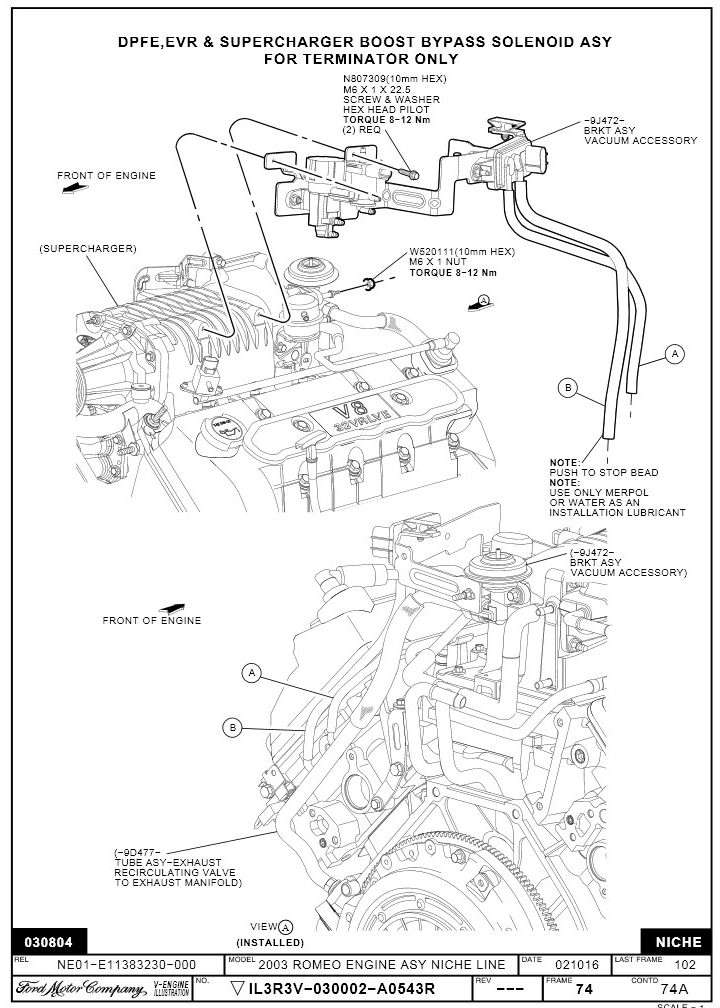
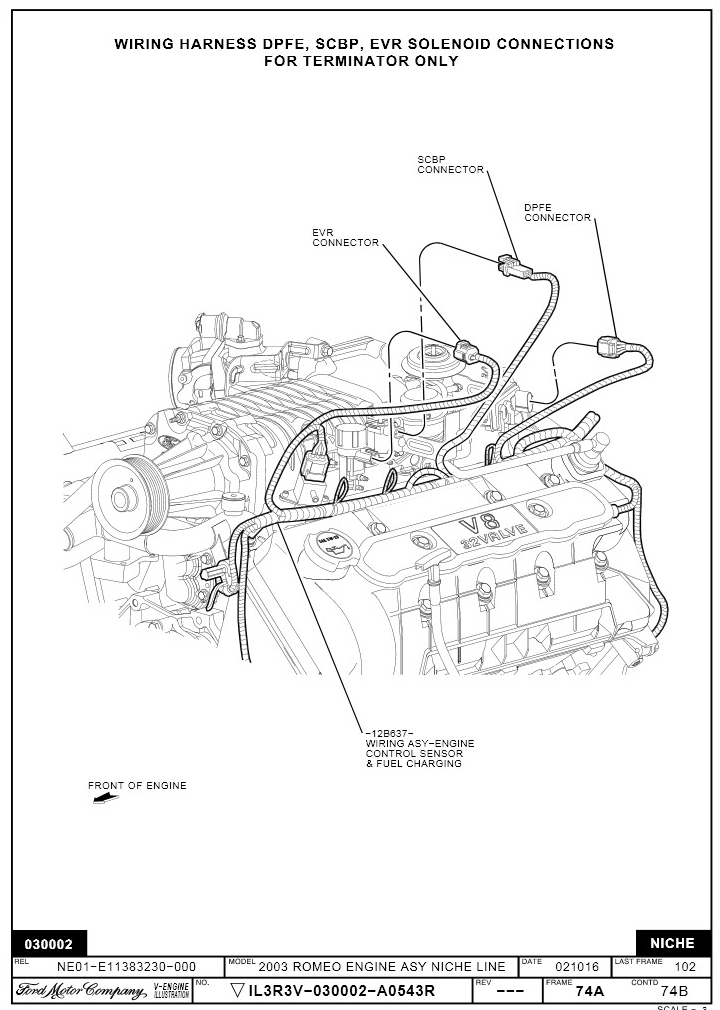
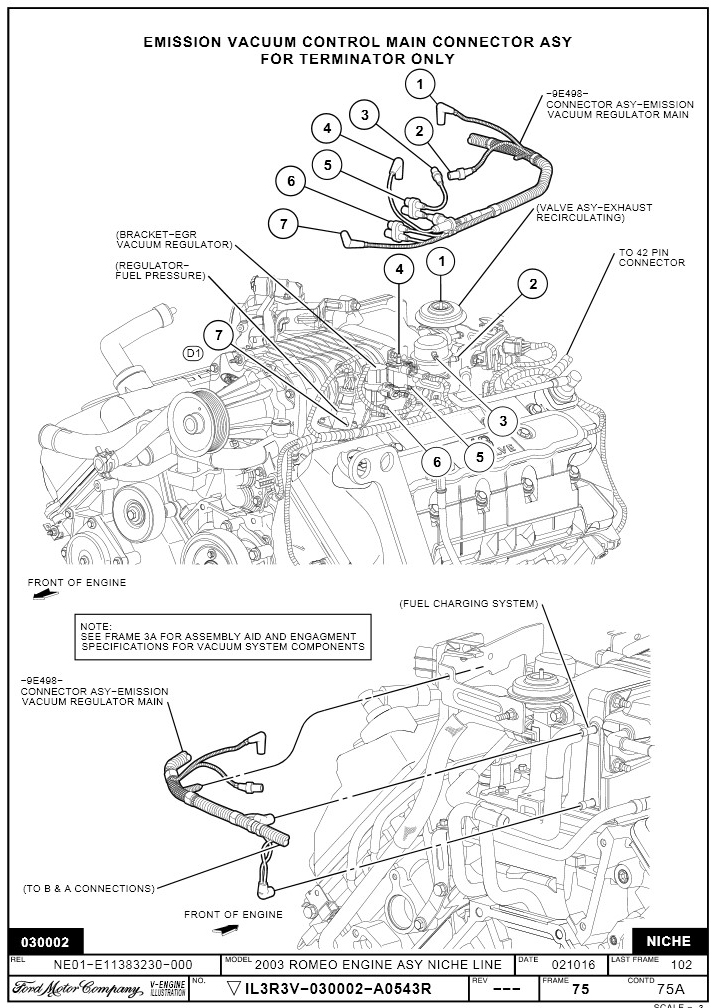
Once you decide to remove the supercharger, whether for maintenance or an upgrade, it also helps to have the factory service procedure - plenty of detail and all the torque specifications (just be aware of when needing in-lb's, since there are occasional errors!). The whole assembly is not difficult to pull out, especially if it is done complete with the lower intake attached as when originally installed, but like everything with this engine, plan ahead and be prepared. For a bit extra, the diagrams above also give a detailed look at all the associated vacuum and electrical connectors - they'll definitely come in handy when you start taking it all apart.
It's also worth adding that the previously mentioned anaerobic sealant is a great option to use on the supercharger case flange when reassembling it to the intercooler. Only a small amount of RTV was placed on the corner of the housing from the factory (most likely due to the TMAP, or "IAT2" sensor location), so you don't need to go crazy with it around the entire rim. Thanks to someone on a forum who probably started this trend! In the event the intercooler ever has to be removed, the job becomes a real nightmare if there is a lot of dried silicone to scrape off. If you want a bead of sealant all the way around for your own peace of mind, the anaerobic stuff works perfect and wipes off easily.
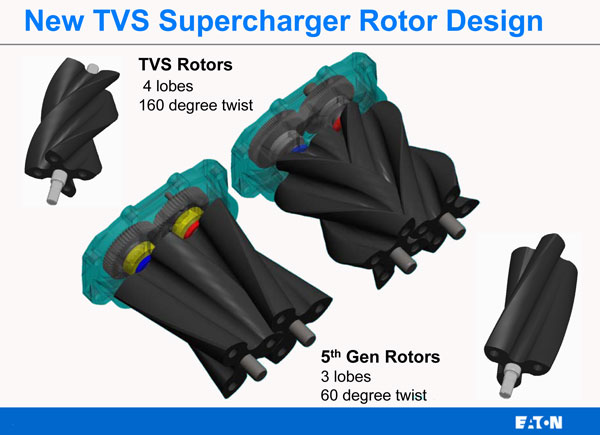
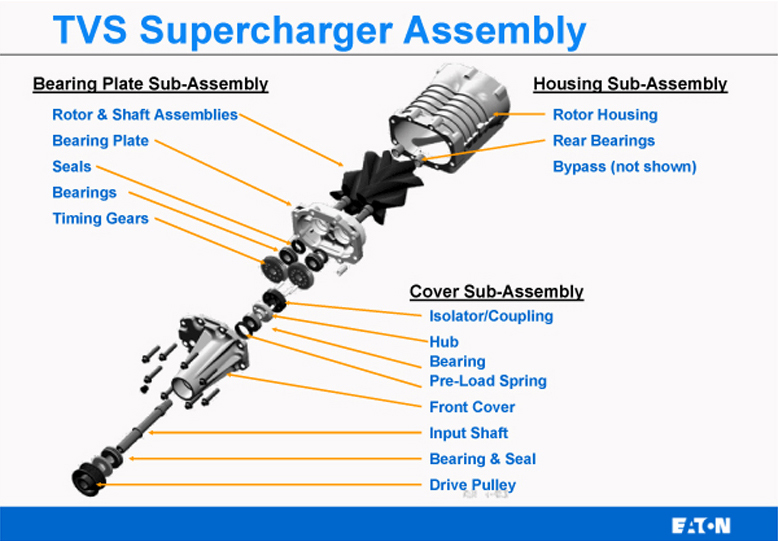
Moving on, a step up from the original blower is the newer "Roots-type" Twin Vortices Series (TVS) supercharger - also made by Eaton - for the GT-500 and some GM vehicles, along with the Roush-developed 2.3L kits from VMP Performance. The TVS utilizes a new rotor twist - 160° versus 60° - which is not only more efficient in that it provides more boost, it takes less energy to run and actually does so with a lower temperature than the roots (more air flow with less rotation). The images above show the difference in the rotor packs, but also give a nice look at the internal components as a general reference. Along with those, I dug around on the internet and found a neat TVS presentation from Eaton that gets in to the history of the Roots, along with more on the TVS (oddly enough, it leaves out any mention of the Terminator). As of 2018, look for the next evolution of the TVS as the R2650 with its 170° rotor twist, which promises to pack even more punch!
 Another upgrade in the efficiency department is the "Twin-Screw"
supercharger from companies
Whipple, along with
Kenne Bell
(their rotor packs coming from
Opcon Autorotor).
These compress the incoming air between the rotors and utilize a different style
rotor pack with a distinct male/female design which is more efficient, and
provides more boost at lower
temperatures. For a great explanation of the different
concepts, Kenne Bell has written
Twin Screw vs. Roots, and for basics on
supercharging, they've added another on
Supercharger Efficiency (with plenty on the internet as well). It's also worth pointing out
that credit for the Twin-Screw actually goes to the late
Swede
Alf Lysholm, who
originally developed this compressor in the 1930's. There is also plenty on
the web about Lysholm, as well as the Whipple site for those really wanting to dive in. Depending on where your
loyalties may lie, there is another article from Kenne Bell with an
Autorotor vs. Lysholm angle -
interesting reading for sure.
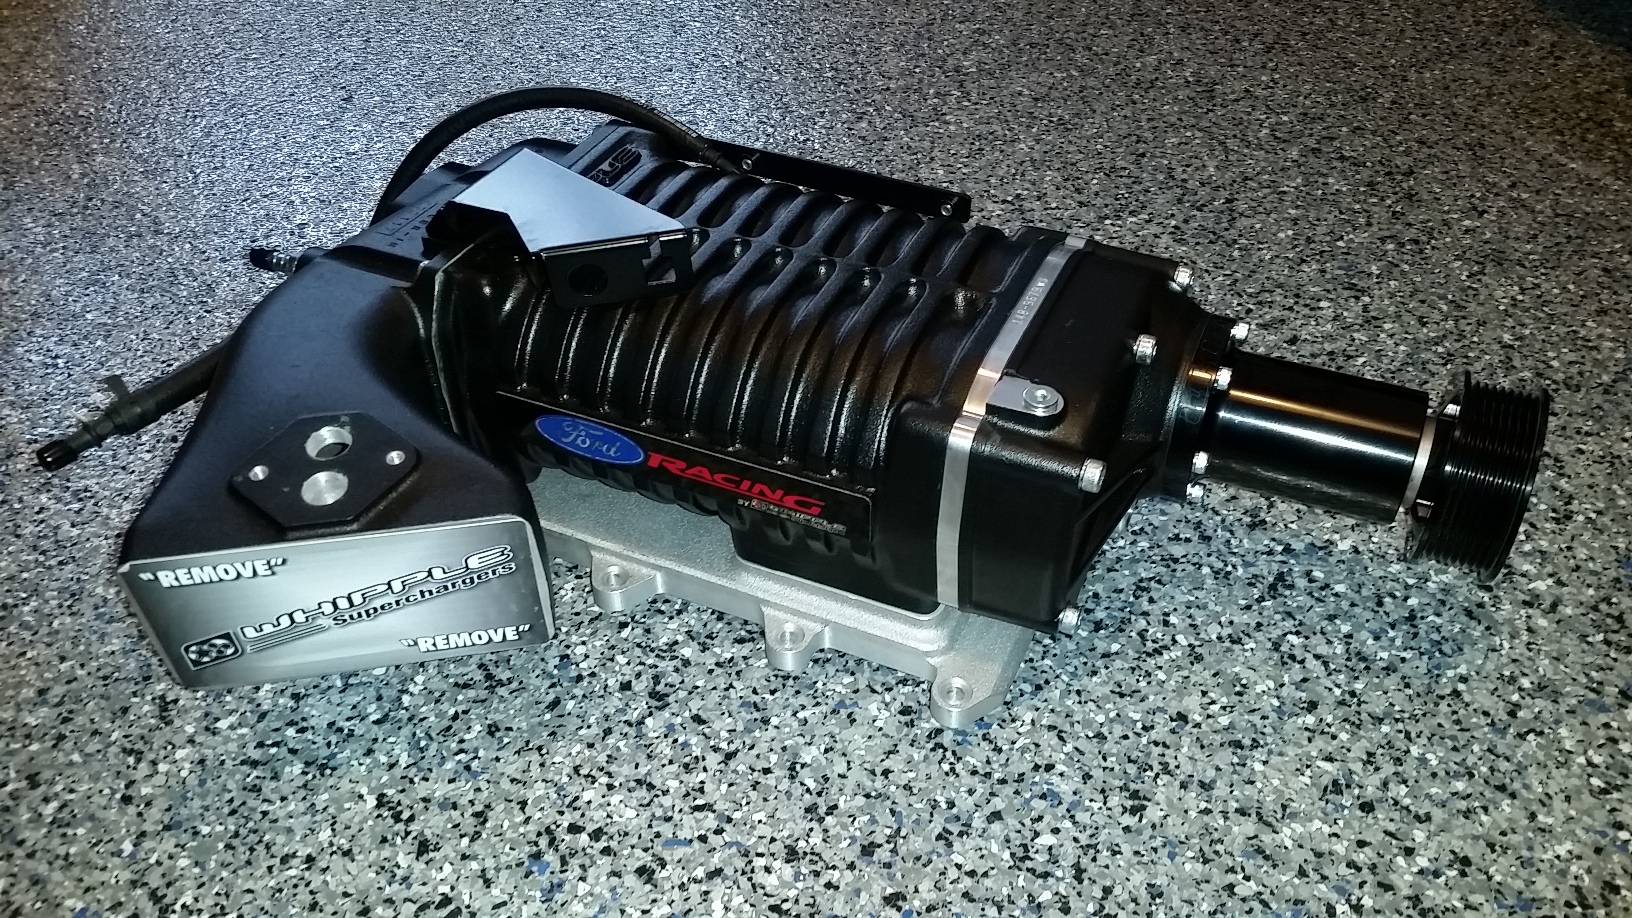
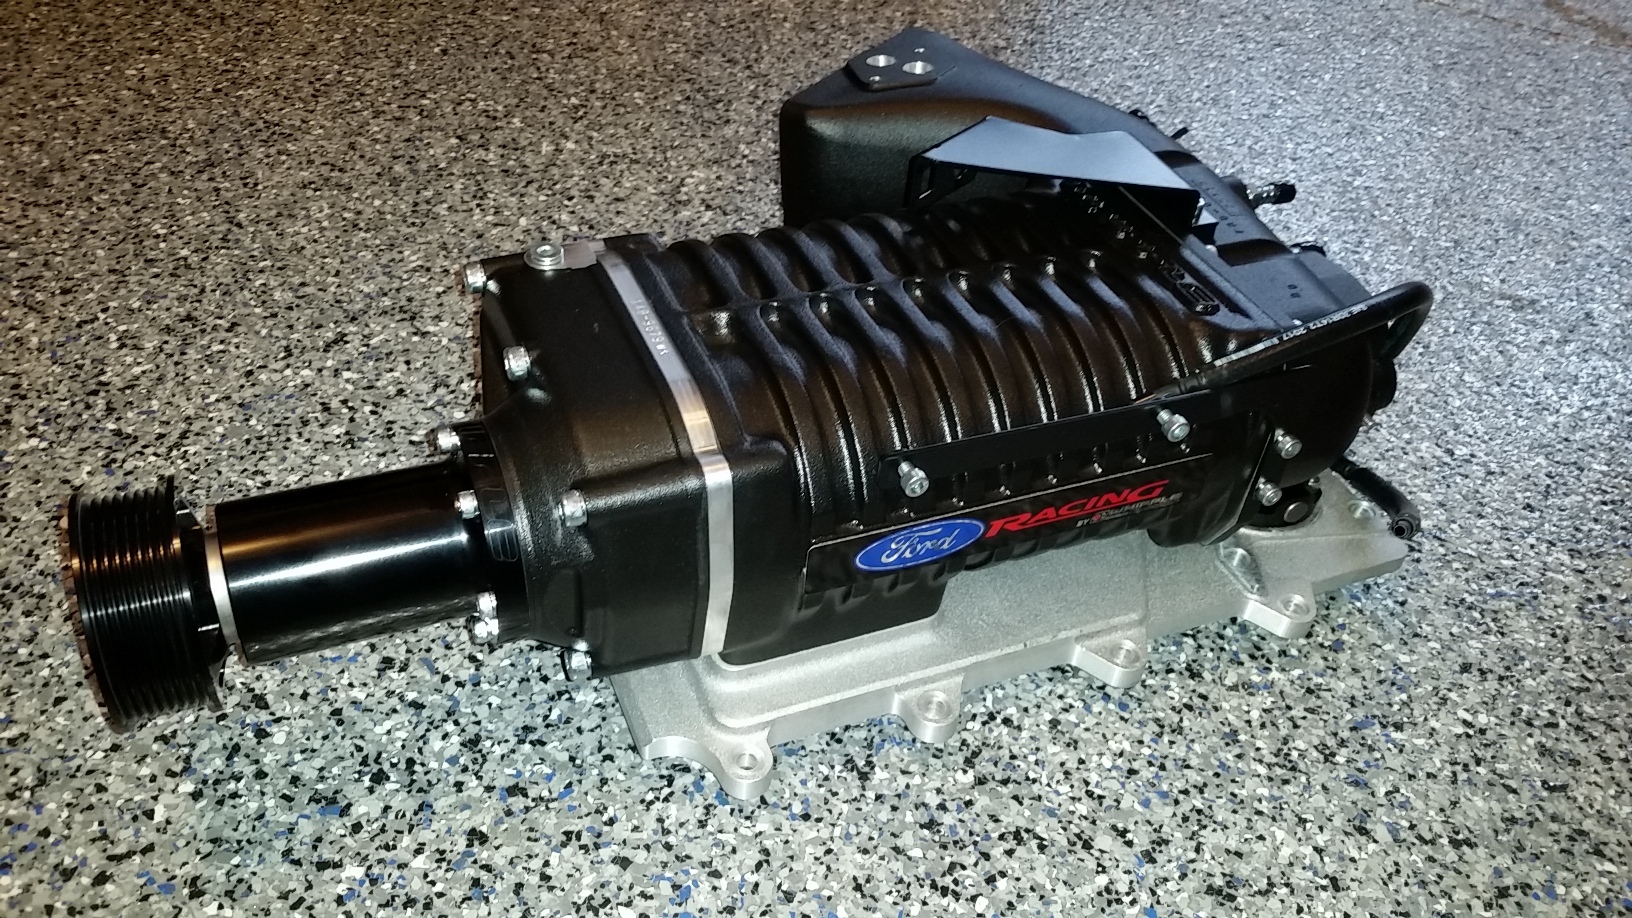
So despite all the enjoyment I received from the ported Eaton, it became time to upgrade once again - no surprise. With the new engine running strong, another project from 2018 was the addition of a 2.3L Whipple, with their trusty W140AX compressor. I've always had an interest in these, especially when they were available through Ford Racing, so this was a great way to go in my opinion even though I took my sweet time (mine being the equivalent of the former M-6066-CT46HP, but with a 3.25" drive pulley). Also, the 2.3 was used on the 690HP Cobra that was developed with SVT and overseen back then by a friend of mine, so he also helped with my decision which made it real easy!
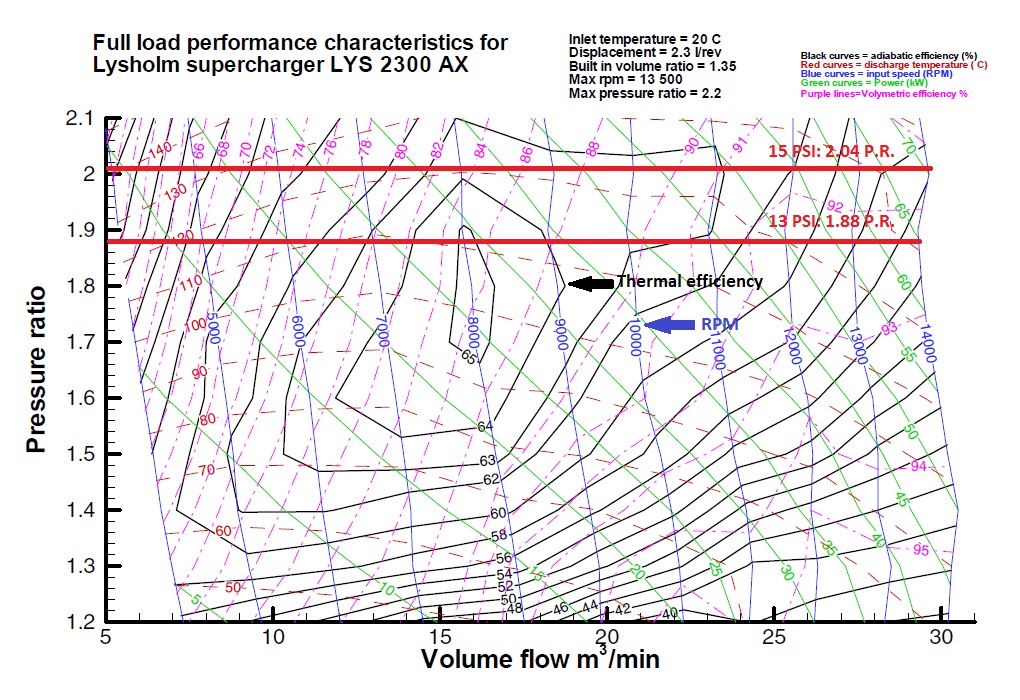
With another new throttle body in my hands (see next section), I was fortunate this worked out as a great package deal through Mark at Lightning Force Performance (LFP), so I couldn't say no. More pictures and details will definitely be added, but for now, the 2.3 compressor map is starting this off along with the pictures above and more down the page. Like the one for the Eaton further up in this section, I added Pressure Ratio reference at its stock boost (a 3.5" pulley) along with where I will be running it (about 15PSI). Additionally, if you crave even more Whipple information, the Ford Racing Installation Manual is nice to have if you own one of these or are thinking about it. If it's associated with Ford Racing, it has to be cool!
Note: One of the unique features of the Ford Racing Whipple was the substitution of special emblems on the side of the case. Even though the partnership between Ford Racing and Whipple no longer exists, the emblems are still available and were recently updated with their neat new look. If you happen to own one of these superchargers and need replacements, or just want to add them for the heck of it, definitely give Whipple a shout (of course I had to buy a set to pay homage to my Ford pals). While you are there, be sure to pick up a shirt and some other stuff as well.
 With
a supercharger moving more air, it's intuitive to consider an upgraded throttle body, especially since an
engine is just a big air pump. The factory twin-57mm piece isn't actually all
that bad, but opening up the intake tract even more with a single-blade throttle
body (SBTB) definitely improves the throttle response and adds some more power.
Since the SBTB flows over 1600 CFM of air compared to about 1100 for the stock
TB, that only makes sense (well, if your blower can support that flow rate).
As I started with the ported supercharger, I had snagged a lightly used version that came from LFP, and since it fell in to my hands for a reasonable price, it was hard to resist. From a side-by-side comparison with the Ford TB, the difference in the two can be clearly seen. With the Whipple upgrade on the way, I even picked up another for a great deal, this time in black to match the new supercharger housing. The first worked well, and I had no doubt I'd be happy with another since they are such a nice part.
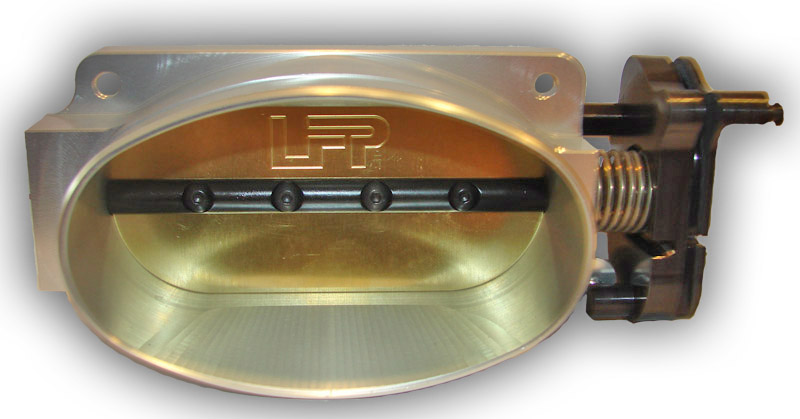
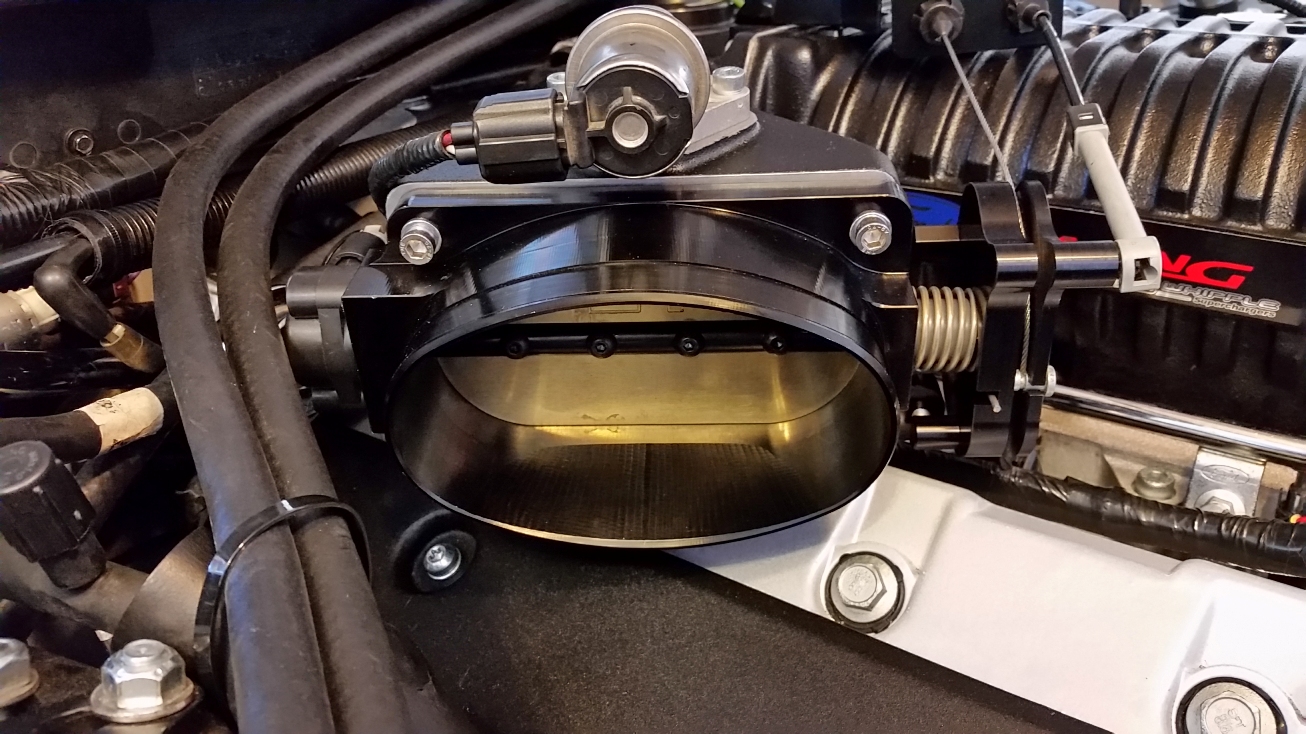
There are also other versions of the SBTB's out there from places like BilletFlow and AccuFab, but this model had suited me fine for several years so far and gave me a factory-like idle. My original one was actually added after Eric Brooks wrote my first custom tune (see next section), yet required NO additional tweaking of the tune to function properly. The one quirk was the weaker return spring, but that has been fairly common in any of these (especially if they are used). If the spring does not produce enough force to keep the blade shut, your idle will suffer since it will tend to shift randomly - definitely annoying. Adding to that, the accelerator pedal will feel odd since the resistance will be way too light, almost as if it is attached to nothing at all.
Fortunately, the solution was simple: a single "helper" spring attached between the throttle cable bracket and the actuator arm. This idea actually came from BBK Performance, since it is (or was) part of their 65mm dual-blade version. They also provide instructions, which requires a slight modification to the throttle cable bracket but is nothing complicated. I picked up a two-pack of springs at my local Lowe's, and once I attached one, the pedal feel was just like the original with a perfect. With the new one, no extra spring has been needed.
Overall, the throttle response is much crisper and the extra breathing is a bonus when having a little fun on the road. It's easy horsepower for a cost that is reasonable, so even better. With the Whipple expected to give me many more years of driving pleasure, I am sure I'll be happy to have it breathing easy and deeper!
Note: When I picked up the first TB, I also scored a plenum from Accufab that is required with the Eaton housing. I could have used it in its as-is polished state, but preferred an OEM look to coincide with the factory paint. Luckily enough, a local automotive paint shop had a way to match the housing color with a custom formula that is essentially exact. With this, it's easy enough to have more paint made at any time if you still have the original supercharger under the hood. Once you look at the specs, you might get a laugh out of the name, but it did look great and appears completely original!
When I decided to go with a ported supercharger and smaller drive pulley, it was obviously going to require a new tune. While there are plenty of generic tunes that can by purchased along with various hand-held devices from a number of vendors, I went with one that was custom by Eric Brooks, former owner of the ModularFords web site, now with HP Tuners. Although Eric runs his business in a separate state, all the tuning he did for me the first time was accomplished remotely, and he really nailed it. My AFR at WOT, for example, was a perfect 11.5, and the engine ran beautifully. It did take effort on my part in the form of some data-logging using the SCT LiveLink software, but I was real happy with the results.
Fast forward to late 2016, and with the new Aluminator originally topped with the tweaked Eaton, another custom tune was in order (my original engine is still perfect, by the way - it didn't get blown up). This is especially necessary with the switch to the FRPP 60pph injectors (M-9593-LU60), along with the other upgrades. As much as I appreciated the OEM drivability so far, I did have to load a temporary tune to compensate for the additional fuel so the idle quality wouldn't suffer. This was not a big ordeal, and gave me the opportunity to do some easy driving over the first summer. After about 400 miles of "break in", it was now time to get on this.
From here, I have to thank Jeff Chambers of the former CRT Performance in Norwalk, Ohio for not only getting my Cobra up on his dyno, but his expertise in writing an amazing tune (Jeff, unfortunately, retired from tuning in 2019). I did drag my feet slightly, but the weather cooperated perfectly, and on November 1st of 2016, I was able to make the trek to his shop so he could work his magic. The new tune was perfect, and the drivability is still just as good as the first time around. Even better, with the extra power under the hood, coupled with the weight reduction up front, the car is even more of a blast to drive.
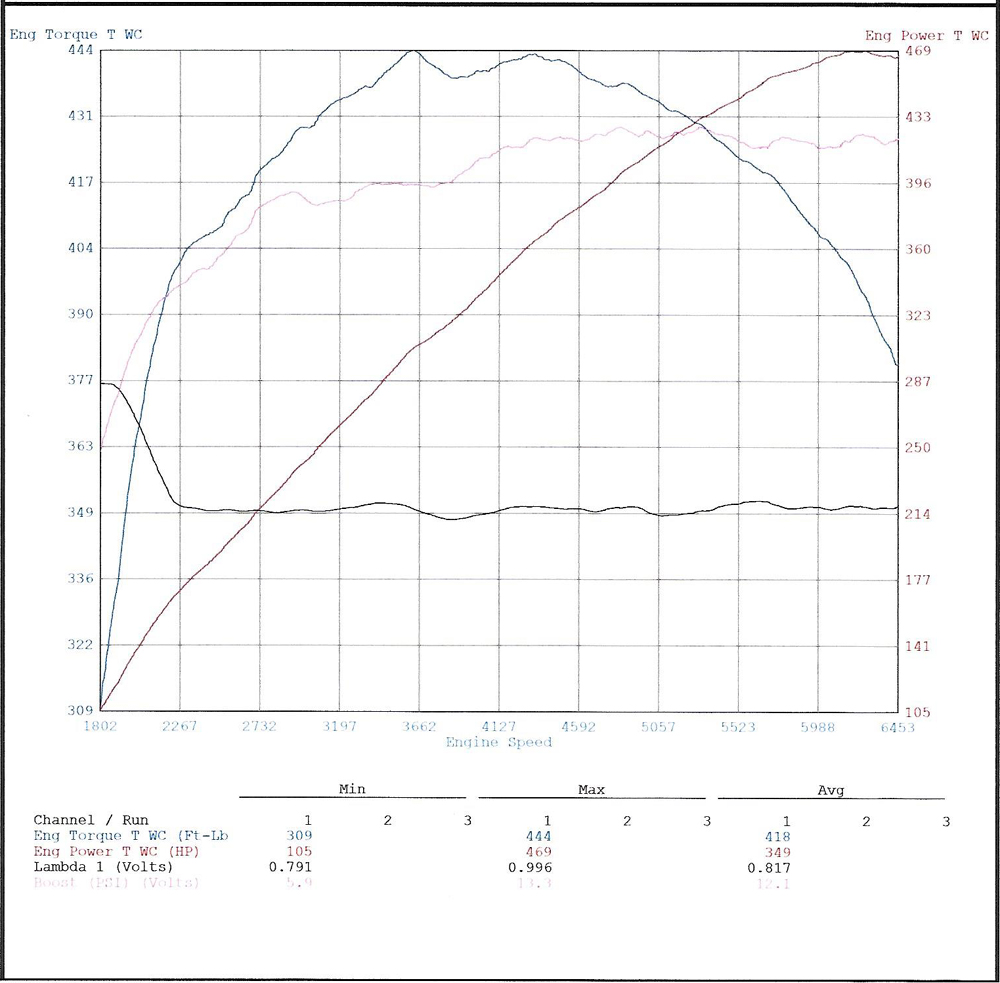
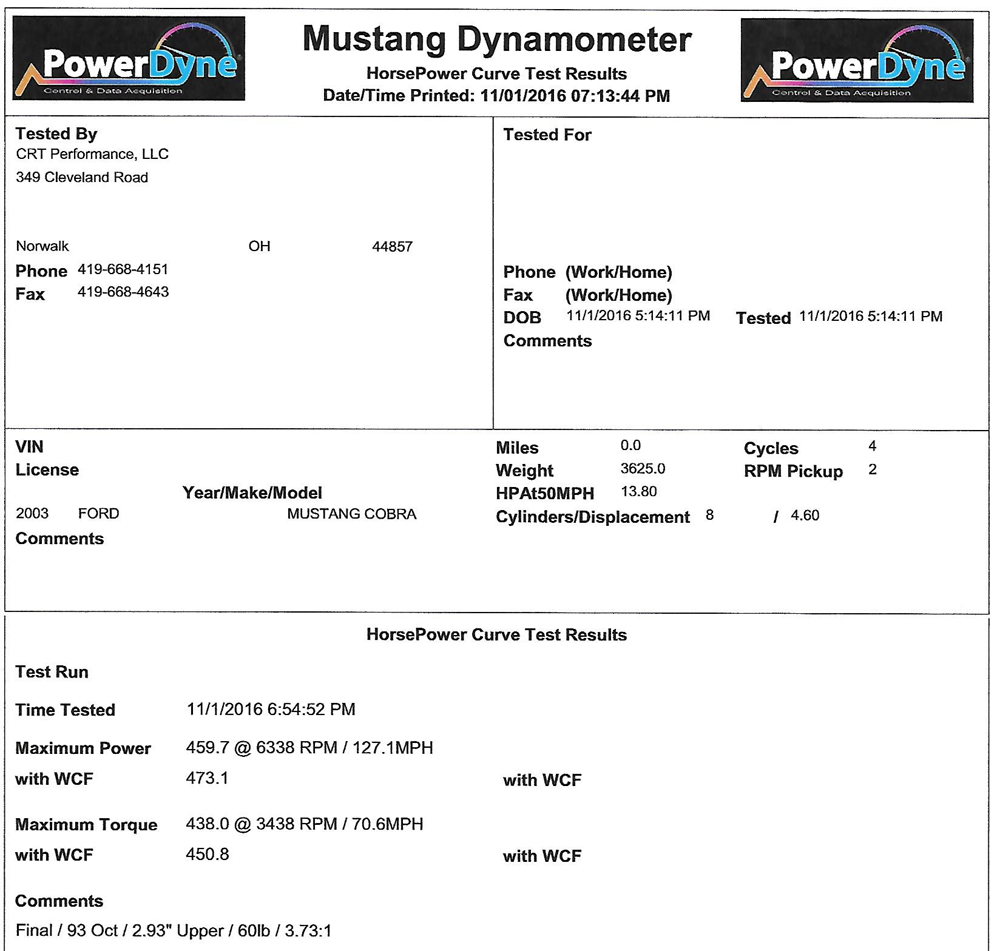
The graphs above show the final output - again with just the ported Eaton - which were achieved just shy of 6,500RPM (I decided not to pursue a higher RPM and additional timing). The output on the Mustang Dyno was a respectable 473 RWHP and 450 LB/FT of torque. This was also with about 14 pounds of boost, and a WOT AFR of 11.3:1. Taking in to account the slight difference between this type of dynomometer and a DynoJet (multiplied by 1.12) that puts me at a realistic 530RWHP, also thanks to the ported heads and '98 cams along with a slight bump in compression. By applying a correction for typical drivetrain loss (15%), this gave me a power level that was just over 600 at the crankshaft - a nice step up from the factory specs.
It's an amazing machine that is just a blast to get out on those real world roads, especially under Whipple power now. Unfortunately, I dragged my feet getting back to the dyno to document the power jump, but it is definitely significant. I was, however, lucky that my new tune mated perfectly to the twin-screw, which was a testament to how well it was written in the first place. Maybe I'll get around to spinning some rollers down the road just to update the above graphs, but at least for now, I'm having plenty of fun each time I get behind the wheel. Thanks again to Jeff, and I hope he's enjoying free time!
Note: Along with a custom tune, one add-on that was required when using the stock 90mm Mass Air Flow (MAF) meter is the DiabloSport MAFia calibrator, which I believe is now out of production (I had previously acquired their F7373). Since the MAF reads voltage based on air flow, this device allows the tuner to adjust the voltage signal within a range that will be correctly interpreted by the computer, alleviating the need to upgrade the MAF. Even better, the MAFia gets tucked under the stock MAF and is completely hidden - which some of us prefer. As an alternative there are aftermarket meters out there that work real well, such as the SCT BA2600, with both being one more piece that will make the tuning flow smoothly.
With an increase in boost (and air flow), one cannot overlook necessary upgrades for the fuel system! The OEM Bosch turbine pumps are referred to as "Pulse Width Modulated", or PWM, and actually perform quite well. Their flow (i.e., speed) is simply a function of supplied volts, coming in pulses - hence the term. In this "Returnless" fuel system, the Electronic Control Module (ECM) monitors fuel rail pressure via the Fuel Rail Pressure Sensor (FRPS), then tells the Fuel Pump Driver Module (FPDM) what voltage is needed to adjust the flow of the pump(s) in order to feed the injectors. Pretty straight forward.
The Terminator pump assembly actually consists of two pumps, which is fairly common knowledge. They flow around 119LPH (Liters Per Hour) each - 238LPH total - and are matched to 39PPH (Pounds Per Hour) injectors in stock form. The pump assembly once carried the FRPP part number M-9407-C46, but it is only available through Ford now: 2R3Z-9H307-AB (Motorcraft PFS-200). It is ridiculously expensive at around $1,600, but it can also be replaced by the Airtex E2432S or Carter P76130S for much less. An even easier way to go if you need new pumps is to simply buy them individually (although they technically were never offered this way): they carry the Bosch part number 0580453613 and can be found online for less than $50 each, which is quite the bargain. Also, if you are removing the pump assembly, be careful with the fuel level sending unit arm which can easily be broken. Not to worry though, they are still sold by Ford as 2R3Z-9275-AA (Motorcraft PS-131) and are available through many sources.
Nevertheless, once induction upgrades come in to play, it's obvious that the fuel system also will need modification to keep up with the demand. Fortunately, the nice people at Kenne Bell have developed their "Boost-a-pump", or BAP, to "boost" the flow rate of the factory pumps. This also alleviates the need to drop the fuel tank, so that is a bonus (not that dropping the tank is that difficult). The BAP increases the voltage to the pumps, which in turn increases their RPM's, thus providing more fuel flow - up to 378LPH now. In most cases, you do not need to remove the factory system in favor of one that is "return" style with "upgraded" pumps and control modules, especially since they seem to cause more problems than they solve!
Note: The original Terminator fuel injectors are easily identifiable by their blue color. They used to be sold individually as 2R3Z-9F593-BA (Motorcraft CM-5026) or through FRPP as M-9593-M39 in a set of eight, but they are another obsolete part. Since upgrades are common here, there is always a steady supply of these on the used market if you are one to still run them!
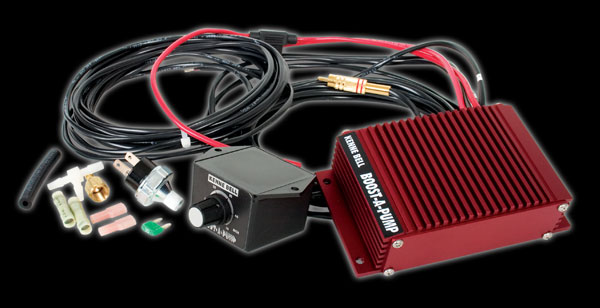
I knew the BAP would be a perfect addition, mine being the universal KB89069, 17.5V 40A version, and it has performed flawlessly so far in conjunction with the custom tune. While some people consider it nothing more than a "Band-Aid", I'm amazed that I've never heard one complaint about them failing or not functioning properly - unless the person installing it is an idiot. In any case, mine wired up in short order, which was not complicated at all. The picture above shows how I set it against the fender liner in the trunk, secured with 3M Dual-Lock fasteners, and tapped in to the harness coming out of the Fuel Pump Driver Module (FPDM). The controller is also visible behind the fuel-pump inertia switch. Once it is all hooked up, the last "modification" that is required is to remove the original 20A fuel pump fuse in the Power Distribution Box (adjacent to the battery), and replace it with one that is 30A - very important!
On that note, a debate has raged on for years as to how to "properly" wire them in (connector C433): upstream of the FPDM or downstream. The original KB instructions show it spliced downstream (the brown/pink wire), and that is how mine has been since day-one with absolutely zero issues. From what I understand, this method allows operation of the BAP as-needed with direct power to the pump(s), whereas splicing it in upstream of the BAP (green/yellow wire), sets control of it via the tune through the FPDM. I believe KB wants it wired upstream when they supply the tune with one of their supercharger kits, but I can't be absolutely sure of that. Maybe my tunes were written knowing I wired downstream, but I never did ask and haven't felt the need to inquire. No matter, it has never given me any trouble, and amazingly enough, I didn't have to add the "popular" wire "upgrade" kits that seem to be all over various forums.
I'll also mention that I did experiment with the "Hobbs" switch that I tapped in to my boost line (the yellow one behind the glove box), but didn't have any luck with it. As it turns out, I was getting a sputter at high RPM's, so I removed it right away and used a jumper for that wire which is fairly common. The BAP is now running full-time with its controller set at about 45%, which seems to be right in the sweet spot. Oddly enough, I believe the newest kits don't even use the controller any longer, yet still retain the Hobbs switch, but that isn't anything I've bothered to verify.
For what it is worth, I dug up as much tech as I could on the BAP (and fuel system), including their instructions and supplement for the Cobra, and have linked them below. If you already have one or are considering it in the future, it is all well-worth checking out. Then again, if you think you'll have to gut your fuel system and start it over, you'll probably be out of luck here.
BAP Theory BAP Tech KB Fuel Pump Tech BAP Instructions
Cobra Supplement Mustang Wiring Diagram
Note: When staying with the factory returnless fuel system, it is not unheard of that spikes in fuel pressure can damage the FRPS. Although Kenne Bell makes a small disc that fits underneath it, allegedly to limit the bursts, I haven't felt the need to add it. Once the FRPS fails, though, you are out of commission until it is replaced (a great reason to have a spare in the car at all times). If you need to pick one up through Ford, the part number is 3R3Z-9F972-AA, and they generally go for between $115 to $150. On a better note, there is a way to get them new for generally under $100: pay a visit to a local Land Rover dealer (or find one on the internet). Yes, the Ford FRPS is actually sold by Land Rover under their part number 4458309 for the supercharged Range Rover. Same exact part, just a different box. If you want an even cheaper version: Standard FPS7 can be found at just about any auto parts store. Always good to have a spare!
 Once
the original drive pulley is swapped out for a smaller one (more boost!),
especially if the supercharger is upgraded, it either means that a shorter belt
is needed, or the original 75.5" belt can be retained and wrapped tighter with
an auxiliary idler pulley. These auxiliary pulleys are commonly known as "snub
idlers", and are mounted right below the supercharger snout on the top of
the
pulley
bridge. If you happen to stay with the Eaton blower, this is also generally accompanied by a removal of the
factory pulley cover
- liked by some and
gladly tossed by others. Otherwise, the cover is easy to
modify if you choose to keep it in place
in order to somewhat hide the idler (something I dabbled with many years back).
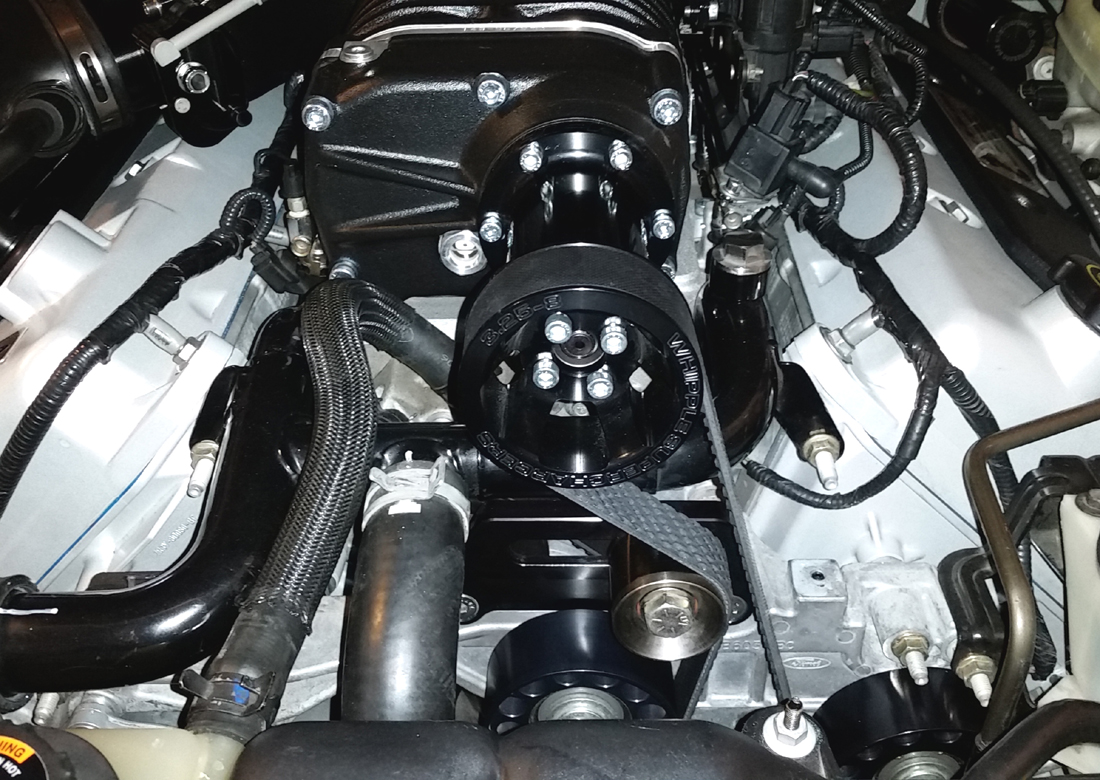
There are a few choices for the snub idlers, with the popular ones coming from Metco Motorsports, and BilletFlow. I chose a different route and ultimately went with a stealthy "hidden" version by Whipple: their 464-ADJID (shown below and in the thumbnail above). This kit went out of production for a while, but as of mid-2018, they are being produced once again. I knew I had to have one and was fortunate to find it a few years ago before the first run disappeared (and a good reason to buy their matching supercharger). It was originally a bit on the expensive side - around $275 - but I got lucky and mine came in much less, making it an even better score. In any case, it actually sits beneath the snout and can be completely invisible if you are still retaining the pulley cover.
Next up were the idler pulleys for the supercharger belt: they tend to get beat up under increased tension (plus boost!) and can literally split apart. Mine were traded out before any chaos could ensue with a set from Billet Pro Shop - also seen below - which not only look great, but are ridiculously solid. There are also plenty of others that can be purchased in varying forms from the companies that make the snub idlers, so take your pick. Opinions may vary on the sizes necessary, but I used two that are 100mm and one 90mm, which was perfect here. If you are ready to upgrade, it's also a great time to check the inner idler pulleys beneath the bridge and possibly replace them along with that belt.
Note: If you happen to have stayed with the original 90mm Ford outer idlers for whatever reason, they are easily replaced as Motorcraft YS-250 or Ford F65Z-8678-AAA. If they are still in decent shape and might just need new bearings, not to worry - those are acquired easily enough under the 6203-2RS spec (17x40x12mm) from any number of sources. These bearings also fit the inner idlers, which are adequate enough to support their accessories.
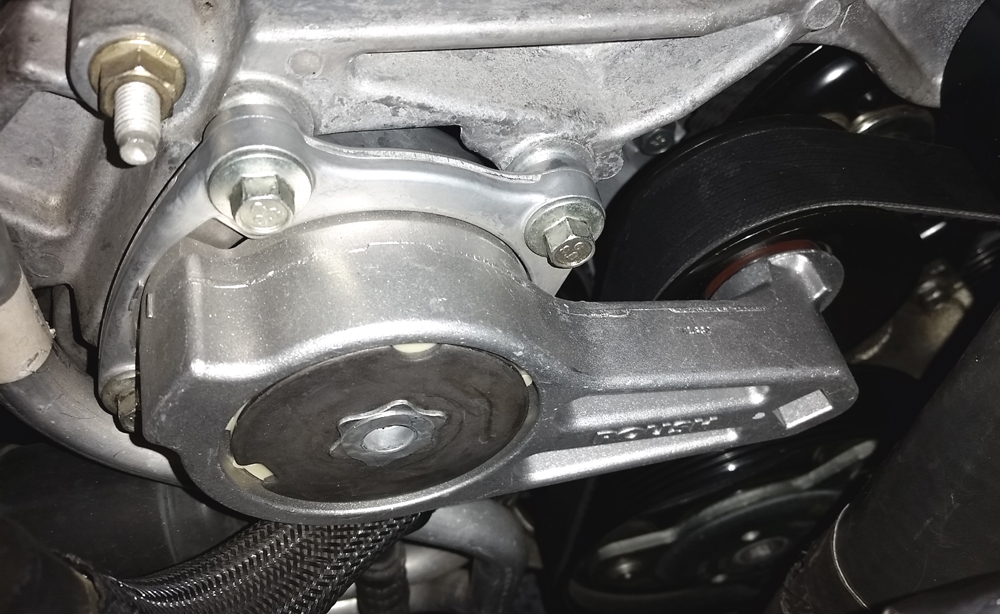
When
it comes to belts, you can simply
use one that is shorter, with no add-on idler, but most likely the
belt will slip if it doesn't fit tight enough. For reference, Metco has a nice
belt chart that will help get anyone in the
ball park, but a shorter belt will generally be needed no matter what (that
information, plus much more, is available on their
web site). Also, the original belts from Ford are 2R3Z-8620-AC (Motorcraft
JK6-966A) which is Primary,
and 2R3Z-8620-BC (Motorcraft JK8-755) which is
Secondary
- for the supercharger. Get ready for some work if you are replacing the primary
belt though: the
crank pulley cage
removal can sometimes be a real chore (unless you have the previously mentioned
flywheel holding tool, then it's not bad
at all). Otherwise, a belt swap for the
supercharger is actually on the simple side and there are plenty of aftermarket
versions available. My choice: the
Continental Elite
line (shown in the thumbnail), formerly known as the Goodyear Gatorback. Not only are they quiet, but they
grip nicely and are very durable.
Finally, and with regards to the aforementioned pulley bridge, a component of it that also tends to bend under additional loads is its tensioner. One simple and economical way to stiffen it is to simply add the unusual looking support plate from Metco. Another great alternative is through Roush, with their model that can be acquired for around $130 (there are expensive billet versions out there as well). This was was my choice, especially since it had more of a factory look. Their part number for it is 404225, which is actually listed for the 2005-2010 3V Mustang (a comparison photo next to the Ford part shows just how stout it is). Credit for this actually goes to former Roush employee Dan Watts for testing the Terminator's compatibility and ensuring this is a great upgrade. Thanks, Dan!
It happens to fit the Terminator perfectly once you swap the pulley, but it needs to be shimmed about 3.5mm for it to line up just right. This is not complicated at all, and was easily accomplished with two washers under each of thee three mounting pads (which took a bit of trial and error to match them in pairs). With it's additional bulk, you'll definitely have no worry of it flexing and contributing to belt slip. For the price, it's another great bang-for-the-buck part to keep that belt wrapped tight for maximum boost!
Note: The pulley bridge and its tensioner were originally sold by Ford as a ridiculously expensive single unit, but it is now obsolete anyway. If that tensioner needs to be replaced, not to worry, it is the same one used on the Lightning pickup and is still available as the Motorcraft BT-63 or Ford 1L3Z-6B209-BA. The inner tensioner also comes from the truck program and the same except for the non-ribbed pulley. If you need that one, it is a Motorcraft BT-61, which carries the Ford part number 1L2Z-6B209-C. It's also easy to buy two of the inner, which are much cheaper, then just swap your original outer pulley to one!
 A less restrictive air intake is
right up there with an aftermarket exhaust when it comes to moving more air
through the engine, especially when the supercharger has been upgraded.
There are a handful of kits out there for this, some that use
"open" filters, and others that tuck the filter under the fender in one
way or another. As 2016 rolled on, especially with the new
engine alive and ticking, I decided it was time for an upgrade here as well.
While I had originally been fine with the K&N FIPK (Fuel Injection Performance Kit) 57-2545, I will admit that it was sucking in a bit more hot air than I was content with. Even though it contains a shield - which some out there lack - the dome of the Cobra R hood did not allow it to seal sufficiently (and it was debatable if shielding did anything at all under even the stock hood). While sitting at idle on a hot day with the Eaton supercharger, the inlet (IAT1) and downstream (IAT2) air temperatures would climb drastically, both approaching 150°. I had definitely dragged my feet on an upgrade for far too long.
Note: If you think an open air kit looks cool just because the inlet is painted to match your car, you'll do nothing but draw hot air in to your engine. Along with my original K&N intake, there is also a similar version made by Steeda if you are set on going that route. An article by Kenne Bell on Hot Air Warning sums up the perils of these open filters nicely - FYI. Additionally, they also make a simple MAF-forward CAI of their own with a monster 12" filter - a perfect example of form following function.
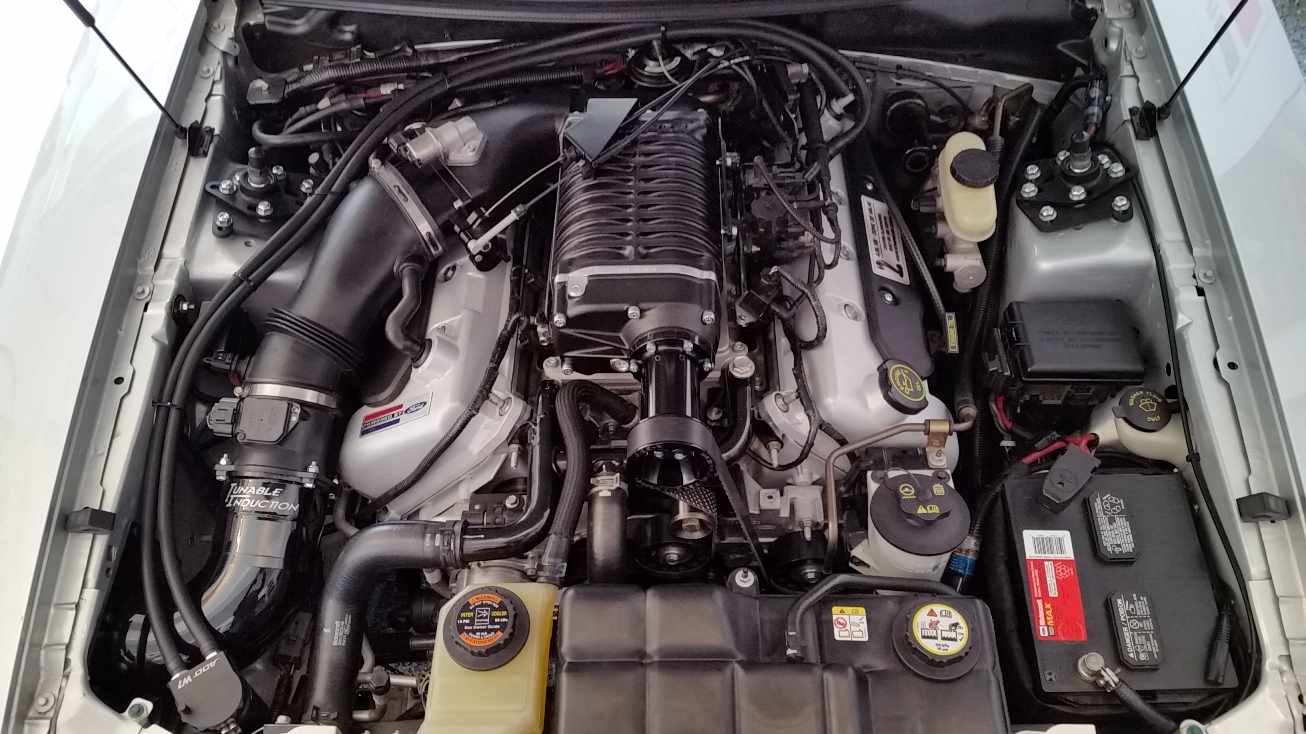
My choice, a fender mounted cold air intake (CAI) courtesy of the former Tunable Induction (shown in the thumbnail and several other places on this page). On a sad note, shop owner Ken Mason passed away in October '16, which led to the business shutting down. This is real unfortunate since they were nice kits, but I'm definitely glad I had picked one up. Anyway, for those that have been around the Mustang world for an extended period of time, this would probably be recognized as the DenseCharger, originally conceived by John DeMolet back in 2001. These kits use real heavy ABS plastic, as opposed to thinner molded tubes, and do a nice job of keeping the intake charge insulated from engine bay heat. Even better, installation was simple and it looks nicer under the hood than an open filter.
With this new intake installed, as I expected, the IAT1 levels were pretty consistent with matching the ambient air temperature - no surprise considering the filter is tucked away under the fender. It also helped with the Eaton housing, since they are known to run on the warm side, by drawing in the cooler air from below. Even when stopped and at idle, the IAT2 may creep up, but not nearly to the levels seen with an open filter. Definitely a better situation.
As the Eaton makes its way out for the Whipple, I have no intention of moving to a different kit. Since I am not stepping up to ridiculously high boost levels, I am sure this will still flow plenty of air. Also, if I happen to need easy access to the spark plugs (or anything in that area), the original intake tube is retained and can be popped right off - no need to fuss with some giant plastic contraption that is sprawled across that side of the engine. So far, I think this intake will keep doing just fine.
Note: As shown in the thumbnail at the top of this section, the filter is obviously green. Simple enough, it comes from a company called Green Filter USA. The supplied filter is their part number 2374, coming in at just 6" tall with a 4.5" inlet (not one of their giant versions, but I will probably step up soon enough). With the unique color of this filter, it was also pertinent to pick up a cleaning kit, which was easy thanks to Summit Racing. Interestingly enough, Green Filter is also a supplier for the new Ford GT race car - a testament to the quality of their products!
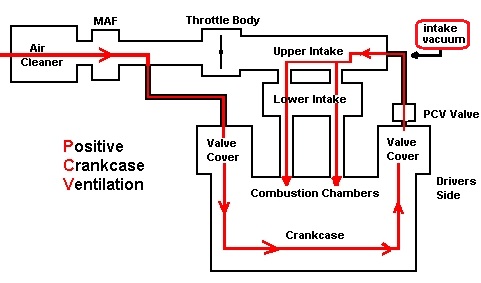
 The PCV,
or Positive Crankcase Ventilation, system is meant to recycle excess
combustion gasses, called "blow-by", that slip past the piston rings and in to
the crankcase. This is done by placing a positive pressure on the system, by way
of the intake air flow, and drawing the gasses back in to the engine where they
can be burned again. Along with the blow-by, there are also oil vapors
circulating around in the crankcase from the whipping action of the crank and
pistons. At one time, the PCV system did not exist, but
when emissions regulations began popping up in the 1960's, someone decided it
was a good idea to cut down on all the additional combustion and noxious gasses.
By the way, it's not "PVC" either - that's plumbing material.
In conjunction with the PCV system, an oil separator, or a way to remove excess oil from the intake tract, is essentially a necessity for a forced-induction car. This is even more so the case for the Terminator since it cuts way down on oil coating the intercooler that sits beneath the supercharger housing. As the intercooler gets loaded with the oil-laden vapor that is drawn through the intake, its effectiveness will definitely diminish, leading to reduced performance (plus, they are just a drag to clean). Additionally, the excess oil vapor will have the effect of lowering the fuel octane, meaning less power, and will contribute to carbon buildup on the pistons and valves.
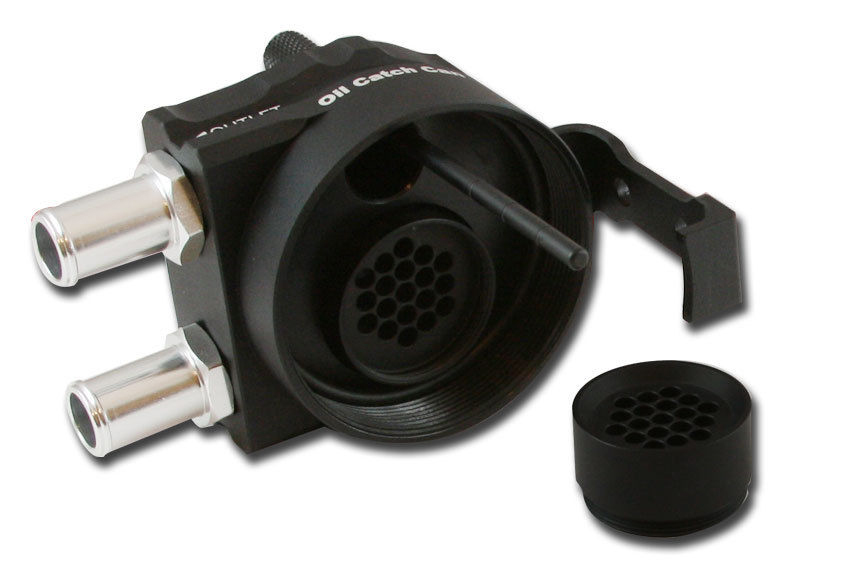
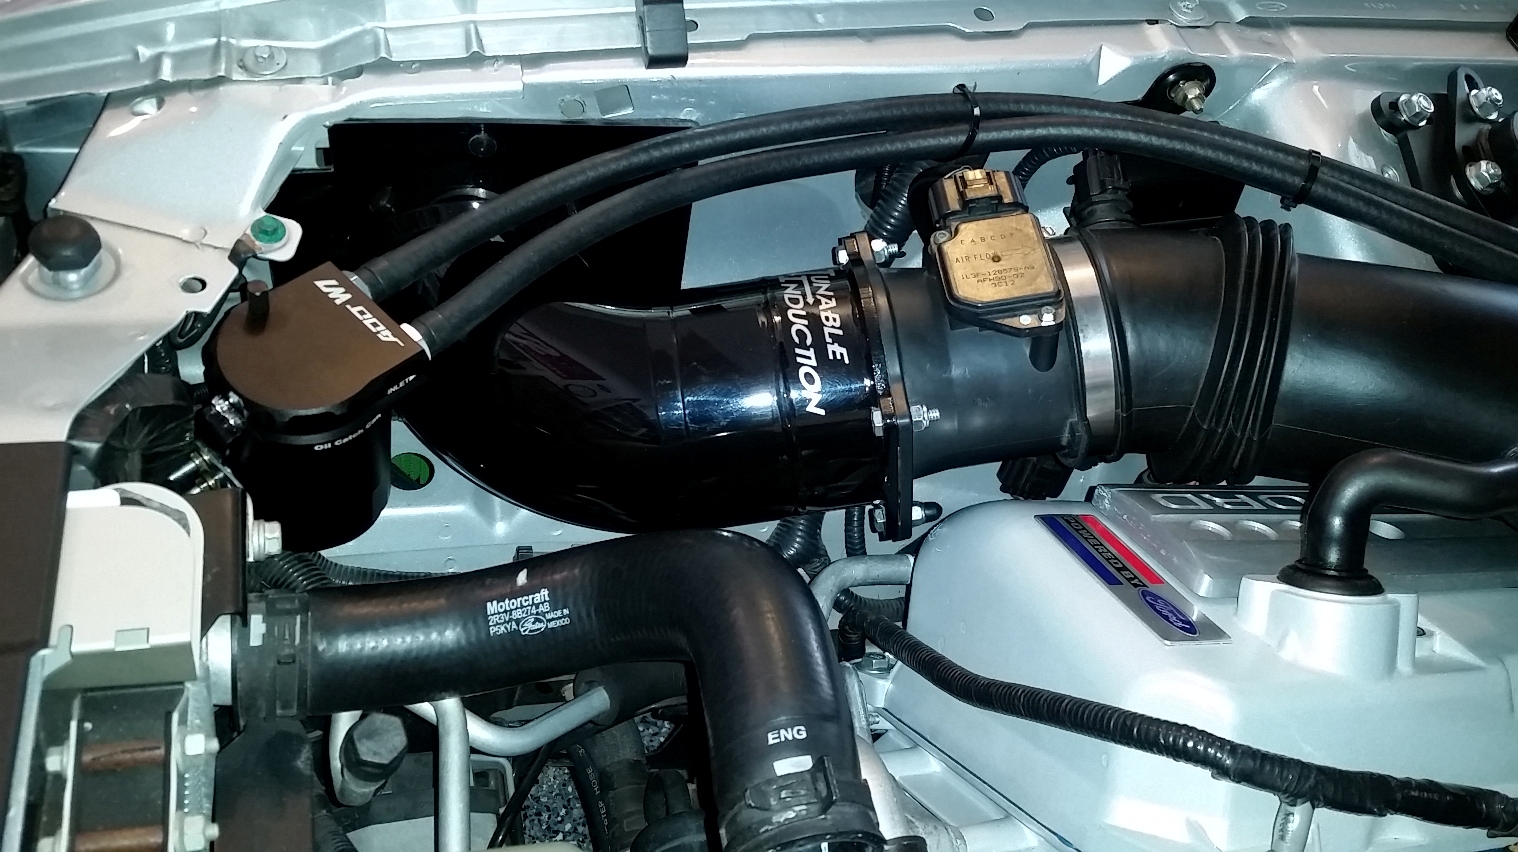
Some will choose to use a simple water separator from an air compressor that you can buy just about anywhere (or as a kit from Steeda, for example) but I liked something that looked like it was an actual automotive part although the "cheap" one is probably every bit as functional as the "popular" kits out there. After my new Aluminator was up and running, I decided it was time to remove the puny separator I had used for the past several years in favor of a larger one made by a company called Advanced Design Depot, and sold as their "ADD W1" on eBay (see thumbnail) . If you want to pick one up, they are found easily by searching for it by the part number or simply "oil separator" or "oil catch can" (there are a lot of good ones!). If you are in to some bling, they also come anodized in several more colors for whatever suits your tastes.
Not only is this tank a quality piece, but it's overall just a better design than what I had used before. As a nice touch, it even has a small dipstick along with a filter element that is removable for cleaning. Does it work? Absolutely. With just a few hundred miles on it as I initially wrote this, there is a noticeable amount of oil in the tank already - probably more than the other one would accumulate over the course of 1,000 miles or more. Definitely a great score, and one that will go a long way to keeping the intercooler much cleaner.
A decent close-up is below where you can see how it is mounted using a flat corner bracket tweaked and bolted to the radiator support. It is also evident the simple way it fits in the factory PCV line, between the PCV valve and intake (circled in the diagram above), using lengths of 3/8" ID fuel line and a barbed coupler to mate with the original connection. There is nothing to it and it's not complicated at all. Doing it right also means mounting it farther away from the PCV valve than on the firewall: this gives the oil vapor the ability to cool, condense, and drop in to the tank. It works great, looks perfect under the hood, and it's compact size makes it easy to mount in the tight confines of the Terminators engine bay. Another great score.
Note: In the diagram up above, notice that metered air flows past the Mass Air Flow sensor before it is drawn in to the engine (a "pre-filter" is useless there since that side is inlet air). It is closed, and calibrated, yet some people feel the need to remove all the PCV gear in favor of breather caps and allegedly "better performance". Yes, you can have the tune altered to allow for an open system, but really, what is the point? The topic has probably been beaten to death, so I'll be happy to avoid it. It doesn't bother me to have the PCV gear there, nor do I see any advantage to yanking it all, other than for aesthetics. It's just as well that the unburned gasses are recycled - less crud we all have to breathe.
An important area to consider when
building, re-building, or just being proactive with your upgraded engine is the
oil pump. From the factory, the pump on the Terminator
actually isn't all that bad, but it does have one Achilles' heel: its drive
gears. Under high-RPM use, the factory powdered-metal gears have been known to
shatter, which is definitely not good for your engine, especially if you are on
a track (then again, it's bad no matter where you might be).
The modular engine Generated-Rotor, or "Gerotor" pumps are actually installed on the front of the block, rather than sitting in the oil pan, and are driven by the crankshaft snout. As the crank turns, the internal gears of the pump are rotated around the snout causing a suction which in turn draws the oil up through the pump body and in to the engine block. With the propensity for the gears to be a weak link, there is however a perfect solution: upgraded billet steel gear sets.
On my end, I purchased new "Shark tooth" gears from Boundary Engineering, which turned out to be a great value at just over $200, to install in a new Ford Racing pump. There are also versions made by MMR and the Triangle Speed Shop that are more expensive, but have been given positive reviews and are still decent choices. I went ahead and spent the money with Boundary after chatting with the shops owner, Travis, and feeling good about soliciting a small business run by enthusiasts. Here's a comment from Travis on a forum when he was asked about his products:
"...I manufacture and design the gears myself. These are made in America, made by me actually. There aren't many that actually know how to design a trochoidal gerotor pump, but I'm one of them. I didn't hit the copy key, these use a unique pattern that mitigates the torsion moments on the teeth and creates a bigger pumping chamber. We have thousands of my designed gears floating in different vehicles, and many house name my brand. I challenge you to find one that has failed."
Read more at: http://www.modularfords.com/threads/236857-Aluminator-Gibtec-build
Read more at: http://www.modularfords.com/threads/236857-Aluminator-Gibtec-build
It turned out perfectly, especially since the gears really are a work of art (only car guys would say that, but compare them to the original set and draw your own conclusions). With all that in mind, my pump has been rebuilt, and installed in my new Aluminator. The images below actually show another pump - minus the backing plate - with the OEM components on the left, and with the new gears installed on the right (I neglected to get a picture of the actual pump I ended up using). If you aren't sure if a gear swap is up your alley, check out how simple it is in a YouTube video courtesy of Jon Pavia at UPR - more good press for Travis as well!
Note: It should be apparent to anyone working on these engines how critical oil pressure is - hence the necessity of using better pump gears. As for monitoring it, the stock gauge stinks and is essentially just an on/off indicator (I believe it activates with just around 5PSI). Fortunately, it is easy to add a functional oil pressure sensor to read on the Interceptor, or an aftermarket gauge if you choose. I made sure to pick up the AeroForce kit, with all the details shown on my Electrical page.
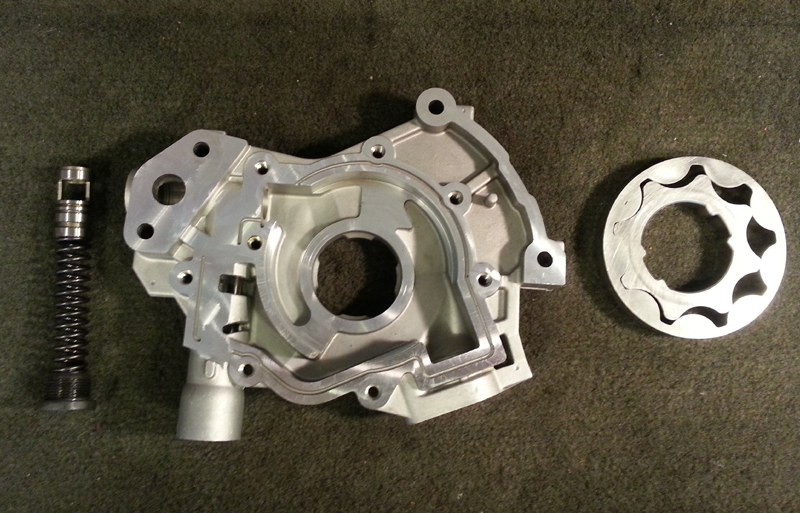
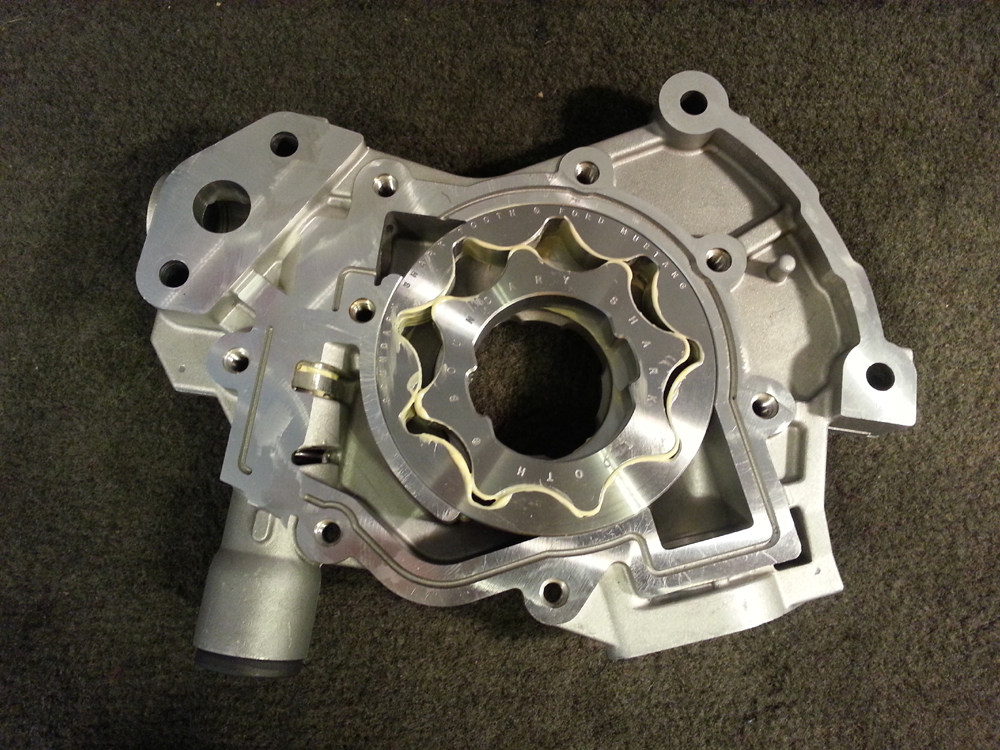
Overall, the Gerotor pumps are incredibly simple, yet perfectly functional. The main moving part is the gear set, working in conjunction with a pressure relief valve adjacent to it that recycles oil back around the gears as necessary. Based on the model of engine and its specific pump, the only real variable internally is the relief valve: the stiffer the spring, the higher the pressure that must be reached in order for the plunger to be forced down. Once the plunger is compressed, excess oil flowing up and around the top of the rotors will be bled back for another pass.
While the stock Terminator pump is a good choice for just about every performance DOHC engine out there, there are some other options available as well. Oil pump giant Melling also sells upgraded pumps that already contain their billet gears, but it's also just as easy to buy the gears and transplant them in to a pump of your own (you can also buy the pumps from the aforementioned gear vendors). Another idea is the use of the latest "3V" pump, which is a high-volume and high-pressure version (with a 75PSI relief spring compared to 60PSI in the HO pump).
Interestingly enough, the newest 3V pump is also now used on the 5.4 and 5.8L Shelby engines, and had been adapted for use in the already-discontinued Ford Racing Aluminator M-6009-A46X 5.0L stroker short block. The 3V pump is a viable upgrade for the 4V engines as well, especially since the A46X block is also perfectly suited for 4V heads (the 3V pump operates at a higher pressure due to the Variable Valve Timing gears). The pump is also available as the FRPP M-6600-F46, Melling M360, or through Ford under DR3Z-6600-A: my choice for the new engine. If you look closely, you'll also see "3V" embossed on them compared to the "HO" on the Terminator pump.
With the internal upgrades in mind, one last important part of the pump to bring up is the back cover, which I why I chose the newest Ford pump. The earlier factory pumps (9L3Z-6600-A) all have an aluminum backing plate that will flex at high RPM's. This is something to consider, especially since the flex permits some oil to leak around the back, potentially leading to a drop in oil pressure. To combat this, the Melling M360 uses an iron backing plate, whereas the latest Ford and FRPP pumps have a steel backing plate - both definitely stiffer than aluminum (see the chart below for component weights). If you really want to get serious, while mixing in a little bit of tinkering, snag the Shelby pump and add some new gears to make it essentially bullet-proof, or just buy it complete from Boundary. With as much money that can go in to these engines, the last place one would want to skimp is something as basic as the oil pump.
| Component | Weight, pounds | Weight, grams |
| Gear set, standard | 1.11 (1Lb, 1.8 Oz.) | 504 |
| Gear set, billet | 1.24 (1Lb, 3.8 Oz.) | 563 |
| Backing plate, aluminum | 0.32 (5.1 Oz.) | 145 |
| Backing plate, steel | 1.29 (1Lb, 4.7 Oz.) | 586 |
Note: The factory oil pump in the Terminator and all '96-'04 DOHC Mustangs is considered a "high-output" version. It delivers approximately 10% more volume that the previous SOHC pumps and has a pick-up tube opening of 15/16" compared to 13/16" on the non-HO pumps. Along with the availability through Ford as F8OZ-6600-AA, the pump - including a new pick-up tube - can also be purchased through Ford Racing as M-6600-D46 (yes, the Ford Racing pump is the same). Otherwise, the pump by itself is also available through Melling as their M-227.
The oil pan on the Terminator is a pretty decent one for most conditions, so it's worth addressing. It is actually a common pan for the '96-'04 4.6L V-8, with this version used beginning in 1997 (the '96 pan had a unique part number due to inclusion of a level sensor). Amazingly enough, it is still sold through Ford as XR3Z-6675-DA and also carried the FRPP part number of M-6675-D46 for a brief time. Additionally, an OEM replacement is made by Spectra under their part number FP46A, so new pans are definitely easy to acquire if necessary.
Along with the option to stay with the factory pan, an upgrade to a "Deep sump" pan that holds a higher volume of oil is popular, especially if any performance driving is involved. The bigger pans are available through a handful of manufacturers and will hold 8 to 9 quarts (they generally advertise them with a seven quart capacity, however). These pans are also particularly important when upgrading to a higher pressure oil pump, since the increase in volume will ensure adequate lubrication.
Note: The SVT Supplement (see my SVT Documents page) states that the oil capacity of the Terminator is 6 quarts, but original fill was actually 6.5 to 6.8 quarts. Even with the aftermarket pans out there advertising their extra capacity, plenty of Terminator owners regularly use additional oil without issue. Not bad for a pan with no extra kick-out!
 For
my new Aluminator, I picked up the
Canton 15-784 "Road race" pan. Not only is Canton one of the bigger names in
this area, this exact pan was also used on the
2000 Cobra R and was
factory installed. It is also advertised as a 7 quart pan, but per the '00R Supplement,
the capacity is 8.5
quarts (due to the external oil cooler). Like the Terminator pan, its factory fill was higher - this time
over 9 quarts - so there
is no doubt these pans are going to hold more oil if necessary. I experimented
and filled mine with 8 quarts of
water before mounting it, and that level just barely reached the baffle and
front of the pan, so even with nine quarts, the level won't be too extreme,
although the additional oil is unnecessary.
As a bonus, it uses the factory pick-up tube and contains a sump with four trap doors. The doors open inward to allow oil to flow towards the pick-up, and will keep the oil from flowing away from the pickup during hard cornering and acceleration - definitely beneficial! Also, the slosh baffle on top is removable, but I'd imagine there aren't many cases where it would need to come off. Overall, it's just a real nice pan with some fine craftsmanship behind it.
One minor glitch worth mentioning is the oil level reading on the factory dipstick. With eight quarts of oil in my pan, the reading is still close to the full mark, which I note and keep an eye on. Some people have complained that theirs reads real low (obvious with the wider and slightly deeper sump), and have in turn just kept adding more oil to bring the level up to a point where it can be seen on the stick - generally a bad idea. If you do find yourself dissatisfied in this situation, Canton recommends a slightly longer dipstick from the E-150 van series, 1C2Z-6750-AA, which can be marked and trimmed as necessary. Simple enough.
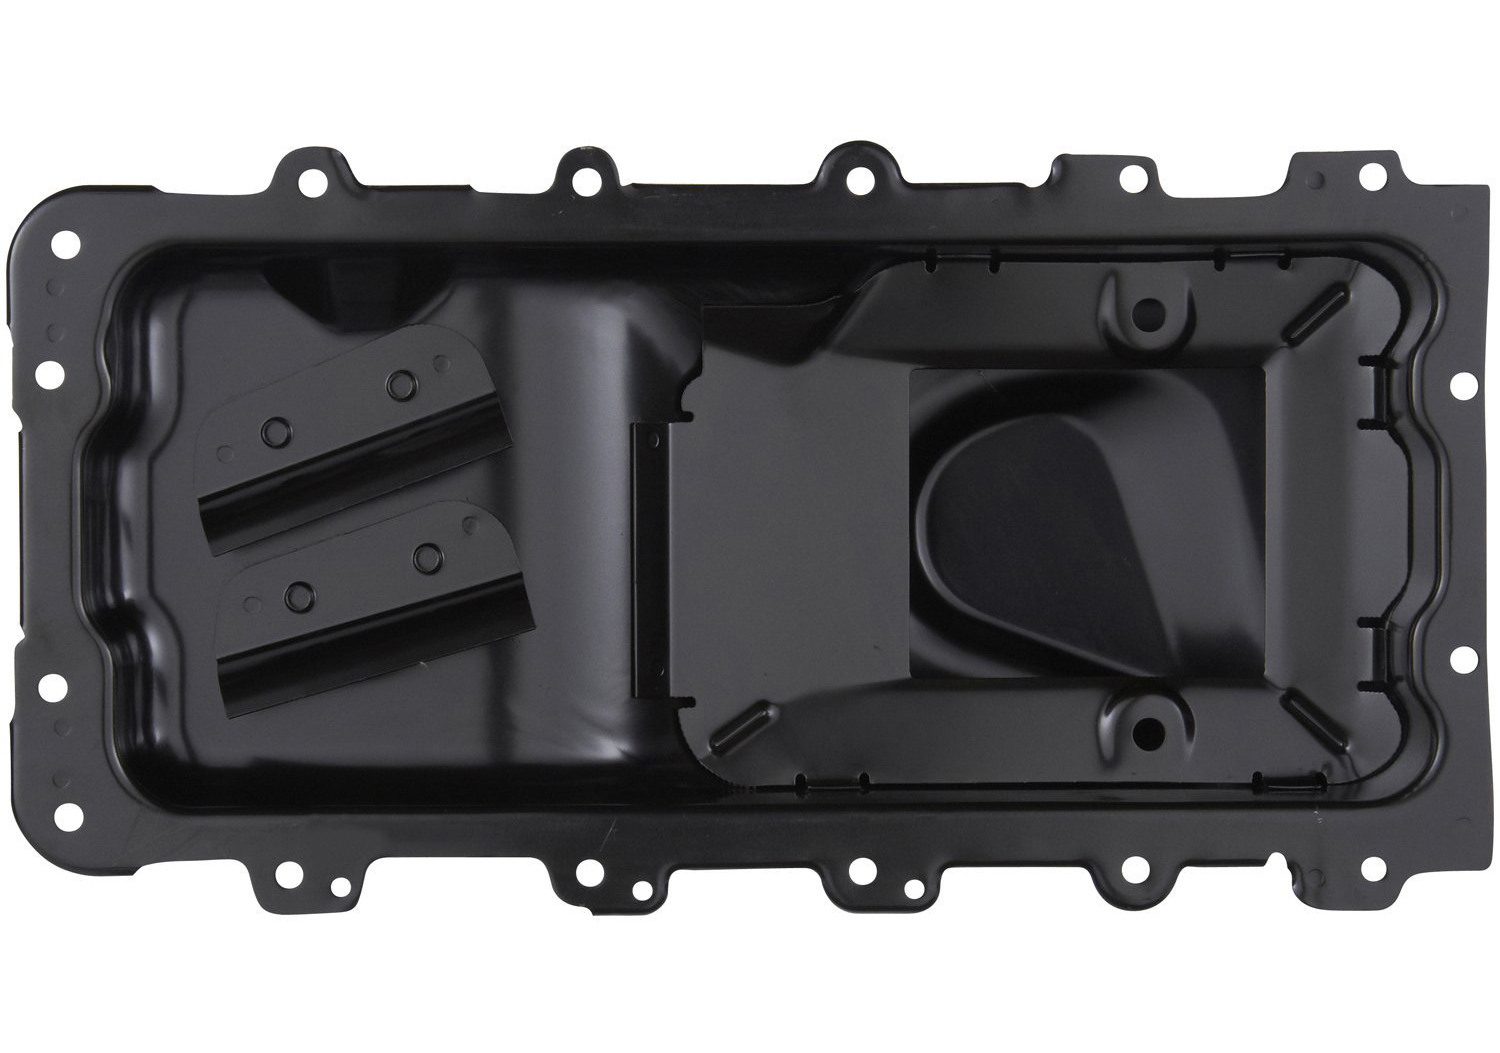
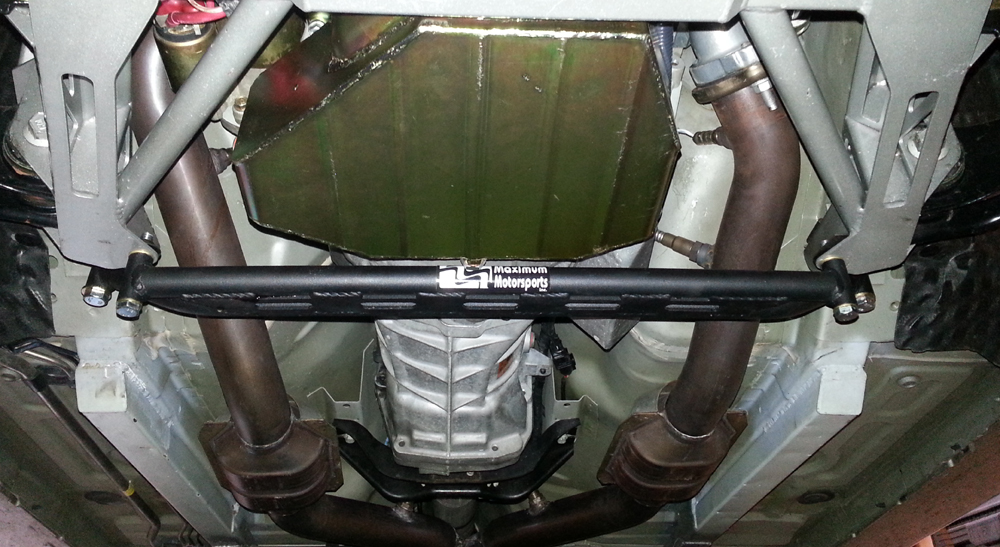
Back to the factory pan. It has a slightly extended sump for the pick-up, a fixed slosh baffle, and also features built-in "scrapers" at the front of the pan. Because of the scrapers, the Terminator also had a "windage tray" (meant to limit the foaming of oil from the cranks rotation) that only covered the rear of the crankshaft, directly above the sump. In the image above, the scrapers are visible to the left with the sump and baffle shown on the right side.
Along the lines of the windage tray, the Terminator pan can be used with full-length versions, but if that is the case, those scrapers either need to be cut off or "massaged" downward to allow for the necessary clearance. This would be the case if one acquires the 3V Mustang tray, Ford part number 4R3Z-6687-BA (standard with the Aluminator block), or if using something like the Canton tray, which was also original equipment on the 2000R. With the Canton pan, it isn't an issue since the scrapers are not present - yet another nice feature.
If you are content on staying with the Ford pan, it's not a bad way to go, especially if you are comfortable exploring the upper limits of its capacity. Still, if there are big dollars going in to a new, or rebuilt engine, you can't go wrong by adding to the oil quantity with a larger pan. After all, oil is the life blood of your engine.
Note: Although the OEM oil pan is still available through Ford after all these years, the "high-flow" pick-up tube is obsolete. The FRPP oil pump listed in the above section is even a better deal now, since somehow the tube is still part of that kit which is very reasonably priced. Don't panic if you need one separately though, as Melling does sell their version of it under part number 335S - it's just not as good of a deal!
 This
is a late player to the game, but something I actually intended to purchase when
the new Aluminator was finished. While there are some good filters
out there such as the trusty FL-820S, some guys will prefer more of a
"performance" version from places like
K&N,
Bosch, Wix, and
Mobil1,
just to name a handful. I have been partial to the
Bosch 3410 up until now, but for
the first fill of oil in the fresh engine, I picked up the Motorcraft filter
just to run it with at idle for a few hours.
Nonetheless, my intention was still to splurge and upgrade to a high-flow, high-filtration filter that was not only indestructible, but even better - washable and reusable. Now, I'll be stepping up to a billet aluminum version, the PurePower PP8433. All of its finer points are illustrated below, along with a nice view of the components (made in the USA as well). Not only do they look great, but they also have a higher flow rate and a burst strength that conventional filters won't come close to matching, as indicated in the specs. Even better, you can cut down on the amount of used filters that end up in landfills, so it is a win all around. If you are serious about your engine, you just won't go wrong here.
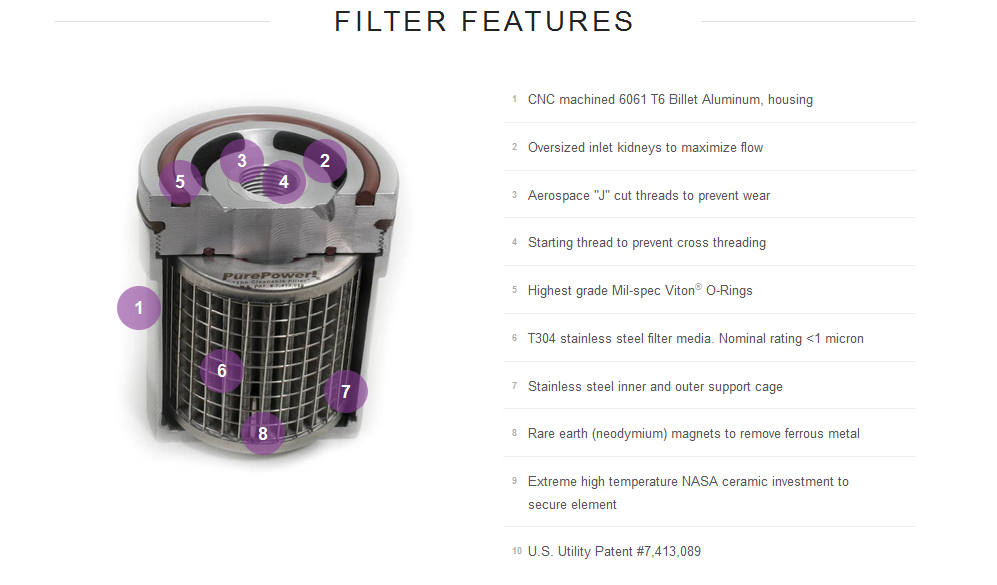
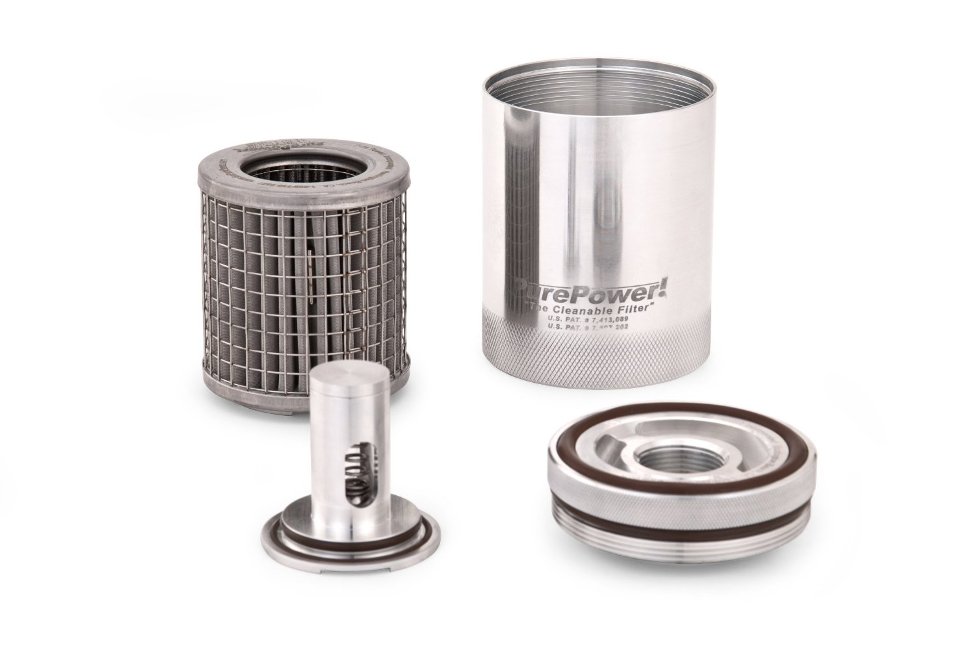
While on the subject of oil filters, there is no sense in skipping over my $0.02 on the oil itself. I've been partial to Mobil1 (no, it's not "Mobile 1") in my vehicles for over two decades, and it has never let me down. How can I say that? Well, easy: I frequently send samples in to Blackstone Labs for analysis, and they have yet to show me that the oil isn't holding up or doing exactly what it needs to do. I always get a kick out of the forum crowds that will tell you which oil is "best", or why they'll abandon one brand since it wasn't "meeting expectations" or some other nonsense like that. With everything, opinions will vary, but since I have yet to see that what I have been using for so long isn't cutting it, I'll stay with the known quantity.
Expanding further on that, my preference in the Cobra since I purchased it had been the M1 High-Mileage 5W-30. It was actually one of their better oils, containing higher levels of the anti-wear additives Zinc and Phosphorus (Zn and Ph), commonly referred to as "ZDDP". As a 30-weight oil, it is perfectly suited for a performance engine, and under hard use, it isn't going to "shear" down as fast as a 20-weight oil. Despite what some may say about the need for the anti-wear additives being diminished with newer roller cam engines, I believe them to be quite beneficial all the time, especially when an engine is new or driven hard. For more info on all the M1 oils, their Product Guide has some good information.
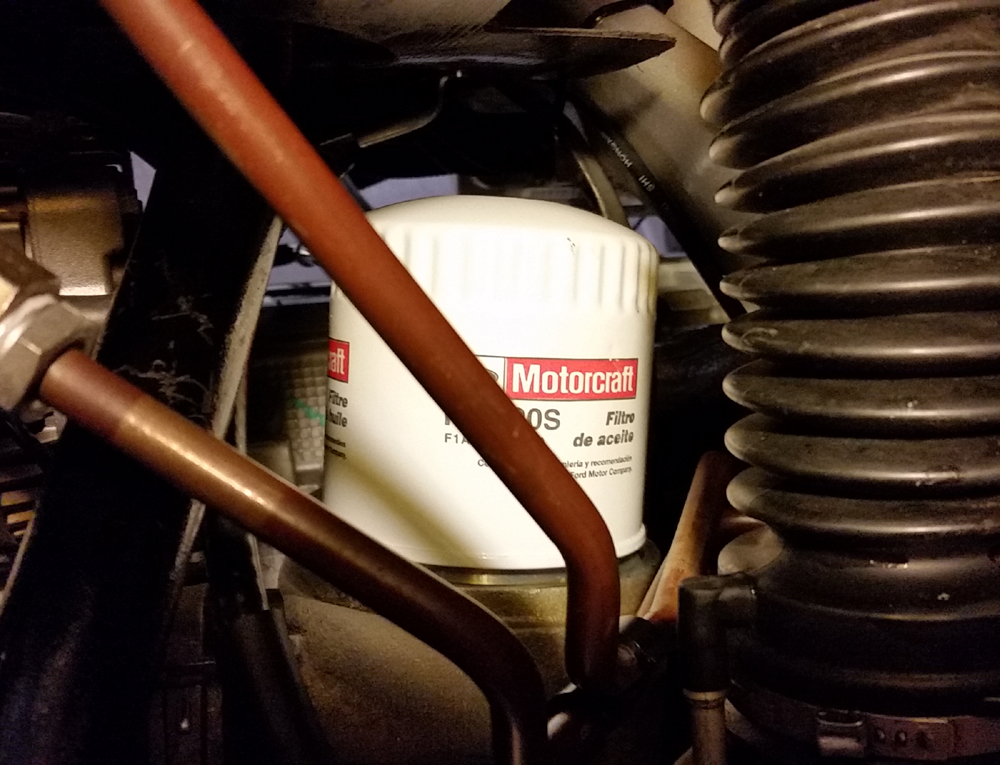
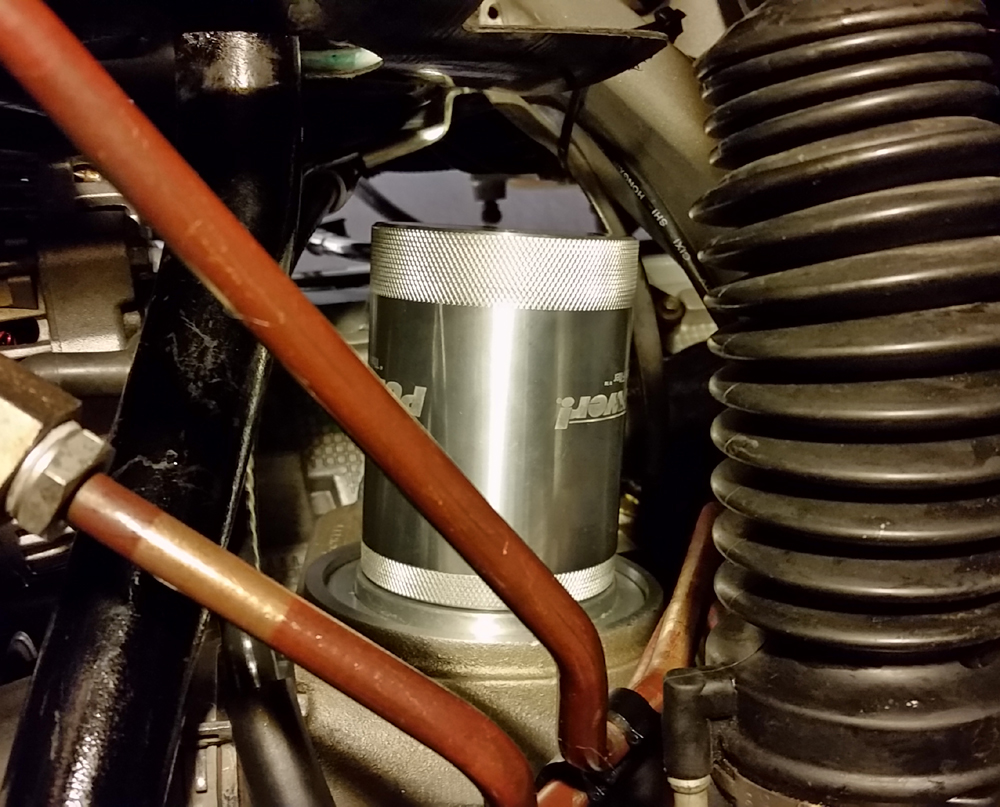
Taking a slight step back, after about four hours of idle run time on the new engine, I not only upgraded the filter (the before and after shown above), but I sent a sample of the "break-in" oil to Blackstone. Although I've mentioned Mobil1, I actually used a non-synthetic oil for the first fill, and then used it for a few hundred miles before I switched back to the M1. While there are specifically labeled "break-in" oils on the market, I went with the trusty Shell Rotella 15W-40 diesel oil. Yes, it's labeled as a diesel oil, but that is because it has a higher ZDDP count beneficial to hard-driven diesel engines. Even with just an easy four hours on the engine, the Blackstone Used Oil Analysis, or "UOA", showed that the Shell oil is some pretty decent stuff.
 Even
with Shell showing good numbers, I ultimately went back to an M1 synthetic oil for full-time operation
as the miles were adding up. My
new oil of choice, with higher ZDDP values is the European Car
Formula 0W-40 - one of the better products from Mobil. No, it's not a "zero-weight" oil, it is still a 40-weight, as
indicated by the suffix. The prefix simply tells you the cold-flow "pumpability"
of the oil: the lower the number, the easier it will flow when cold - perfect
for start-up. The "0W" does not indicate that the oil is a zero-weight in the
winter! In this case (and in all), that wouldn't make sense. You couldn't have
an oil that would be a "0W" when cold and a "40" when hot since that would imply
it would be thicker as it heated up. Clear as used oil!
Note: The DOHC engines have been using 5W-30 oil since they first hit the streets. Sometime in the early 2000's, thanks to the government's all-wise Corporate Average Fuel Economy (CAFE) standards, Ford made the switch to the lighter oil to show improvements in mileage spread out among all models. In simplest terms, the thinner oil will produce less drag on the engine, theoretically improving the MPG's (the thinner oil, however, is less "durable"). It's a ridiculously small number, but when it's factored in across a lot of engines in a lot of cars, driving a lot of miles, apparently it means something. As an example, a Motorcraft 5W-20 product description even promises a "significant improvement in fuel economy" over the previous 30-weight oils. If it's in print, and on the internet, it must be true.
I'm not actually a fan of "bling", especially under the hood, but I did enjoy adding a few things that look perfect with the times. Although some items like the "C/C" plates, oil separator, and intake happen to fit right in, those were purely a matter of function over form which turned out well anyway. Still, I had to add a little more of the personal touch.
From Ford Racing, I initially liked the very cool "Powered by Ford" coil covers that were once sold as M-6067-GT. These were actually sourced from the 5.4L Ford GT engine, but they fit perfectly on the 4.6 as well. They are discontinued from Ford Racing, but there are still some in the Ford parts system although you are now required to provide a VIN from an actual GT to purchase them. In any case, their part numbers are 4G7Z-6P067-AA and 4G7Z-6P067-BA. I also added the proper stainless-steel button-head Torx bolts that are another nice touch: available through Ford as W701621-S437. It's just too bad that only one side is really visible when on the Terminator since they do look amazing.
With that in mind, and with the upgrade to the Whipple over the winter of 2017-2018, I decided to switch back to the factory covers that were powder coated to match the new black housing (the "old" stuff is still shown at the end of this section). I wasn't quite sure I would like them at first, but the slight contrast really did turn out fantastic. Adding to that, I once again got in touch with Jason at Anchor Room and had a custom plate made to fill the space on the drivers side. Not only does it mention there is something slightly different under the hood, it was a great excuse to advertise this site as well. Awesome!
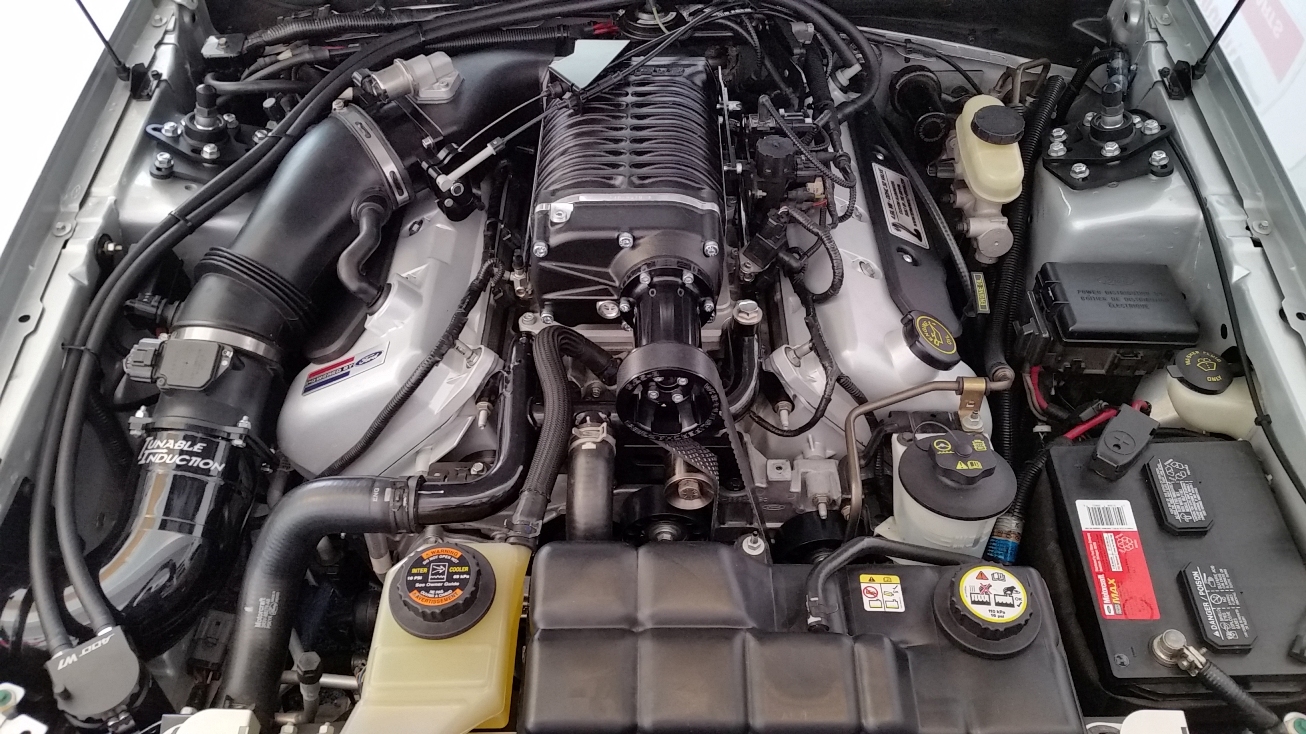

Note: The coil covers are easy to acquire in many forms, styles, and colors to suit a lot of tastes. One down side is that they can be beat up after years of use or re-coating, which also may mean the gasket may have seen its better days. Fortunately, the gasket for all DOHC covers is the same, and universal to both sides. If you happen to need them, the Ford part number is F7LZ-6P069-AA, and they are about $20 each. Also, to the best of my knowledge, the original color on the Terminator cam & COP covers is Argent Silver. The coating is extremely durable, but if you have a set that may need to be re-coated to an OE look, it is still possible to find the paint out there. As long as you don't mind it being listed as a wheel paint, it should be a pretty decent match!
 Another
nice touch with the installation of my new
Aluminator engine, is a Powered By Ford emblem on the
passenger side cam cover (this
one wasn't built at Romeo, after all!). It was easy to
find via an internet search, and even better, the size is almost a perfect match
to the original Niche Line plate (I still have a brand new one, so that will
stay in my collection). While my build was in
progress, I also had the timing cover and cam covers powder coated in silver, so
everything looks good as new and the color goes nicely with the exterior paint.
On the small side, and still referencing the cam covers, my oil cap was replaced: it has "Engine Oil" on it (which matches the dip-stick) rather than the factory "SAE 5W20". If you are overly picky about something like this and would like to replace your OEM cap - especially if you have ceased using a 5W-20 oil - it's easy enough to get this one through Ford or any of their vendors. The Motorcraft part number is EC-743.
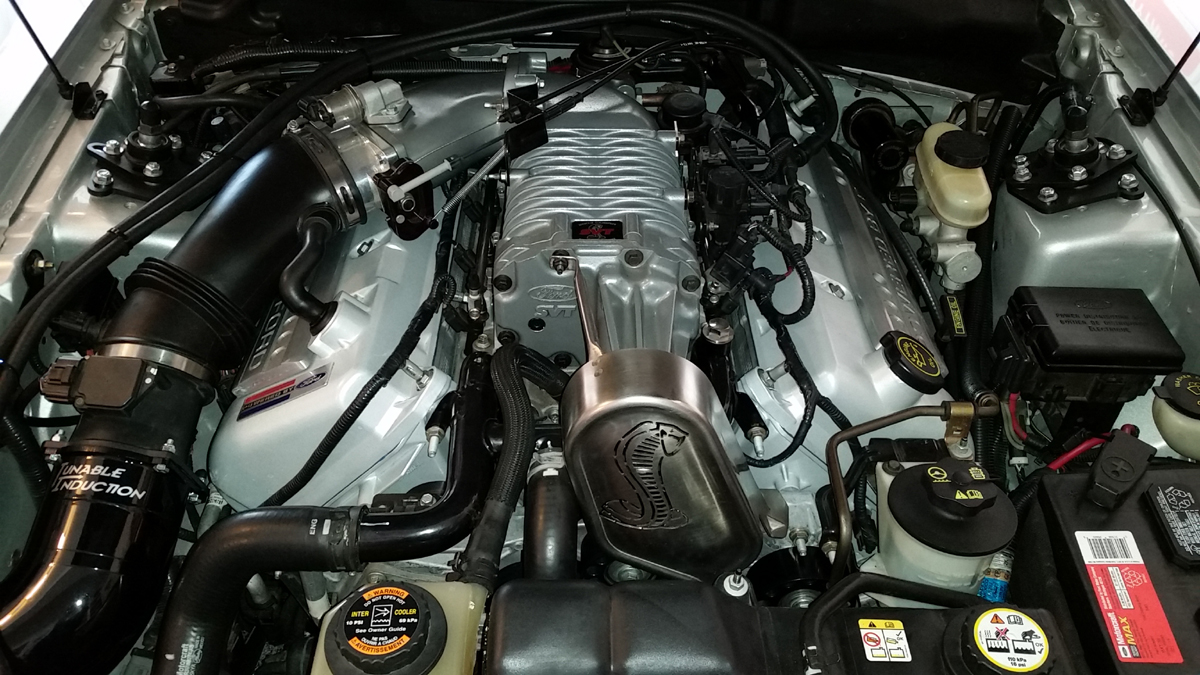
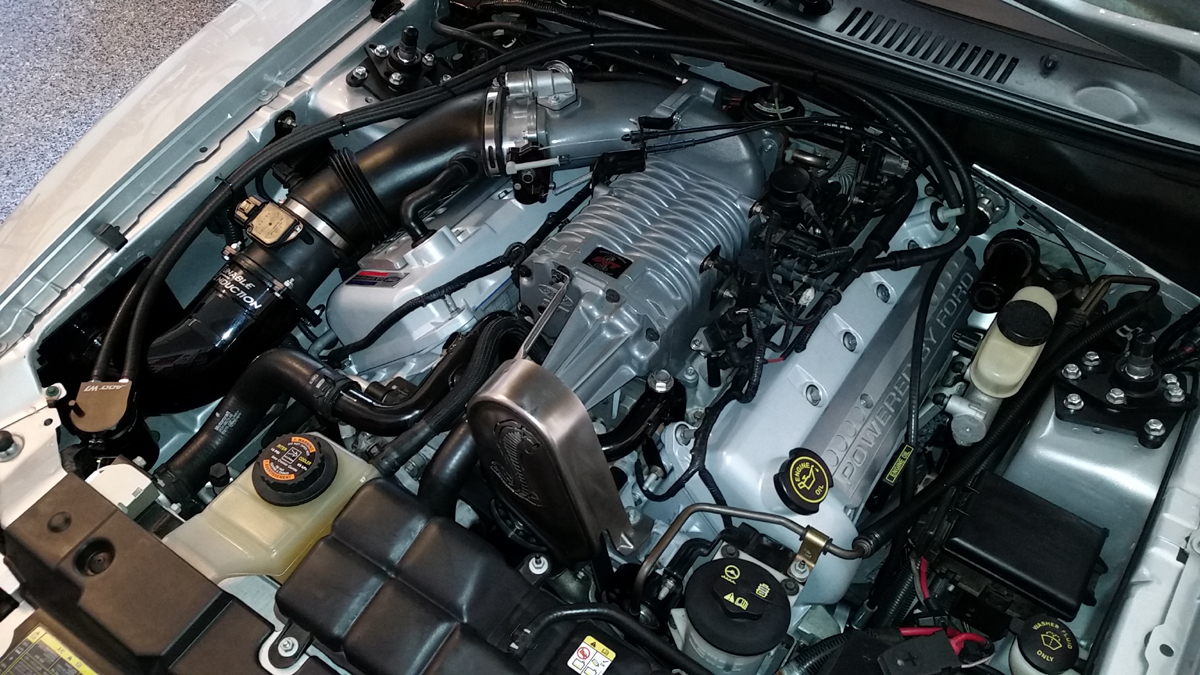
Also on the small side, something that looked good while the stock supercharger was still in place: a decorative cover plate, as shown above, before the transformation. It is something relatively new from the SVT Store, and is perfect for the Eaton housing. Even better, it is very inexpensive, and if you happen to like it, there is a great excuse to head on over to the site and stock up on other Cobra and SVT collectibles. Thanks to the stores proprietor, Marcie, for letting me add the prototype to my Cobra - it really was a perfect addition.
My last unique item, again from FRPP and for the Eaton housing, was the "Cobra" pulley cover. The one I had was interesting since it is bare steel with a brushed finish, whereas the norm for them through Ford Racing was a chrome finish. They used to be available as M-2301-J, and even though the stock photo could almost pass as bare, all the other ones I have seen were definitely chrome. It's also worth pointing out that it contains the strut that actually attaches to the front of the blower, whereas the chrome one apparently left that out and was only attached with the two lower bolts. With the new Whipple taking over, I'll be sad to see this go, but it sure looked great while it was there!
Note: For some more trivia, the un-painted pulley covers apparently existed very early in the program on the Pre-Production cars (also shown on my Background page). Where that changed is anybody's guess, but it is most likely one of those minute items that will never be figured out. If someone out there knows, it would be neat to find out the story there.
