![]()
![]()
![]()
![]()
![]()
![]()
![]()
![]()
![]()
![]()
![]()
![]()
![]()
![]()
![]()
![]()
![]()
![]()
![]()
![]()
![]()
Suspension

Featured
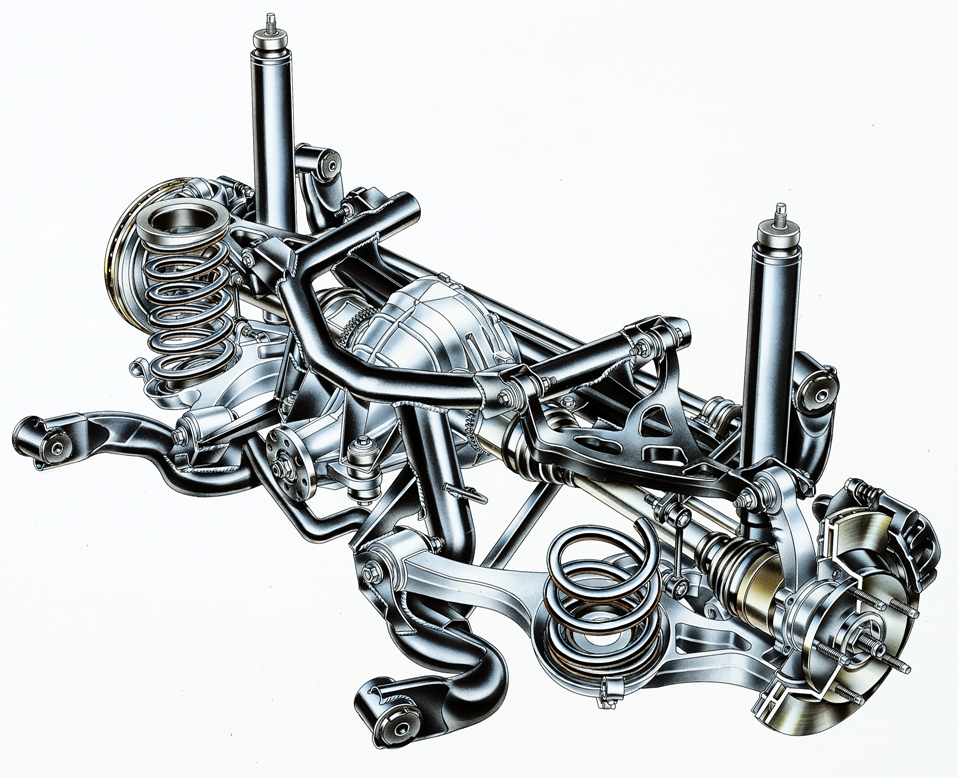 For many driving enthusiasts, the
Independent Rear Suspension (IRS) was a welcomed upgrade to the Cobra in
1999, but sadly enough, it only lasted through 2004.
When the New-Edge Cobra hit the market with
its new IRS, many of
us were thrilled that the antiquated stick-axle may have become a thing of the
past. Still, the naysayers complained that this IRS was worthless since it is an
assembly that had to be built around an "ancient" chassis. Sure that is the process that took place, but
any IRS is going to be an assembly of its own, so making this fit in to an
existing chassis doesn't change the fact that it was still more advanced than a
solid axle.
For many driving enthusiasts, the
Independent Rear Suspension (IRS) was a welcomed upgrade to the Cobra in
1999, but sadly enough, it only lasted through 2004.
When the New-Edge Cobra hit the market with
its new IRS, many of
us were thrilled that the antiquated stick-axle may have become a thing of the
past. Still, the naysayers complained that this IRS was worthless since it is an
assembly that had to be built around an "ancient" chassis. Sure that is the process that took place, but
any IRS is going to be an assembly of its own, so making this fit in to an
existing chassis doesn't change the fact that it was still more advanced than a
solid axle.
Unfortunately, compromises needed to be reached between the engineers, accountants, and customers, so as decent as the new suspension was in terms of handling improvements, it wasn't perfect. The bushing material had to satisfy the masses, but could still be tweaked for the better thanks to the aftermarket (stiffer bushings were also the norm in the 2000 R and Terminator, so all was not lost). For the dump-the-clutch crowd, the softer bushings also contributed to axle hop during hard launches thanks to the rebound effect contributed by the factory rubber. Definitely not ideal, but also easily remedied - especially with the right tires.
On a better note, the new IRS actually helped with the front-rear balance by adding weight (a fully assembled IRS weighs in at over 300 pounds, whereas the solid axle is about 200). There are still drag-racers, however, that insist on removing the heavier independent rear in favor of the lighter stick axle to further their cause. In this case, you would make an already nose-heavy Mustang even more biased towards the front, but that is the mentality of some people if all you care about is going fast in a straight line. If you appreciate improved handling, there is no denying the IRS is the way to go.
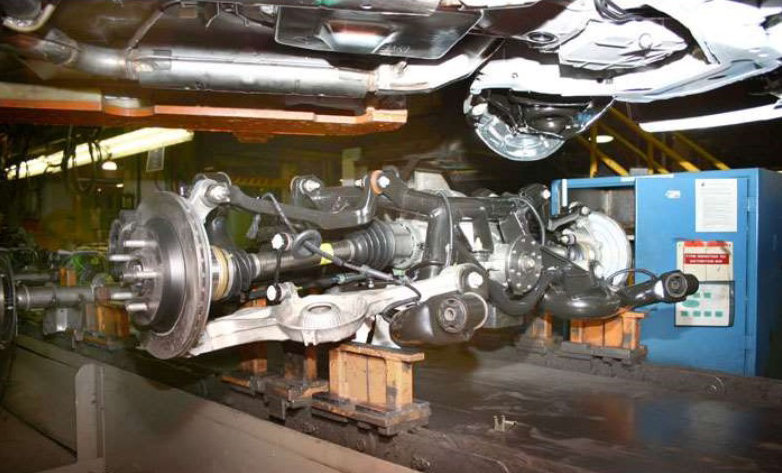
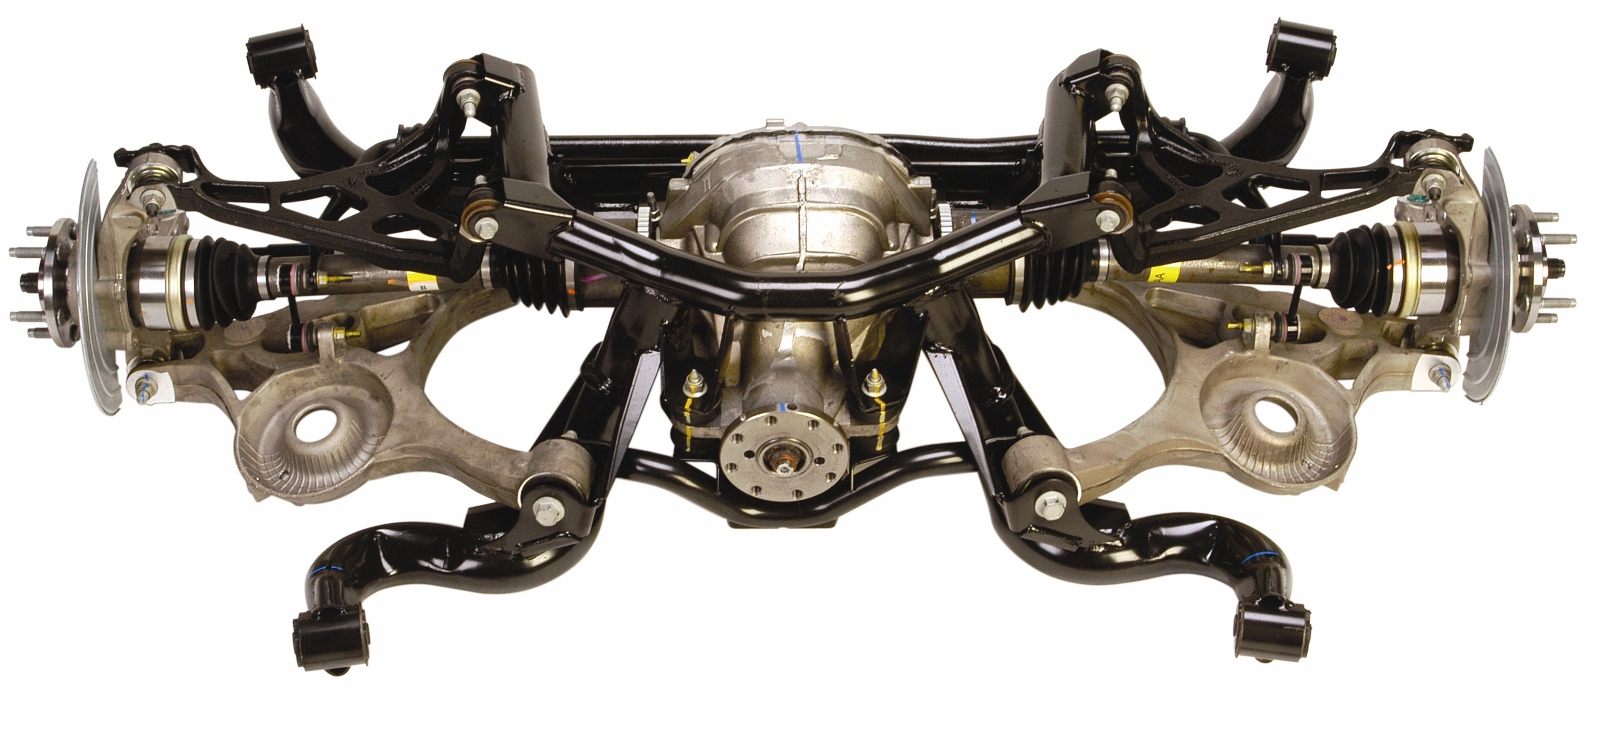
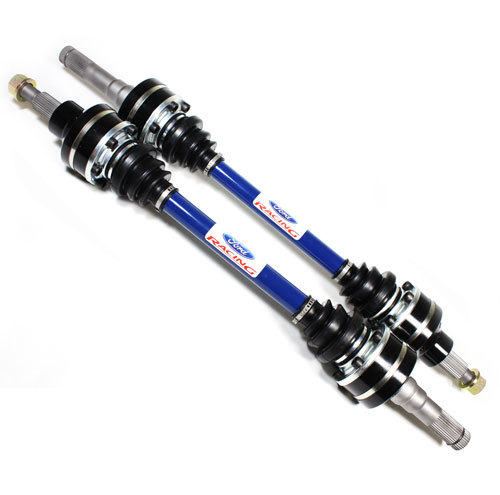
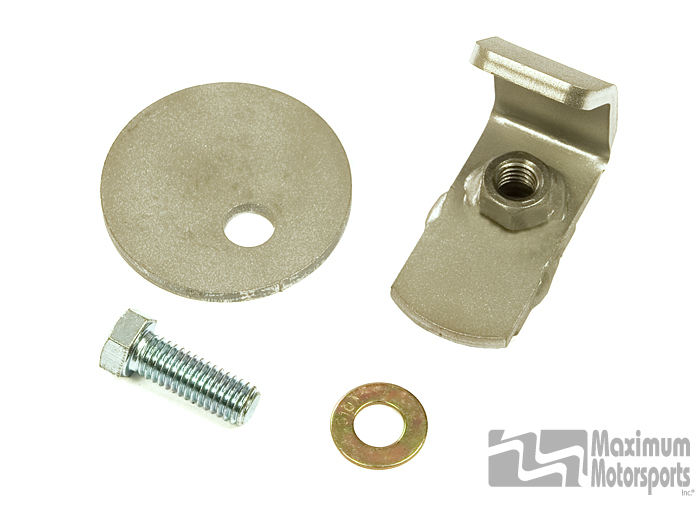
Note: The IRS was delivered to Ford as an assembly, with the cradle beginning its journey at Benteler Automotive in Livonia, Michigan. The complete rear was assembled, aligned, and even better - easily adapted to the DAP assembly line just for the Cobra. It was also briefly available through Ford Racing as M-5564-A (also shown at the top of this page), but if you are looking to retrofit one in to a solid-axle Mustang, you are now left scouring the used market or finding some misguided Cobra owner that thinks his car will be better off without an IRS.
Even when the S-197 chassis made its debut in 2005, the rumors were that it would also get an IRS, but once again, the solid rear returned. If you want to believe what is on the internet, there is an article that supposedly uncovers a "lost IRS" that was specific to the then-new Mustang, but who knows if it was the real thing. It didn't ultimately matter since it never made it to production, most likely due to its cost. Fortunately, Ford has seen the error of their ways, and the 2015-up S550 Mustang's new suspension includes an IRS - a huge boost for "real world" driving.
As for the Terminator, some changes did find their way in to the 2003 IRS that improved it from its first version, so that was a step in the right direction. Notably, the half-shafts were beefed up to handle the increase in torque and featured an increased spline count - 31 compared to 28 - on the inner stubs (actually, a change in '01 to the inner splines). They were also now mated to 3.55 gears rather than the previous 3.27 set used in '99 and '01. The bushings were upgraded all around and the front differential brace had additional flanges to hold the forward end of the differential more solidly. Finally, the sway bar came in 1mm thicker at 26 millimeters.
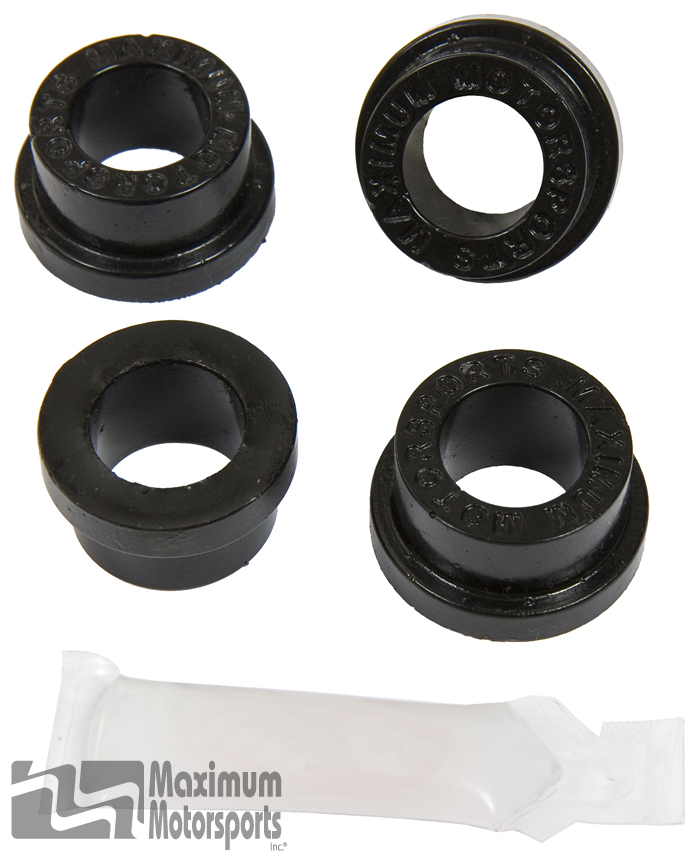
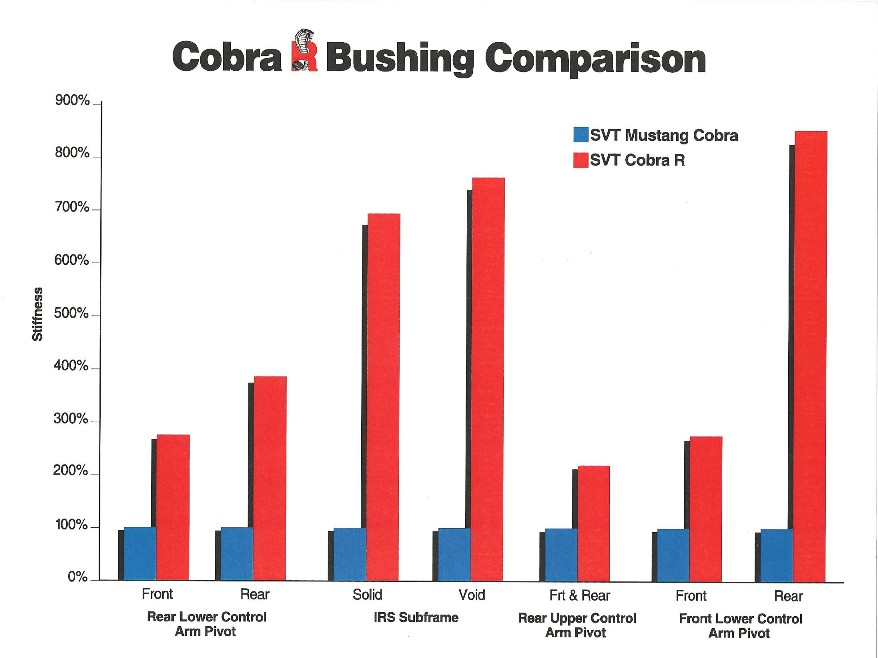 The
thumbnail on the left
shows an interesting comparison between all the bushings on the
2000R vs. the
'99/'01, including the IRS. For what it's worth, a friend at SVT stated that the
Terminator bushings were "close" to what went in the
R, so that was somewhat of a good sign, even if they are still rubber. No matter
what, even if you are someone who has stayed with a
completely stock IRS just to enjoy comfortable cruising, or if you've modified
it suit your own tastes, there is just no denying that it is still a big upgrade
over a solid axle! All these items are also mentioned on this page and elsewhere on
my site, so read on and see how I've improved my own IRS and suspension.
The
thumbnail on the left
shows an interesting comparison between all the bushings on the
2000R vs. the
'99/'01, including the IRS. For what it's worth, a friend at SVT stated that the
Terminator bushings were "close" to what went in the
R, so that was somewhat of a good sign, even if they are still rubber. No matter
what, even if you are someone who has stayed with a
completely stock IRS just to enjoy comfortable cruising, or if you've modified
it suit your own tastes, there is just no denying that it is still a big upgrade
over a solid axle! All these items are also mentioned on this page and elsewhere on
my site, so read on and see how I've improved my own IRS and suspension.
Note: An IRS was also contemplated back in the 1960's, but thanks to the bean-counters, it was squashed. The creator of the early version, a Ford engineer named Klaus Arning, actually developed his rear suspension to bolt in to the existing chassis with some minor modifications. Does that sound familiar? If you'd like to see more of this IRS, especially with a modern twist, check out Mustang IRS, courtesy of Duane Carling. There is also a neat YouTube video with a resurrection of one of the original 1965 GT-350's that is getting an IRS - just the way it should have been!
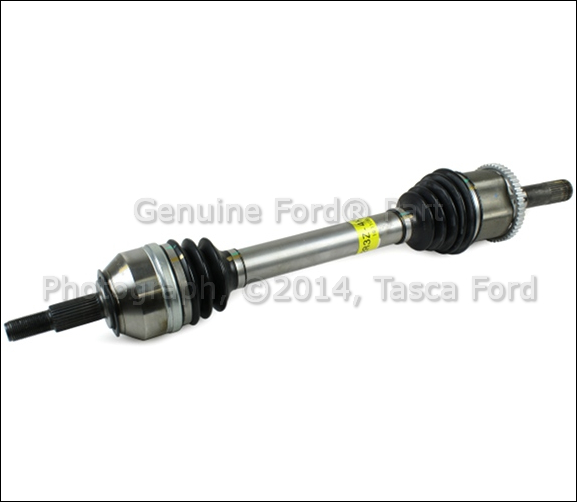 I actually should have placed this section
on my Drivetrain page, but it segued nicely here
after referring to the S550 IRS. As mentioned
previously, the half-shafts (made then by GKN Driveline)
were "improved" on the Terminator, and since I'm not a drag-racer, I never had
any issues with them breaking due to high-RPM clutch dumps. Fortunately, if a
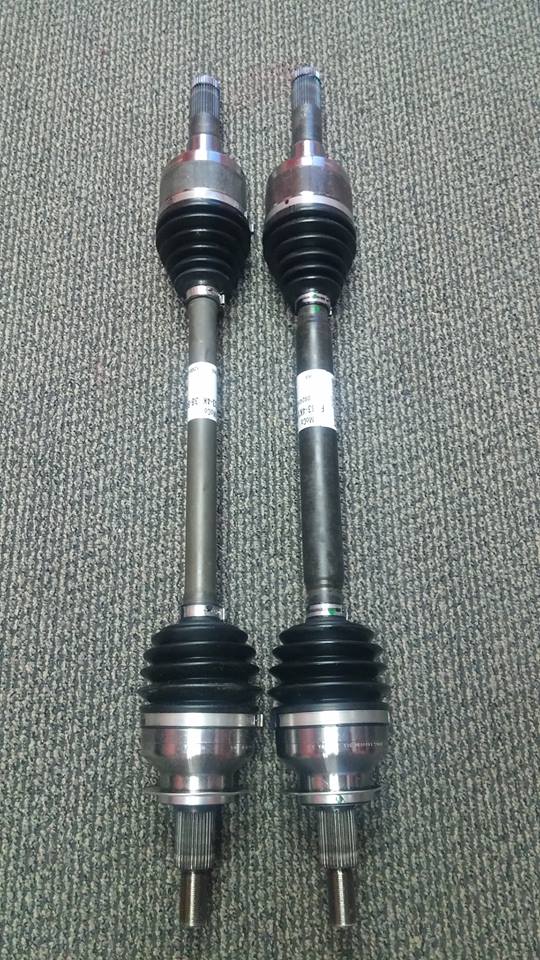
replacement is needed, you can continue to buy them from Ford as 2R3Z-4K138-AA
(shown in the thumbnail image with permission from Tasca
Ford). I did tweak my own slightly by
applying a coat of POR-15 silver to them (they are bare steel and rust
otherwise), so they at least they looked a bit nicer, but that is it. Otherwise,
I do have a few gripes...
I actually should have placed this section
on my Drivetrain page, but it segued nicely here
after referring to the S550 IRS. As mentioned
previously, the half-shafts (made then by GKN Driveline)
were "improved" on the Terminator, and since I'm not a drag-racer, I never had
any issues with them breaking due to high-RPM clutch dumps. Fortunately, if a
replacement is needed, you can continue to buy them from Ford as 2R3Z-4K138-AA
(shown in the thumbnail image with permission from Tasca
Ford). I did tweak my own slightly by
applying a coat of POR-15 silver to them (they are bare steel and rust
otherwise), so they at least they looked a bit nicer, but that is it. Otherwise,
I do have a few gripes...
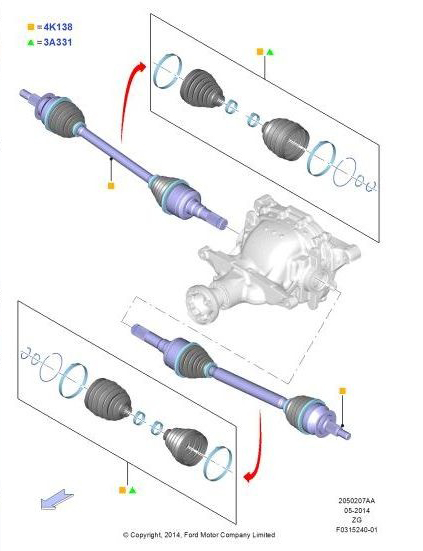
One significant improvement did find its way in to the 2015 IRS that New Edge Cobra owners completely lost out on: half-shafts that are unique to each side. Ford actually took a page from the GM playbook of the '09-up CTS-V, and by varying the diameters and weight, their oscillation frequencies were changed. This essentially eliminates the wheel hop by ensuring they don't wind-up and release at the same rates of the identical shafts. Here's a quote from a GM engineer that sums it up nicely:
“Cars with independent rear suspensions and a limited-slip differential are naturally prone to an oscillatory motion between the two half-shafts. They’re like springs that you wind up, and because they have the same rate [of movement], as you unwind one, it transfers torque to the other, which sets up a ringing effect (resonance). By adding a larger, stiffer half-shaft to the left side, it stops the ringing, or the oscillatory windup, that leads to axle hop.”
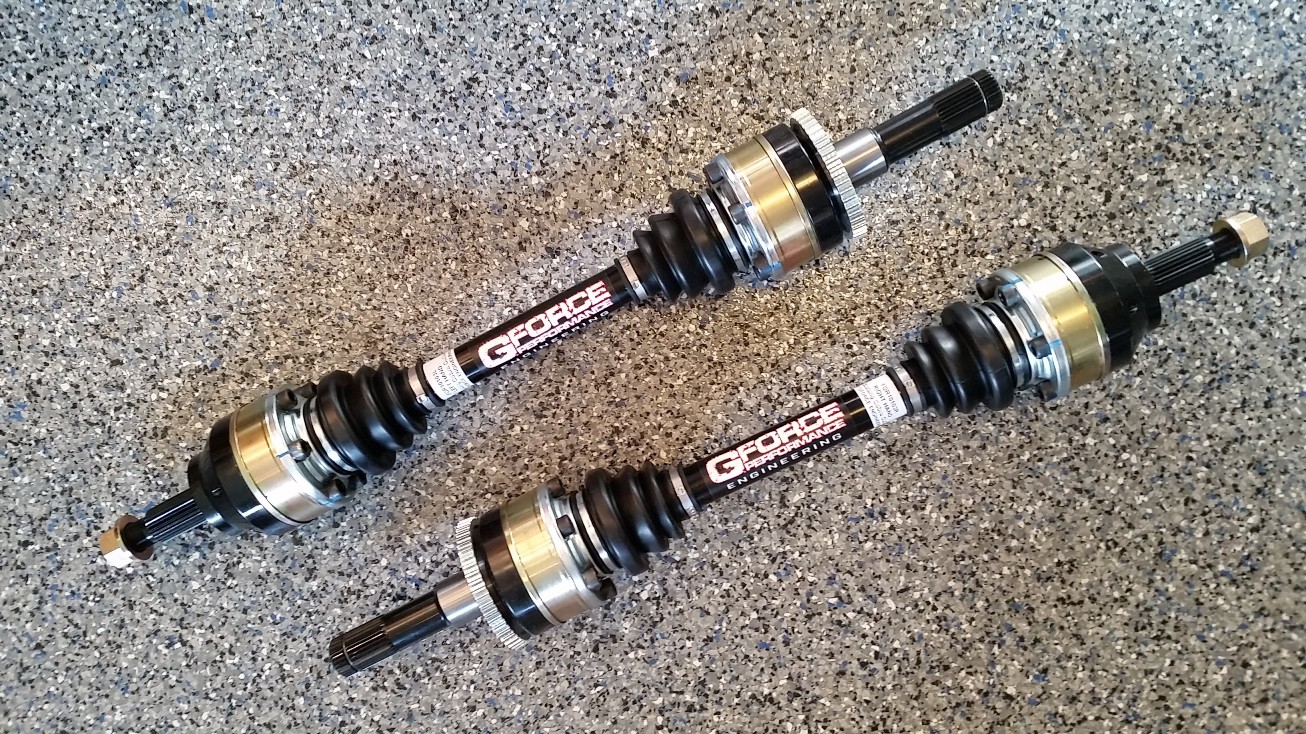
The Ford parts catalogue illustrates the newest half-shafts correctly, and a picture of a 2015 IRS display clearly shows the new axles. Ford Racing also stepped up and is offering higher-strength versions for hardcore racers (sorry, no solid axle unless you splurge for a new Cobra Jet). The upgraded parts are actually made by G-Force Engineering, and sold for the S550 as M-4130-M (compare them to the OEM 2015 axles). Interestingly enough, Ford Racing did sell a kit at one time that featured unequal diameter half-shafts, but it was only for the Focus RS.
On a good note, there is now a direct bolt-in (and lifetime warrantied!) kit available from G-Force for the IRS Cobra to compete with the other versions from the Driveshaft Shop. These new axles, FOR10103A, started shipping in late November '16 and they are nice! Oddly enough, their shaft diameter differences are almost non-discernable to the naked eye, but it is there, making them side specific and no doubt an upgrade (one has an OD of 33mm, the other 35mm). Pictures of mine are below, complete with billet ABS rings, but for another look at them being installed, catch this Ultimate Axles article courtesy of Wes Duenkel. After you read it, get ready to break out your credit card!
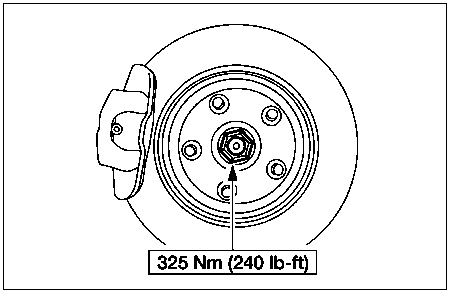
Back to the OE stuff, it is also too bad Ford used a single part number for the half-shafts since an issue that arises frequently involves the retaining nuts: the passenger side can loosen thanks to torque at the wheel, which can wear the bearing and damage the hub. This is a problem that could have been solved had Ford put left-hand threads on its outer stub, but that would have then meant shafts that were not interchangeable. Even with the unique part numbers for 2015, Ford managed to use a right-hand thread on both ends - what a loss. Generally, a blast to 240 ft/lbs (yes, that is correct number) will do the trick for us, but they still should be checked on a regular basis.
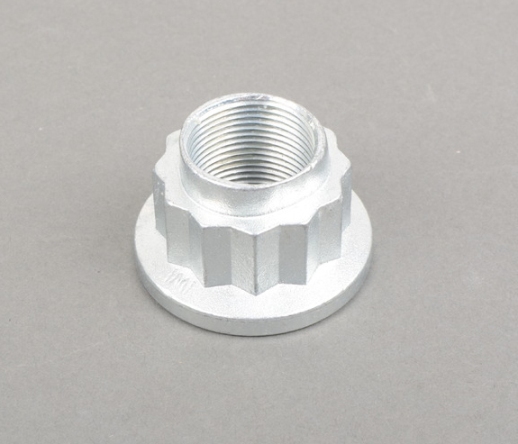
Note: If you also happen to need a spare set of the retaining nuts, Ford does still sell them: they were previously available under part number FOSZ-4B477-A, but have been updated to a more robust "nylock" version as W707772-S441. For useless trivia, they have an M24-2.0 thread pitch, and a 36mm hex. I had tried these new nuts for about two years, and can report that they never budged while in service. Several friends are also using them with positive results, so it appears they are a worthwhile upgrade. The Ford nuts, however, will not fit the G-Force shafts which use a Porsche-standard M24-1.5 thread, with the supplied nuts actually sourced from Nissan. To be on the safe side, I again upgraded to a locking version, which were acquired from Porsche as their WHT 006-779. They do have an odd 32mm 12-point hex, but that socket is easily found at most auto parts stores.
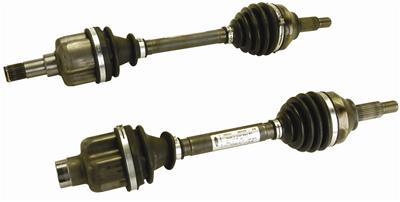
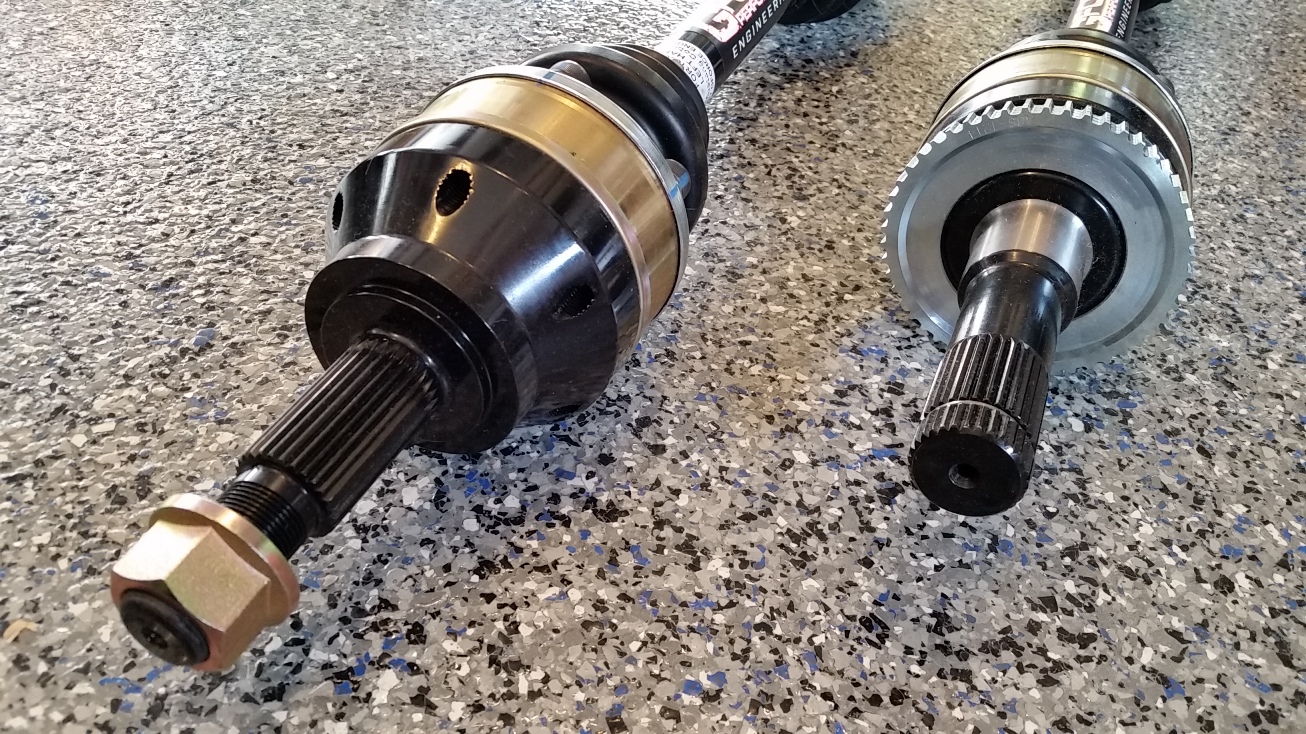
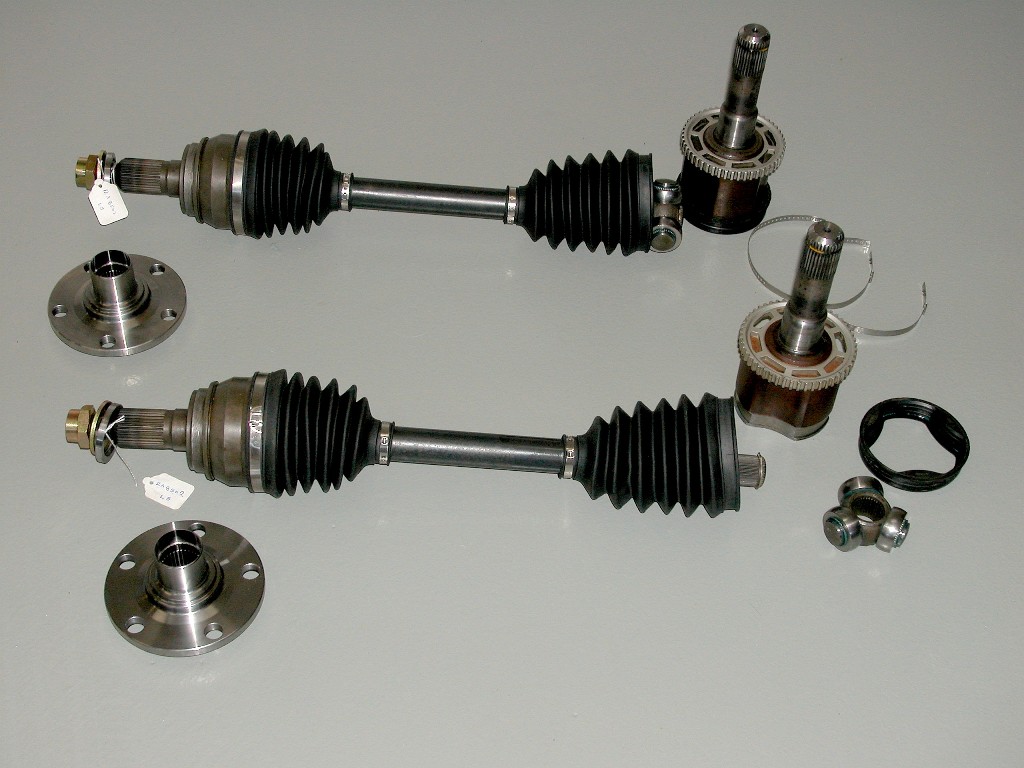
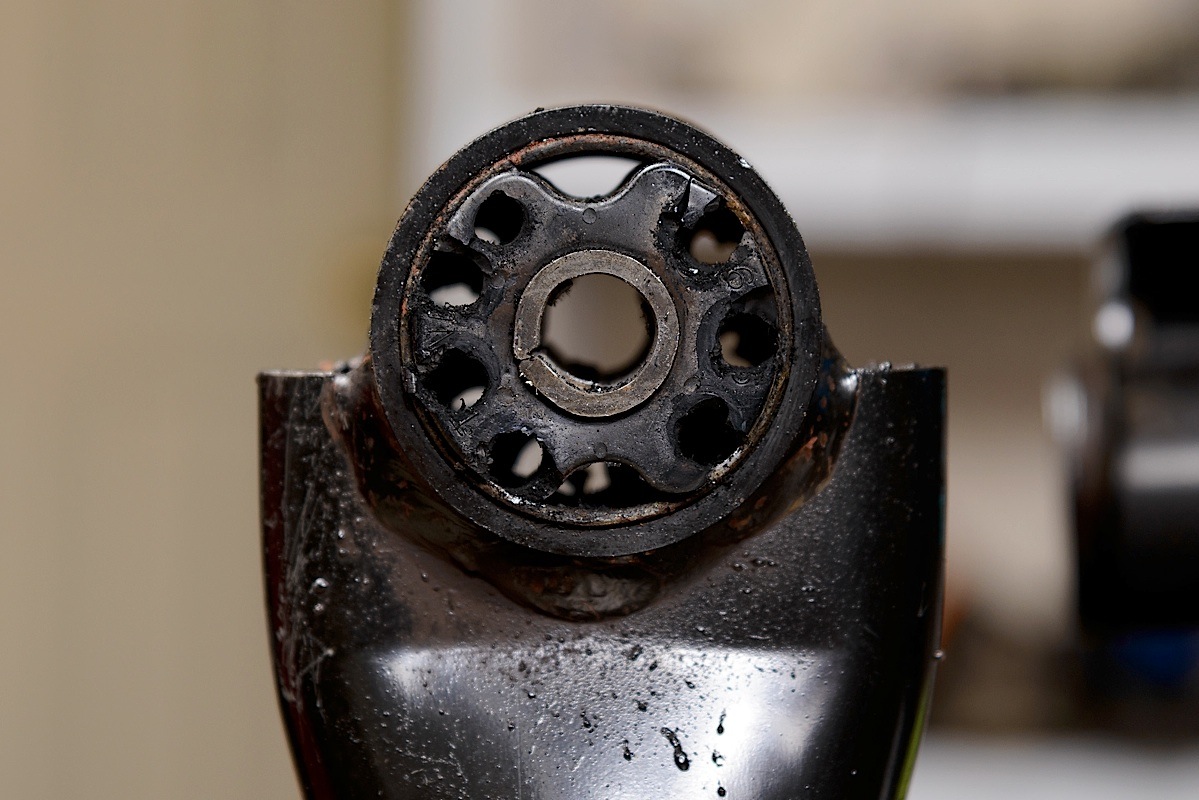
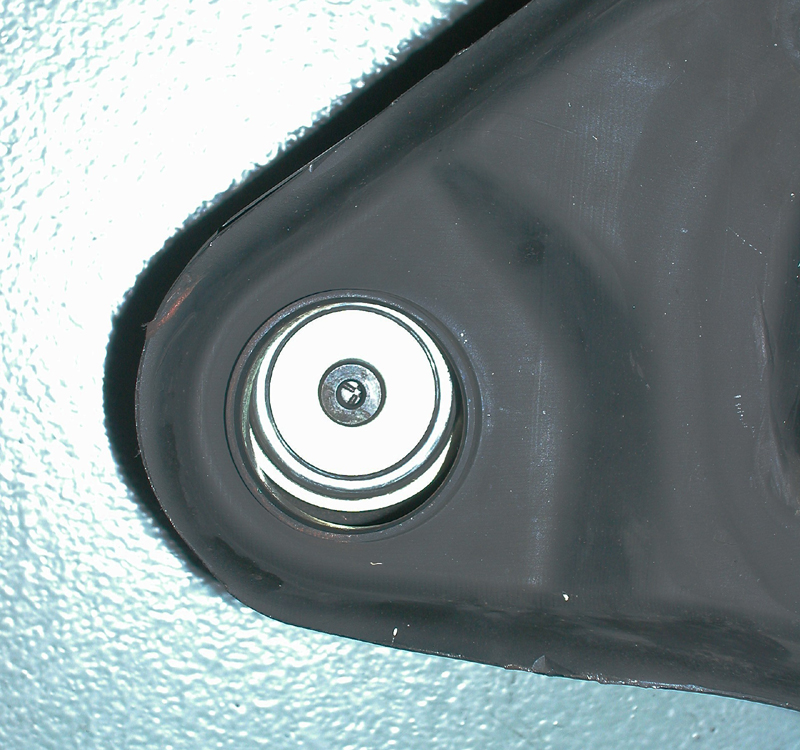
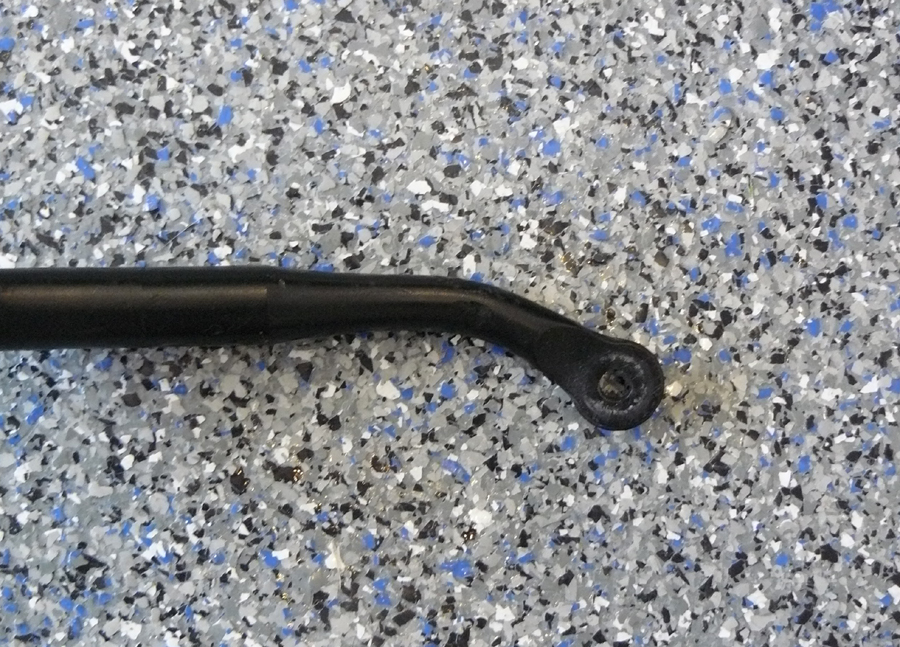
A final nuance of the stock axles that I wouldn't consider bad but just inherent due solely to their design: a "clunk" that can occur as the inner and outer constant velocity, or "CV" joints compress or expand (not to be confused with the IRS cradle clunk mentioned further down this page). Unlike a tie rod end that is of a fixed length, the axles actually lengthen slightly as the suspension compresses and rebounds (think geometry and a right-triangle). Without the ability to do this, the control arms would bind and the camber curves would change as the spindles traveled up and down. Additionally, there is a very slight amount of play where the inner stub meets the differential, so that end can occasionally knock against the housing as well.
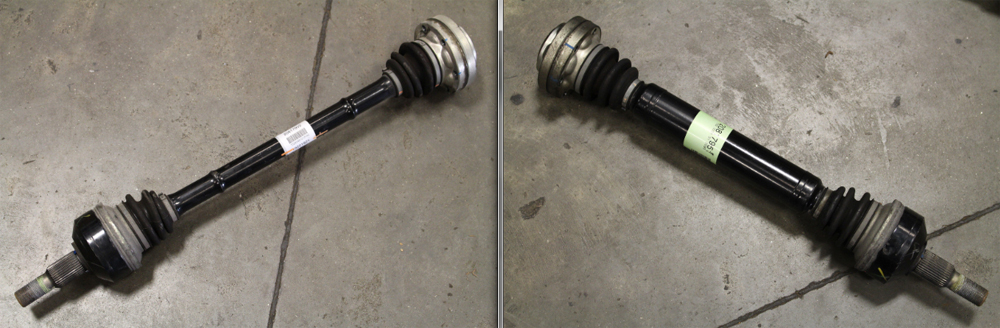
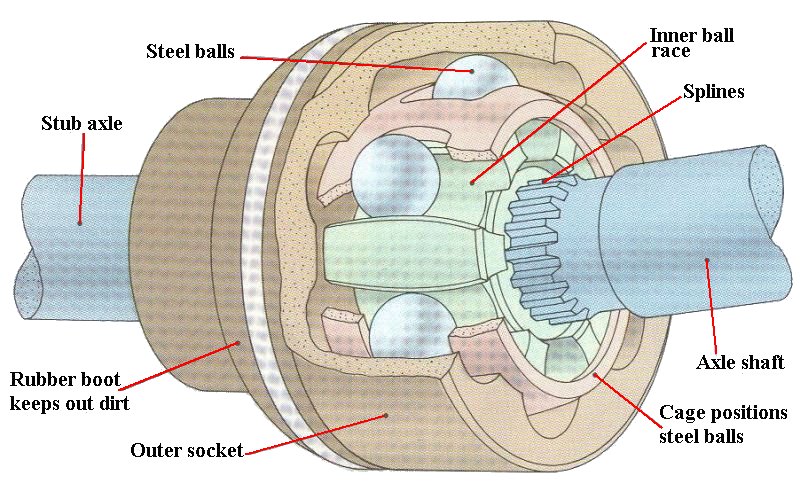 Since
the shafts are meant to articulate with the suspension movement, they are built
with this play in the "tripods". If you've ever had one laid out horizontally,
you may have noticed that you can hold either end and actually force them in and
out a very small amount which can make them clunk (you never want to pick one up
solely by an end though!). For reference, the thumbnail image shows an example
of how the CV's are seated in the housing while being secured on the inboard end
of the axle shaft. Those in the Cobra are actually "tripods", however, and can
be seen in a partially disassembled
DSS set, courtesy of my
buddy Tony (his outgoing pair - being replaced by the G-Force version as well). Once the tripods are seated, the socket and
axle are
essentially only held
together by the boots, so again, don't pick them up by their ends. As strong as
they can be, they do have their limits.
Since
the shafts are meant to articulate with the suspension movement, they are built
with this play in the "tripods". If you've ever had one laid out horizontally,
you may have noticed that you can hold either end and actually force them in and
out a very small amount which can make them clunk (you never want to pick one up
solely by an end though!). For reference, the thumbnail image shows an example
of how the CV's are seated in the housing while being secured on the inboard end
of the axle shaft. Those in the Cobra are actually "tripods", however, and can
be seen in a partially disassembled
DSS set, courtesy of my
buddy Tony (his outgoing pair - being replaced by the G-Force version as well). Once the tripods are seated, the socket and
axle are
essentially only held
together by the boots, so again, don't pick them up by their ends. As strong as
they can be, they do have their limits.
Now that the warm weather of 2018 has arrived and I've had the chance to get behind the wheel with the new gear, I have to say the G-Force half-shafts rock! Keep in mind that I couldn't care less about drag racing, but when still jumping on it (having fun, but doing it safely, of course), the rear end definitely stays planted. While I've generally had no real complaints about wheel hop thanks to good tires and a multitude of other IRS upgrades, I did have some concerns about how the rear would react with a new Whipple supercharger (see my Engine page for all those details). No worries now since these axles will take whatever I'd be able to dish out. As an added bonus - making them even more so worth every penny - there is absolutely no more of the clunk!
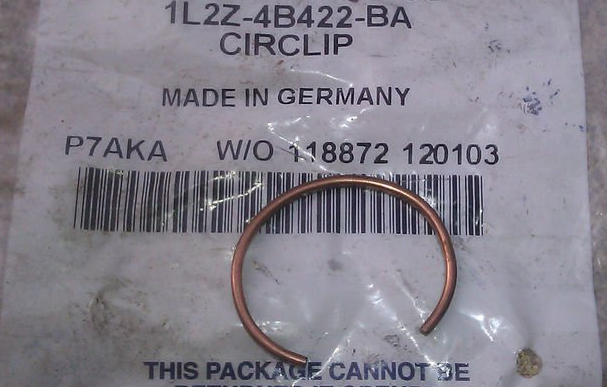
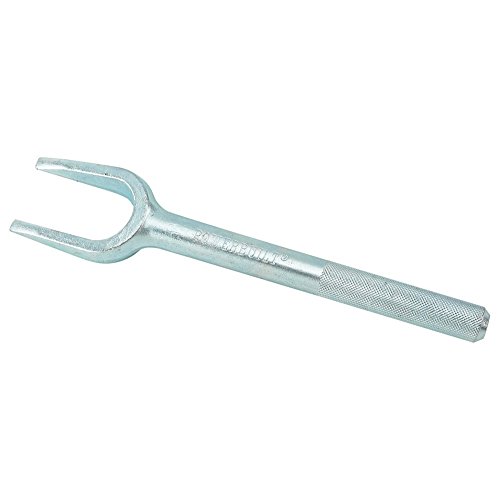
Note: Whenever you have a shaft pulled, it is a good idea to check those snap rings, or "circlips" on the inner stubs (no, they are not "C-clips"). There had been a rumor that the inner grooves of the traction-lock carrier could have been machined incorrectly, making the snap rings fit extremely tight (and susceptible to damage when they come out), but I have never been able to confirm that. My $0.02 is that since some rings are made from flat stock - like the ones I had - it causes them to catch on the inner groves, hence the extra force needed to extract them. If you have those, grab another set from Ford, 1L2Z-4B422-BA, which hopefully are a round wire and will allow the axles to come out much more smoothly. If you still have trouble, a 1-5/8" tie rod separator, such as the PowerBuilt 647056 works great. You can rent the AutoZone set with that one in there, or buy one of your own for the tool stash: a couple taps with it between the differential and hub will pop the axle right out!
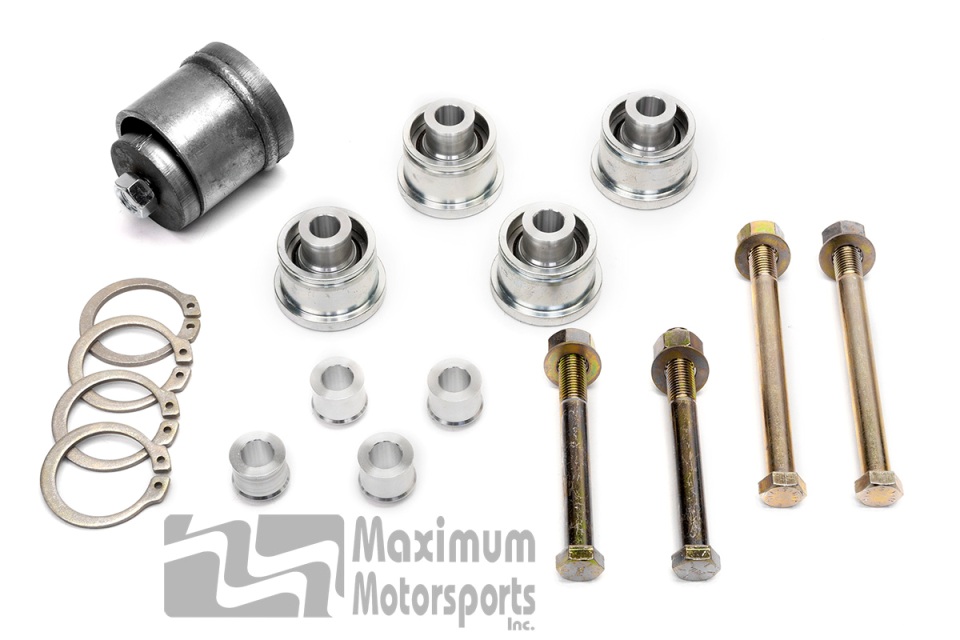
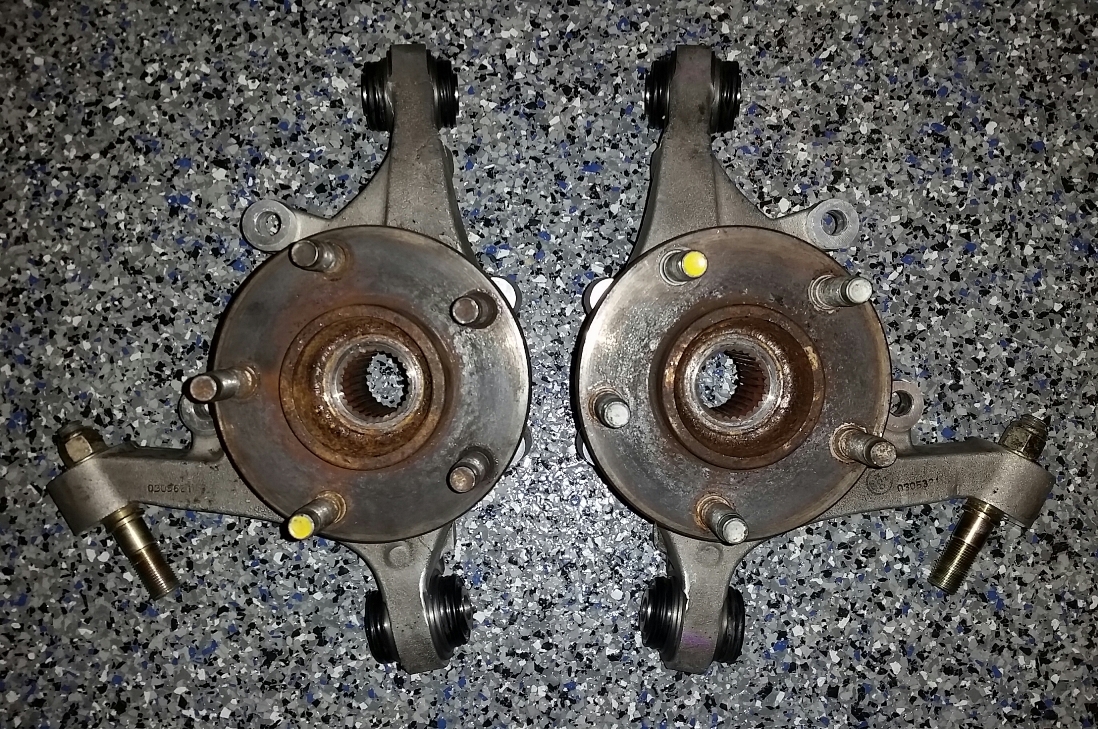
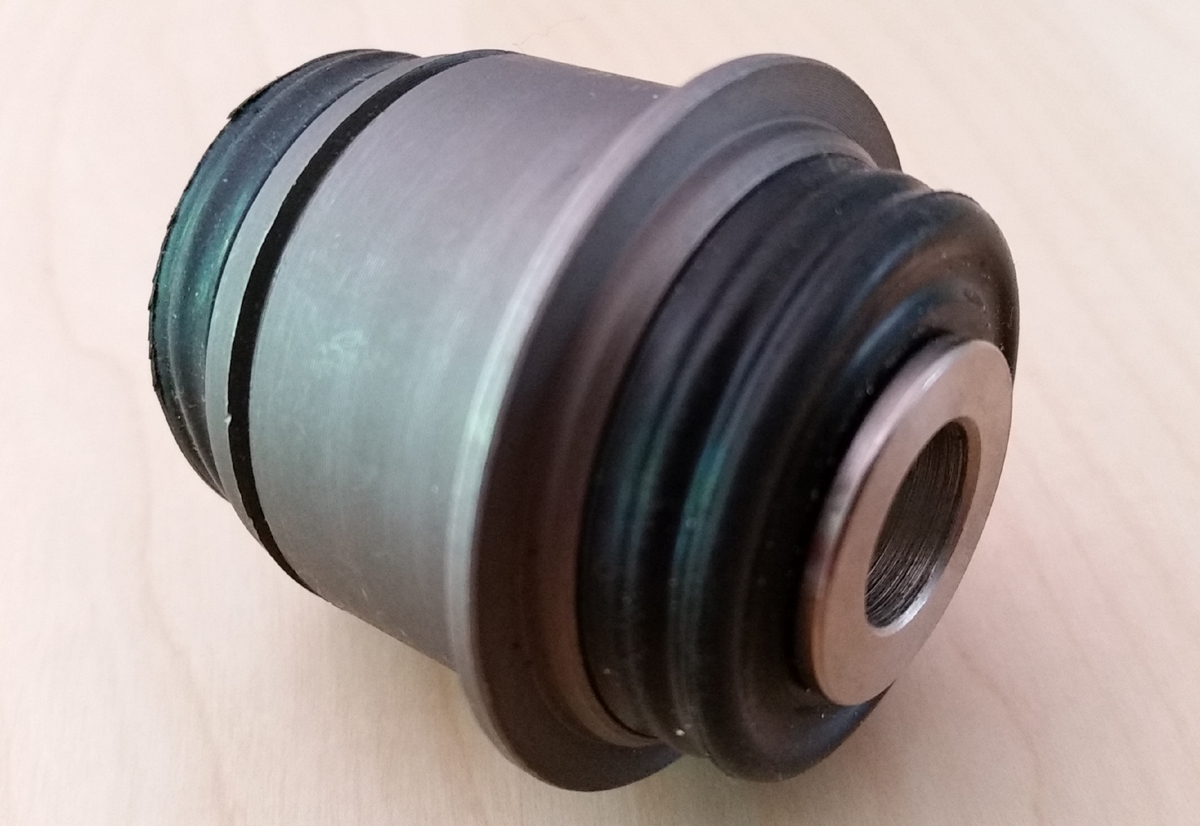
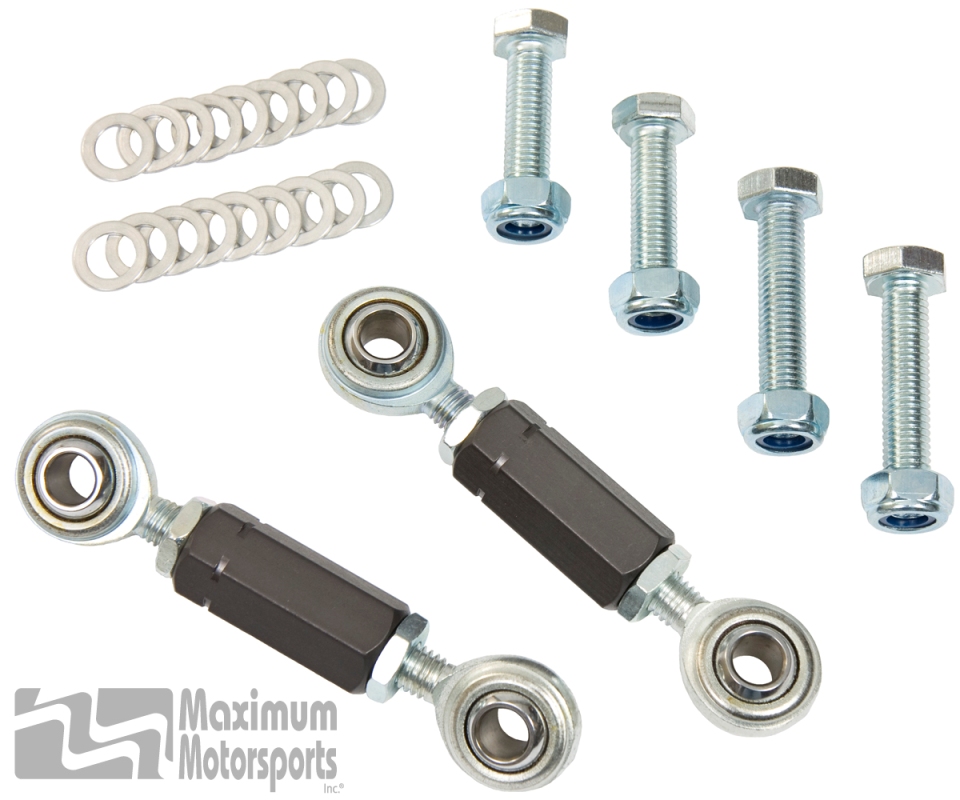
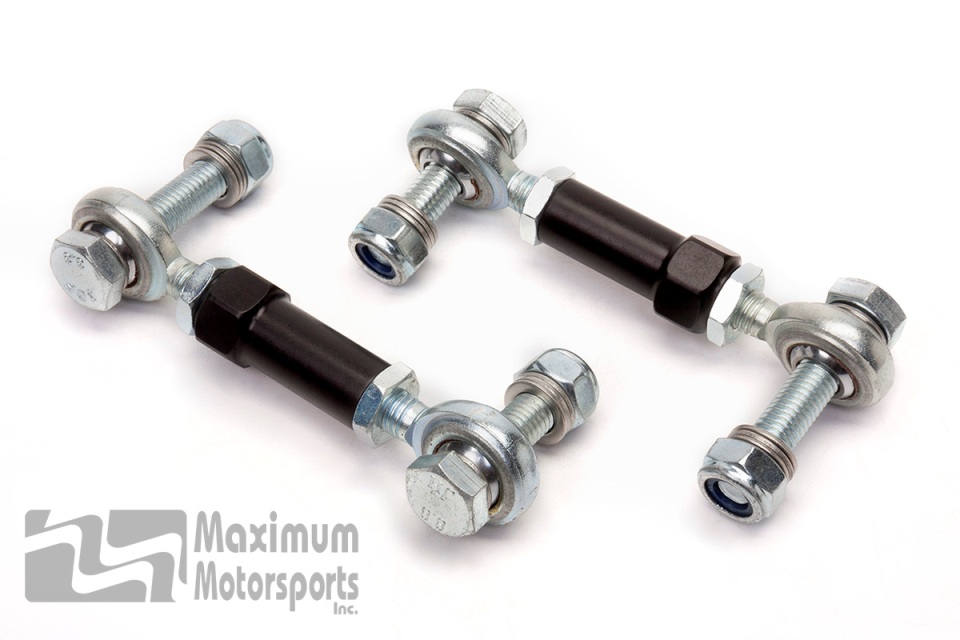
One occasional hurdle that many IRS Cobra owners come across is the need to replace "Cross-axis" joints. These are the ball-joint-like locating points supporting the rear spindles, or "knuckles", at the outer end of the upper and lower control arms. At one time, one would have to buy the new spindle to replace the joints, but fortunately, there are aftermarket solutions that will take a load off your wallet.
The first - in a complete kit with tools - is available from Maximum Motorsports under their part number MMIRSB-3 (below, left). As usual, anything from MM is of the highest quality, and you aren't going to go wrong stepping up to these heavy-duty units. Even though they are still a bit pricey, you can expect them to last since they based on heim joints like many of their other components. For more details on them, MM always puts out nice instructions that will answer any questions one might have, along with the information always available on their web site.
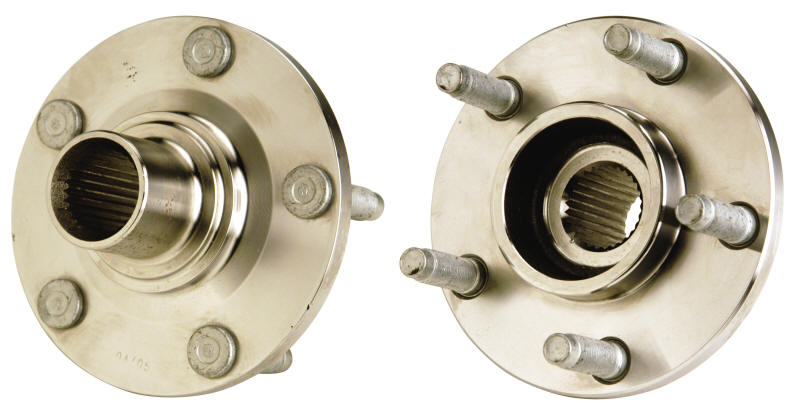
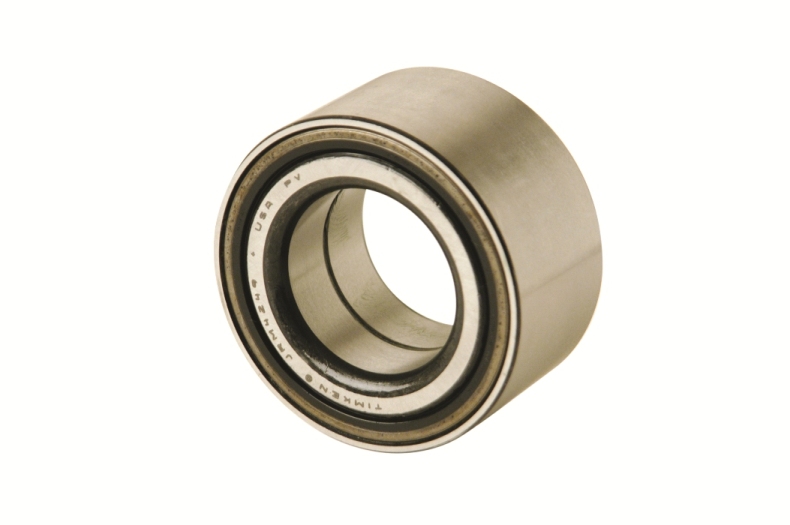
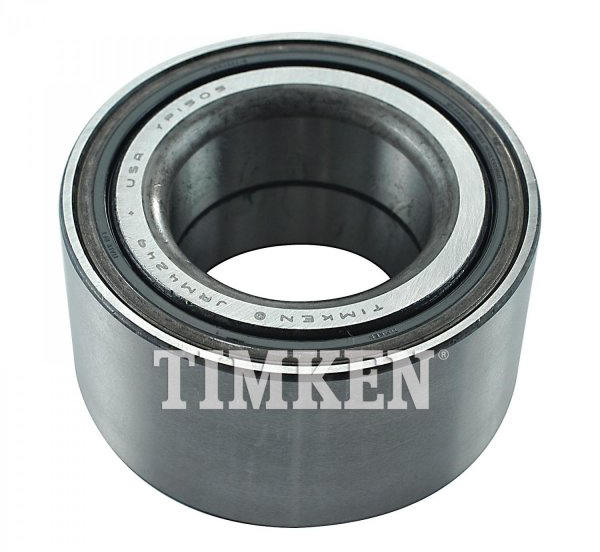
Note: The OEM spindles are still available from Ford and come complete with cross-axis joints as well as the hub and bearing. The part numbers for them are 2R3Z-5A969-AA (L) and 2R3Z-5A968-AA (R) - which retail for almost $700 each, but can usually be found for under $500 online. If yours are fine, it is worth it to go ahead and replace the bearing, and depending on the circumstances, the hub, when you have everything apart. While the hubs are obsolete from Ford, you can still get them through Ford Racing as M-1109-A for about $150 each. The bearings are still sold through Ford under E9DZ-1215-A or also through Ford Racing under M-1215-A. The former goes for about $75, the latter comes in around $50. If you want to save even more cash, check Timken SET49: those can usually be found for less than $30 each and are the same ones packaged through Ford.
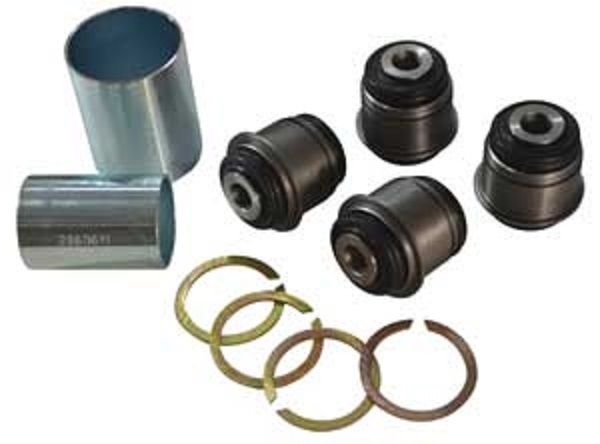
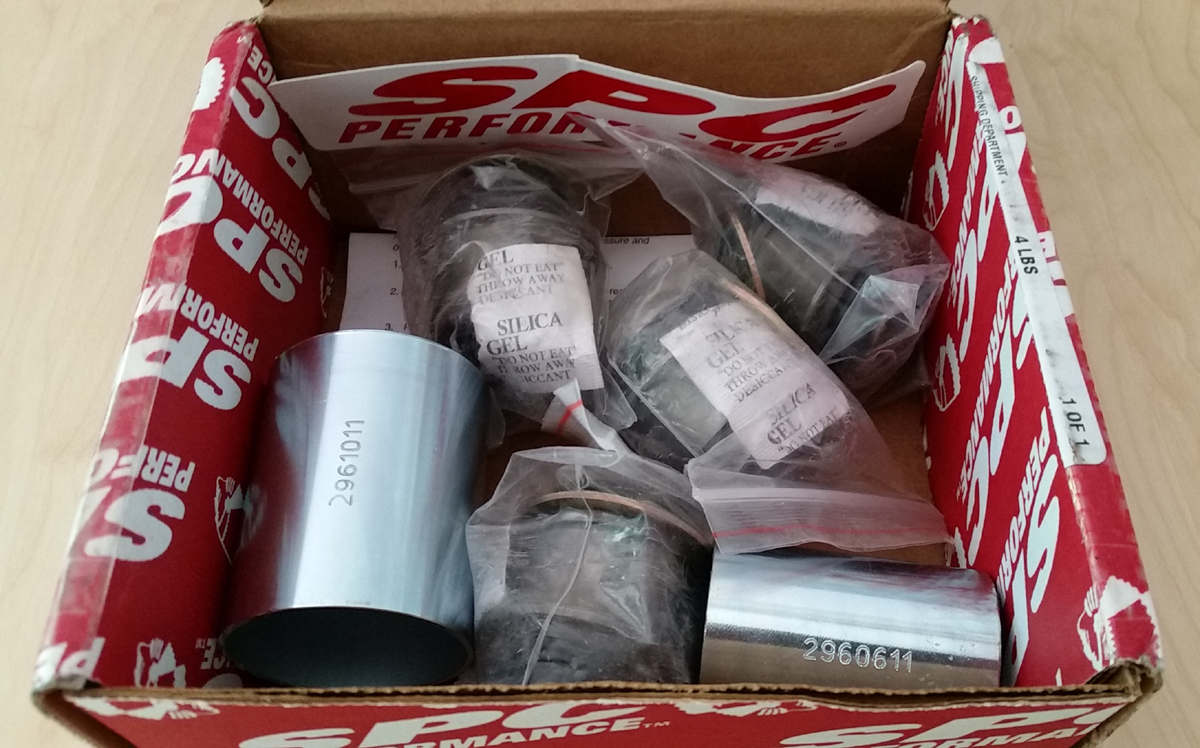
Another kit, which is more of an OEM replacement (and won't hit you as much on the financial end) is from Specialty Products Company. This one, sold like MM's, is available under their part number 72062 (above, right). As a bonus, if you need them individually, that part number is 15645 for each. At about $200 for the complete set, which is about half the cost of the other, it is a heck of a bargain. One point to make when it comes to one of the differences in each: note that SPC includes dust boots on theirs whereas MM does not. While they aren't a must-have, it is still a nice feature to keep crud out and extend their life.
That being said, I put my money where my mouth is and was glad to pick up one of these kits to install along with the new half-shafts. While SPC supplies press fixtures, you'll have to get a bit creative to make them work, but it's nothing that any decent mechanic can't figure out with their instructions. If you are fine with parts that are even better than the Ford originals, this is a great option for sure.
While the installation didn't give me too many headaches, my only gripe came from the snap rings: I actually broke two, which caused a bit of a delay in the project. It wasn't that big of a deal since SPC recommends the Grainger 5DU41 as a replacement (which are more compatible with snap-ring pliers), so I ordered a pack and installed them easily. With these new 'joints', including bearings, my spindles turned out good as new. They are another part that I'm confident is going to be a great bang for the buck and will go a long way to contribute to a finely tuned IRS!
Note: In order to use any of these cross-axis joints, the car needs to have been upgraded to post-'99 spindles that retain the joints with a snap ring. That shouldn't be a problem for most since Ford recalled the original '99 and '00R spindles (NHTSA 01V121) and updated them long ago, but there are always stragglers that don't take care of these things. Not to worry though, it is easy to confirm you have the new ones - which were original equipment starting in '01 - by checking out the IRS Upright ID document thanks to Maximum Motorsports. The complete kit is also sold as 1R3Z-5B706-AA, which is an even better deal than buying the spindles individually.
One of the great debates when it comes to aftermarket suspension components that never seems to end revolves around what bushings are appropriate, or the "best". From the factory, we get the compliant rubber that is meant to make the public happy, but again, have plenty of shortcomings when it comes to performance driving. If you want to make the IRS even better, there is no doubt upgraded bushings will be a great start.
With that in mind, you basically have two choices: polyurethane, or a slightly harder "plastic" material. I used polyurethane going back to my Fox Mustang days, and never had any issues or complaints, so this was the exact route I took with the new suspension. My control arms articulate completely smooth, are noise free, and have absolutely zero play that would indicate bushing wear. As a matter of fact, after over six years, the bushings still look good as new.
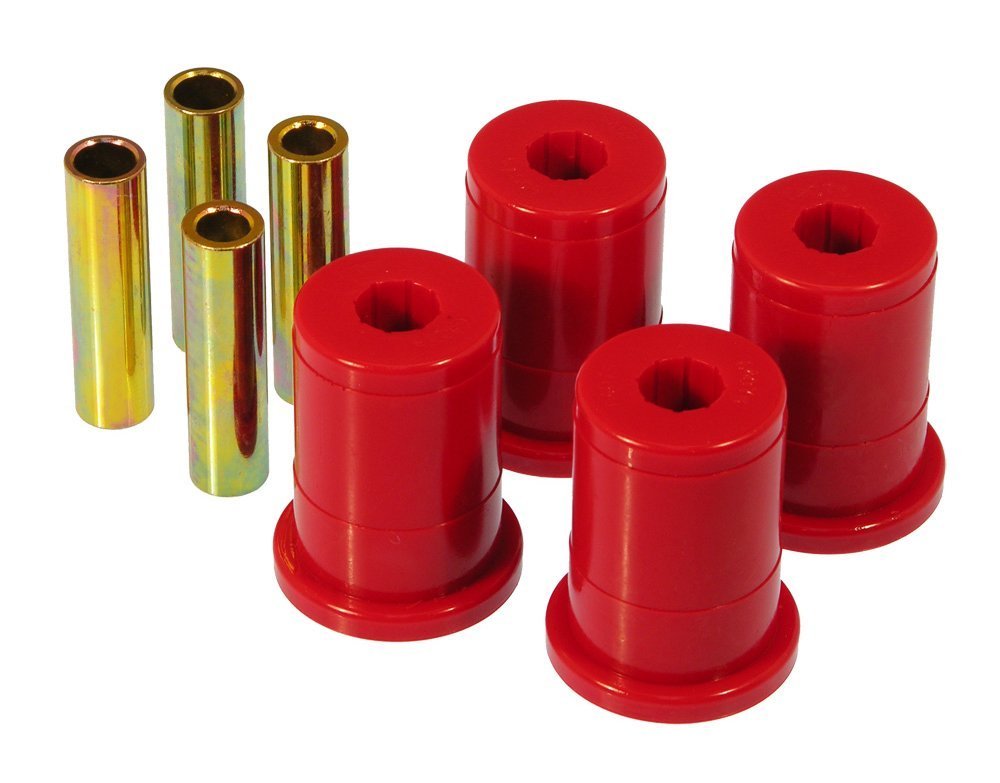
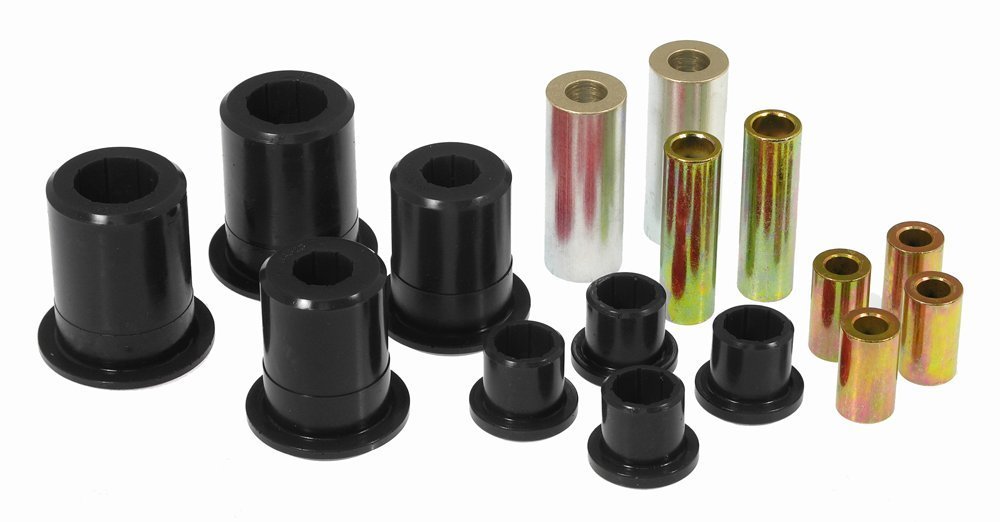
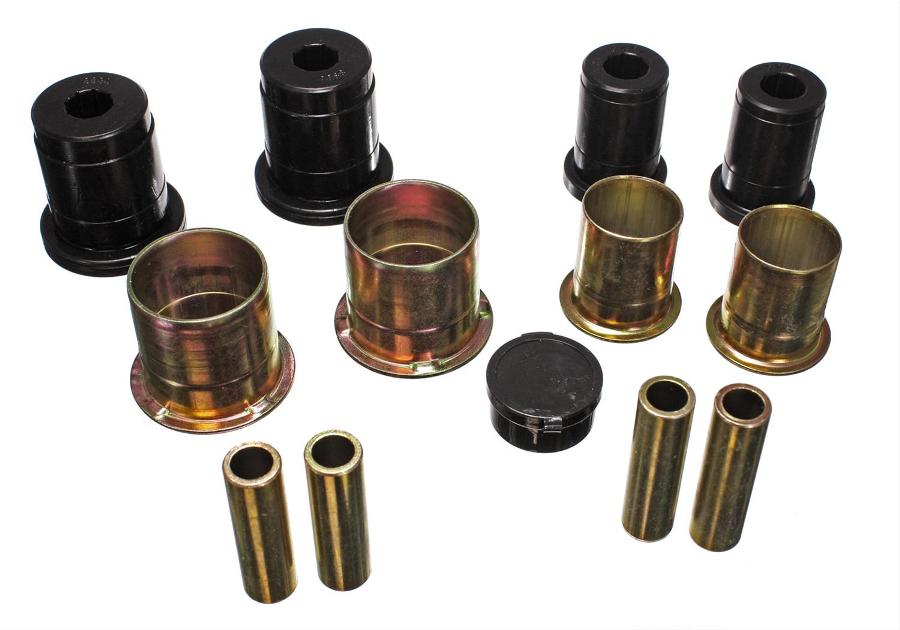
If you chose polyurethane, you have an additional choice in the material made by Prothane, or Energy Suspension. My prescription here is simple: Prothane makes a harder bushing, and it is much more suited for the IRS than the softer poly sold by Energy Suspension. This includes not only the control arms, but the IRS cradle, differential mounts (mentioned on my Drivetrain page), and even the sway bar. Why exactly is this? Well, it is simple if you place a premium on handling: stiffen the rear end if you want to reduce the under-steer. Even better, the firmer bushings also help keep the rear planted to tame the wheel hop. The pictures below are from Prothane, with the red cradle bushings (6-112) on the left and the black control arm set (6-311) on the right.
If you want to believe the forums and fall in to the marketing hype that Delrin is the "only" way to go since poly is only "marginally firmer" than rubber, then knock yourself out. I can assure you, however, that an upgrade from OE rubber to poly is still going to provide a noticeable difference in handling, just as it would if going from rubber to Delrin. Still, it never ceases to amaze me how many "experts" will state that Delrin is proof that something like poly is "junk", especially when most have never actually used the material. Yes, there are a lot of parrots on some of the forums out there! If I was a hard-core road racer, I'd probably even consider Delrin as well, but for the street, I have absolutely no complaints with polyurethane. I can actually enjoy the ride, and when the driving gets a bit aggressive, the rear end stays planted.
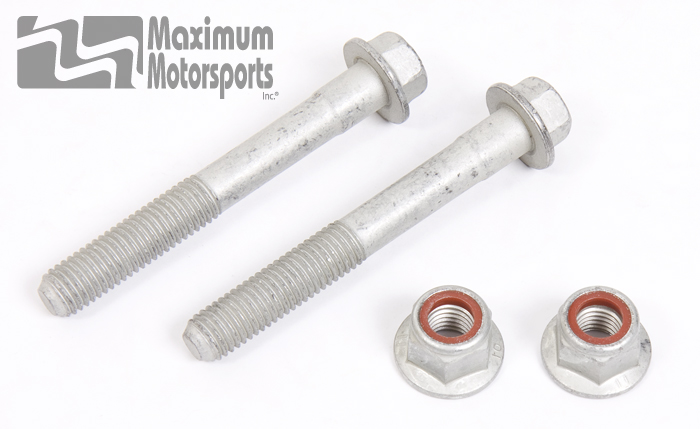
Note: Most, if not all IRS Cobras came with front IRS cradle bushing bolts that have a 12mm diameter and are too small to hold the ends firmly in place - especially with the factory bushings. This is the other part of the infamous "Cobra clunk". Fortunately, Ford sells 14mm bolts that are a perfect fit and can be obtained inexpensively. The bolts carry part number W704939-S439, and the matching nuts are W520215-S440. As an alternative, Maximum Motorsports also sells the kit under their part number MMF-4. Please don't skimp out and use a 9/16" Grade-8 cheap hardware store bolt. Not only do they generally need to be pounded in due to their incorrect size, you are NOT going to get fasteners that are of automotive suspension quality!
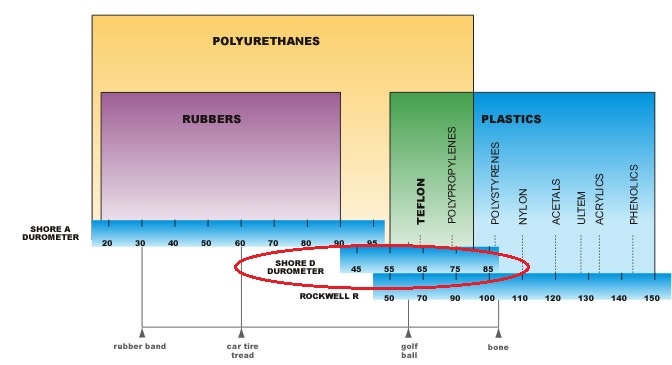
The chart below lists the approximate bushing hardness, or Durometer, on the "Shore-D" scale, starting with the softer rubber and increasing up to Delrin (the higher the number, the harder the material). Where did I get these numbers? Well, they were obtained from a hardness tester - that I own - with a specific tip for the "D" scale (the OEM rubber is an exception and is interpolated for general comparison). As you can probably surmise, there is not a huge difference between the Prothane bushings, and a plastic material like Delrin, but it is enough that the suspension has been firmed up, just not to an undesirable level. Additionally, the polyethylene bushings that are another choice for mounting the IRS cradle are not significantly harder that those by Prothane either, and if you went with the poly there, you would still find your cradle mounted quite solidly.
| Bushing Material |
"Shore-D" Hardness (App.) |
| OEM Rubber |
20 |
| Energy Suspension polyurethane |
40 |
| Prothane/MM polyurethane |
60 |
| UHMW polyethylene |
70 |
| Delrin |
80 |
So, yes, I am a complete advocate for polyurethane, and will stand by its durability and performance without hesitation. I will also mention that one downside to the material is the installation: it's really kind of a pain. If you go this route, you'll not only have to drill out some of the bushing material, but also heat them, pound out the guts, and grind what is left with a wire wheel (have a good shop vacuum handy!). On a good note, Maximum Motorsports sells tools that will assist in the process, but you'll have to also be diligent in getting every last bit of rubber out of the factory shells before you can press in the new bushings. This is actually the case for the cradle and lower control arms, but the upper arm bushings can literally be pried out, so that is a bit of a relief.
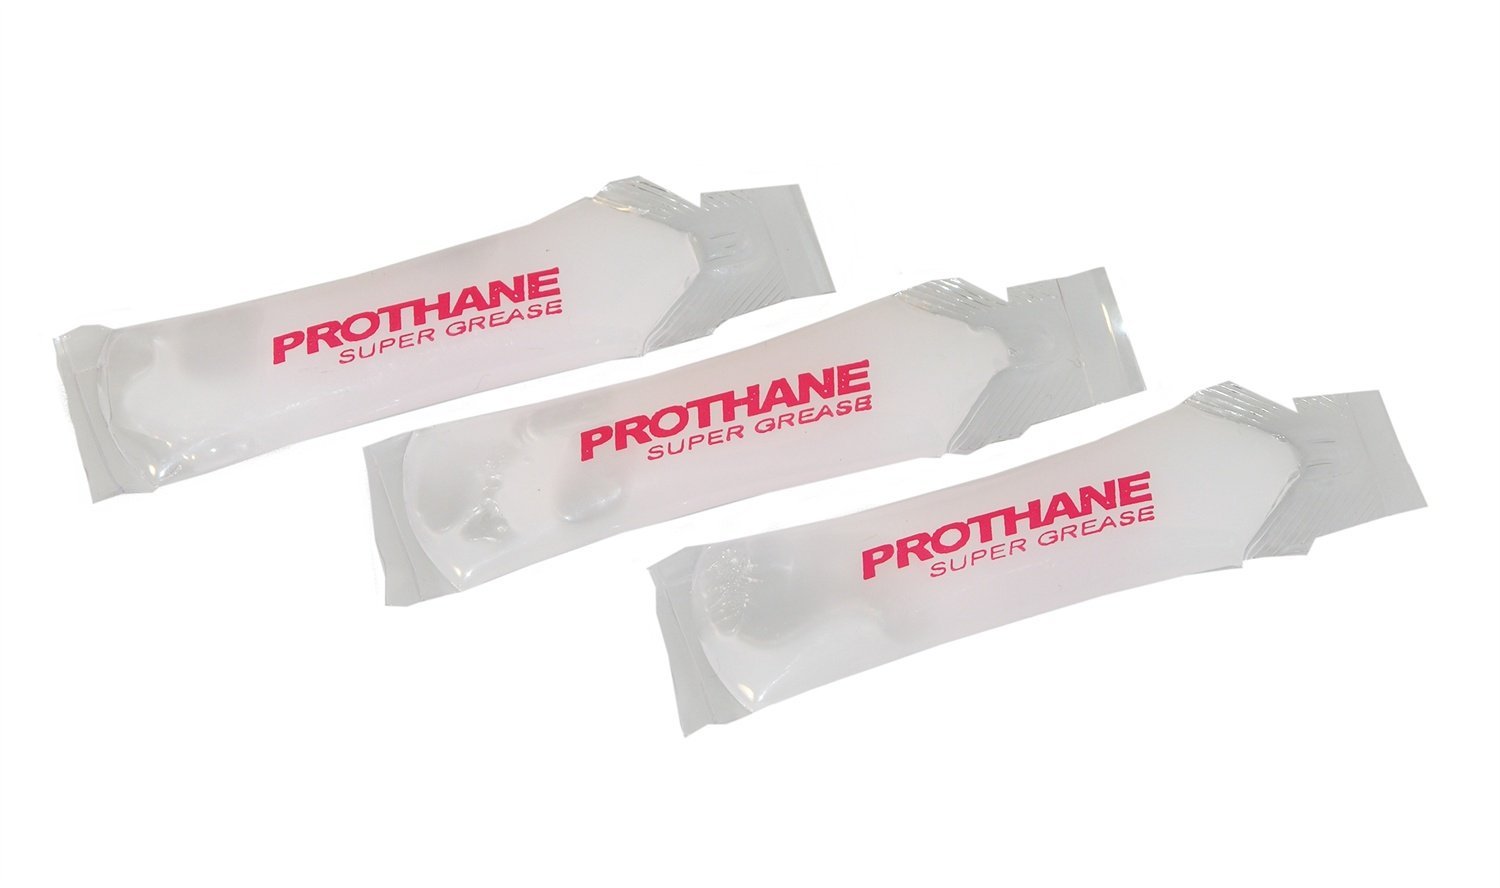
Note: When it comes to squeak-free performance and adequate lubrication, you absolutely, positively have to use significant amounts of the supplied "super grease". Prothane includes packets with each kits, but you can also purchase more in varying amounts from them (or Energy Suspension) through any number of vendors. The stuff will probably withstand a nuclear war, so if used correctly, you don't have to worry about periodic lubrication. My bushings, again, are still completely smooth and silent.
I'll also add that removal and installation of the IRS is perfectly feasible with just one person, despite its size. I've had mine out twice, and it was really no hassle at all. I will admit that my two tricks for making the job a bit easier involve removing both knuckle/axle assemblies first (just saves a bunch of weight), and also making use of a Harbor Freight transmission jack. If you take your time, pay attention to the service manual (downloadable on my SVT Documents page), and have the right tools, removal of this monster is no big chore at all!
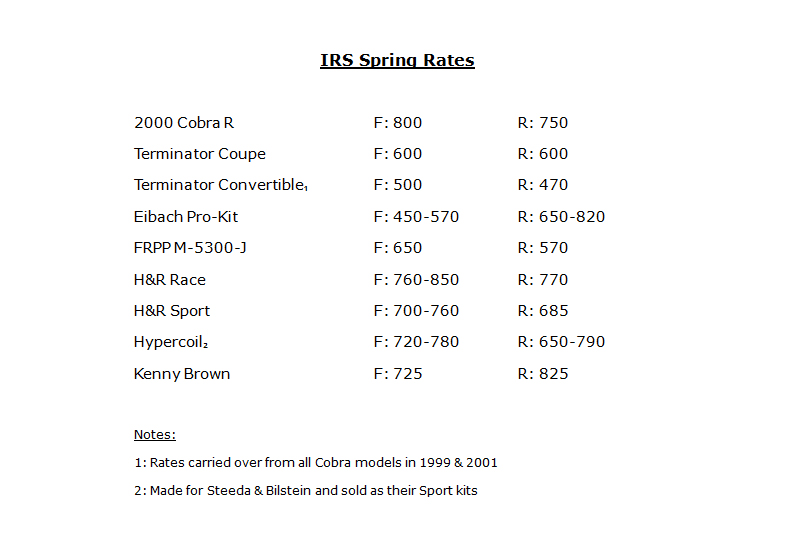
Before going further in to more suspension modifications, the chart below is a general guide for changes that can be made to any number of parameters that may suit your needs. As I've mentioned a few times throughout the site, my preference has been the reduction of under-steer, or "more over-steer". While the Cobra's balance still isn't perfect, the change from stock has been nothing short of amazing thanks to some intelligently placed modifications - especially all those bushings.

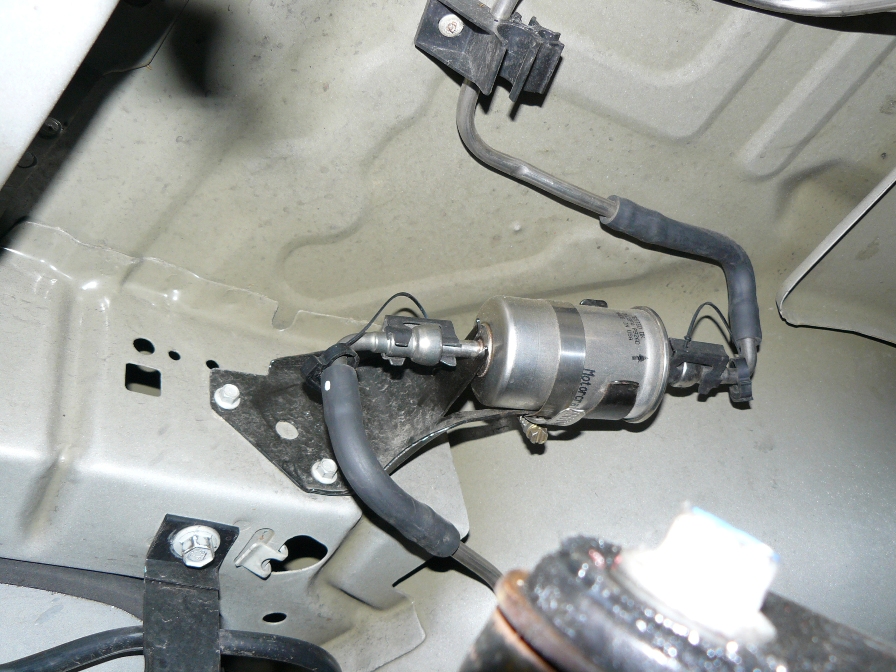
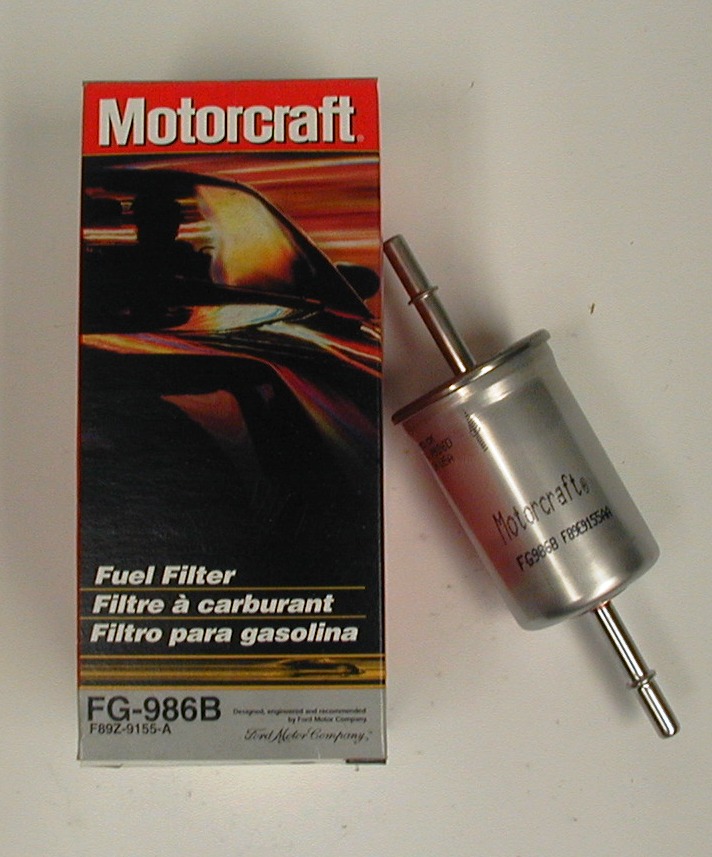
Note: If you are doing any work on the IRS, especially if all or part of it is out of your car, it becomes a great time to change your fuel filter. It is located just forward of the fuel tank towards the passenger side - right behind the top of the IRS cradle. Not that it is impossible to access with everything in there, but it is sure a lot easier when there are less suspension components to reach around! Also, the SVT Supplement for both years lists it as a Motorcraft FG-800A, but that is incorrect. The actual filter needed is the Motorcraft FG-986B or its equivalent.
A popular modification when seeking improved handling that usually comes early on is a change of springs (well, for most of us that are not neglecting the suspension while pursuing crazy power levels instead). Not only do aftermarket springs drop the ride height (i.e., center of gravity), they offer an improvement in handling do to the accompanying increase in "stiffness". There are still plenty of IRS springs out there, but what I wanted was a slightly firmer ride without a ridiculous drop. With a Cobra R theme in full swing, the ideal solution was a set of springs from a real 2000 R.
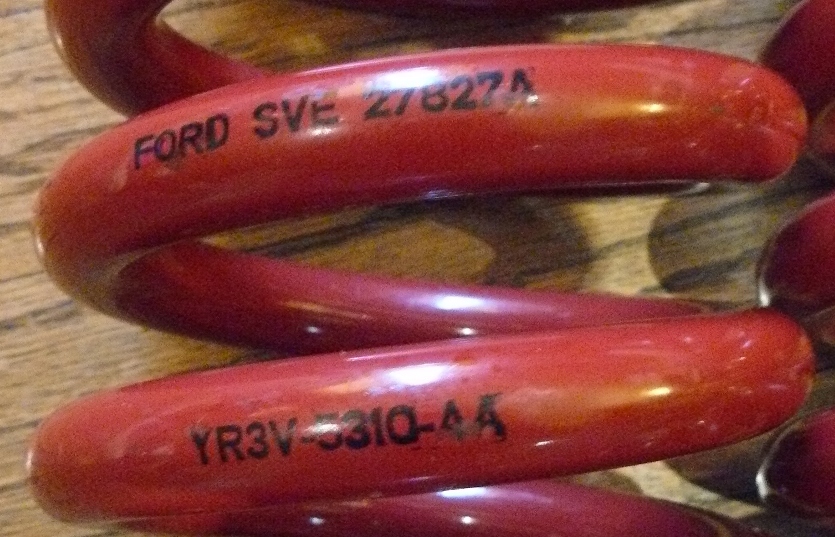
Since I had passed on my decision to actually buy the 2000 model, it worked out great with the new suspension: Cobra R handling, and Terminator power (along with air conditioning and a stereo). If you aren't familiar with these springs, they have linear rates of 800 lb/in for the front, and 750 lb/in rear and were made for Ford by Eibach. The pictures below show a close-up of one of each, with the "YR3V" engineering numbers from the year 2000.

Now if I really wanted to do this right, I would have snagged the ones formerly made by Kenny Brown that have a higher rate in the rear than the front (referenced on the chart in the first paragraph of this section). Still, the R springs are pretty close, and since I didn't have a desire to mix springs, this turned out fine. I did want to stay with a linear rate spring anyway, so the set from the R was just the ticket, especially considering my affinity for those parts. Otherwise, I would have considered the Eibach Pro-Kit since the rear springs there also have a higher rate - although not linear - and the drop is not drastic enough to cause issues. Alternatively, the H&R Race springs (51659-88 for coupes and convertibles) are very popular, and with specifications close to the '00R springs, they are also a great choice.
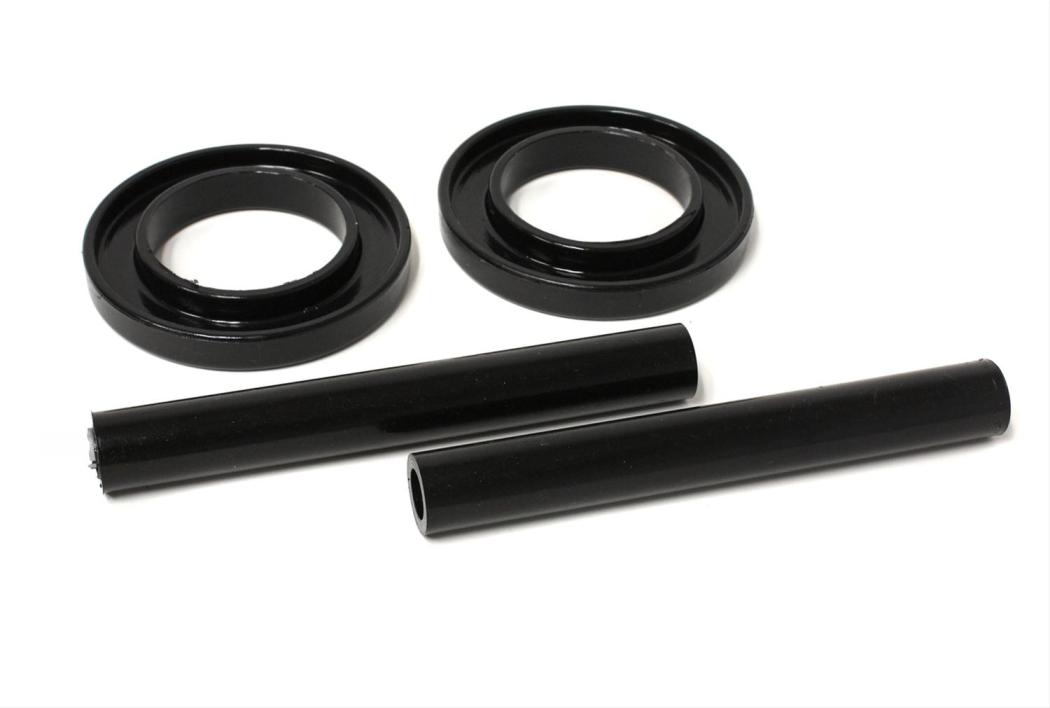
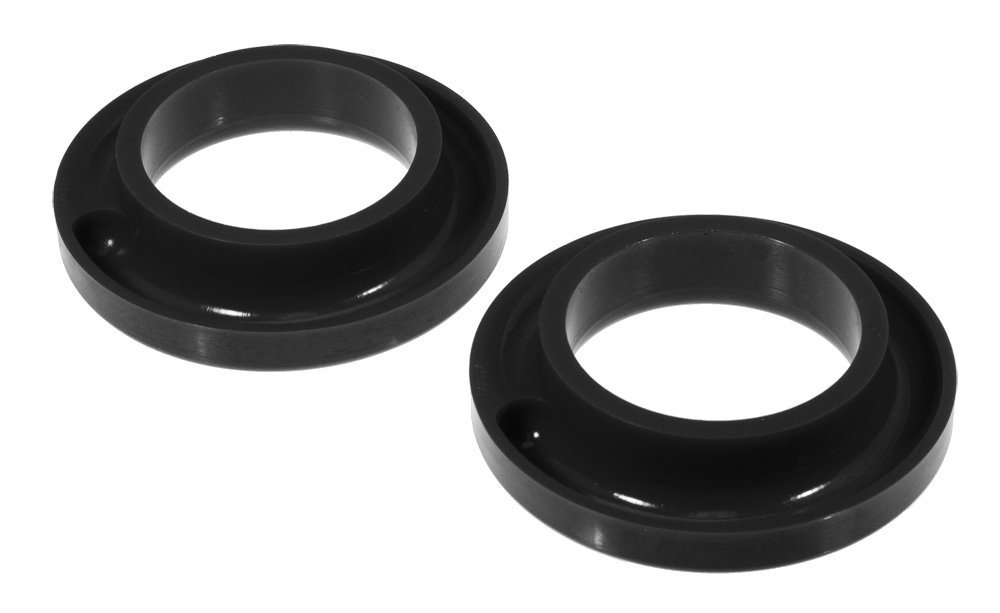
With new springs, I also decided to upgrade the factory rubber isolators and use polyurethane there as well. The front set (standard to all Mustangs from '83-'04) came from Energy Suspension as 4-6102, and were used on the top and bottom. The rear set for the IRS is a bit unique since they are available as just the lower pair (Prothane 6-1709). A complete upper/lower set can also be acquired from Maximum Motorsports, but they are the only source of them that I know of for the IRS. Some guys chose to leave them out - just like the factory did on all the R Mustangs - but I wanted to strategically place them in order to level the ride height to my liking. From past experience, it's not a big issue skipping the upper isolators, but since the lower spring coils articulate against the control arms, I definitely wanted those in place to minimize any noise. So far, no problems.
 It's
probably worth mentioning a "popular" spring modification that I always thought
was a bit idiotic: cutting
of the stock coils. Since springs are really not that expensive, it strikes me
as odd that guys would go through the hassle of doing this when new sets are so
easy to obtain. Adding to that, it always amused me when I saw comments about
how "...removing coils does not change the spring rate since the Terminator has
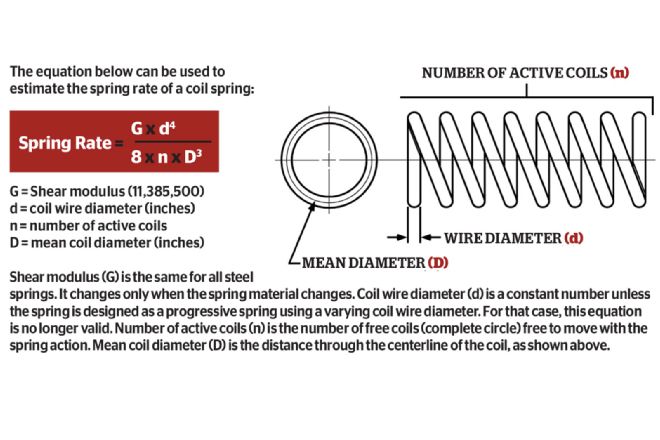
linear rate springs". The formula for calculating the rate of a springs is based
on several factors, including the number of coils, so when you remove a
coil or a portion of one, the rate will actually go up. Granted, it isn't much,
but it's another example of bad information on the internet. Nonetheless, when
you lower your car, the spring rate needs to be much higher than stock in order
to compensate for the CG change - something you still don't get by cutting
coils. For a look at the
formula for calculating spring rates, check out the thumbnail.
It's
probably worth mentioning a "popular" spring modification that I always thought
was a bit idiotic: cutting
of the stock coils. Since springs are really not that expensive, it strikes me
as odd that guys would go through the hassle of doing this when new sets are so
easy to obtain. Adding to that, it always amused me when I saw comments about
how "...removing coils does not change the spring rate since the Terminator has
linear rate springs". The formula for calculating the rate of a springs is based
on several factors, including the number of coils, so when you remove a
coil or a portion of one, the rate will actually go up. Granted, it isn't much,
but it's another example of bad information on the internet. Nonetheless, when
you lower your car, the spring rate needs to be much higher than stock in order
to compensate for the CG change - something you still don't get by cutting
coils. For a look at the
formula for calculating spring rates, check out the thumbnail.
I've been extremely pleased with the R springs to say the least. The stance of my Cobra is absolutely perfect, and with the rest of the "adjustments" I've made, the handling is incredibly sharp and the ride is not at all harsh. Even better: no idiotic "slammed" look!

Note: Installation of coils springs in the SN-95 Cobra is not overly complicated. For the rear, the IRS cradle just has to be lowered slightly to allow the tension on the spring to release. The front can be more of a challenge (especially if the original rubber bushings are still present) since it takes considerable force to deflect the control arms enough to allow for space to extract and re-install the spring. Fortunately, Maximum Motorsports sells a tool that uses the control arm pocket to hold the spring, their MMT-8. As usual, refer to the service manual, and if you aren't adept at something like this, be sure to have a pro tackle it for you!
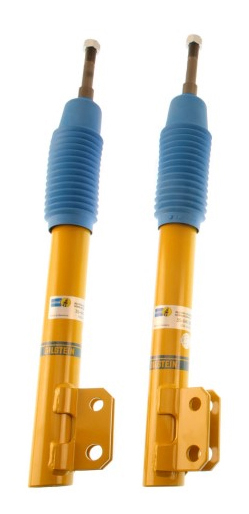
Once you make the jump to new springs, you need to mate them with struts and shocks that match. Here, I lucked out once again and acquired a new set from the 2000 R program, also made by Bilstein, that were perfect companions to the springs. Had I been cheap, I may have been able to stick with the Terminator versions (the coupe set, of course), but I really wanted to reap the full benefits of the upgrades. Ford racing actually used to sell these as M-18124-R00 and M-18125-R00, but fortunately they are still made by Bilstein, although they have been updated slightly to fall in line with their new definitions of "Sport" or "Heavy Duty".
 When
it comes to shocks and struts, there is just no arguing that Bilstein makes some
outstanding products. Even without manual adjustability, they still do a
fantastic job of providing premium control and dampening using their "mono-tube"
technology (at least as far as the Cobra is concerned). There is a bunch of
information on their site that gets in to more detail, but I also found an
informative YouTube video
that highlights some of the Bilstein advantages that is worth watching. We are
very fortunate to have these struts and shocks on the Terminator, but the
earlier IRS cars can be retrofitted quite easily, especially when it comes to
the multiple versions that are available.
When
it comes to shocks and struts, there is just no arguing that Bilstein makes some
outstanding products. Even without manual adjustability, they still do a
fantastic job of providing premium control and dampening using their "mono-tube"
technology (at least as far as the Cobra is concerned). There is a bunch of
information on their site that gets in to more detail, but I also found an
informative YouTube video
that highlights some of the Bilstein advantages that is worth watching. We are
very fortunate to have these struts and shocks on the Terminator, but the
earlier IRS cars can be retrofitted quite easily, especially when it comes to
the multiple versions that are available.
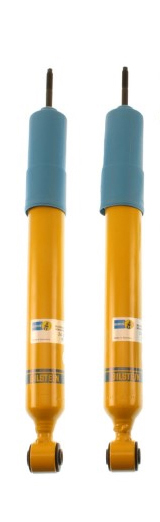
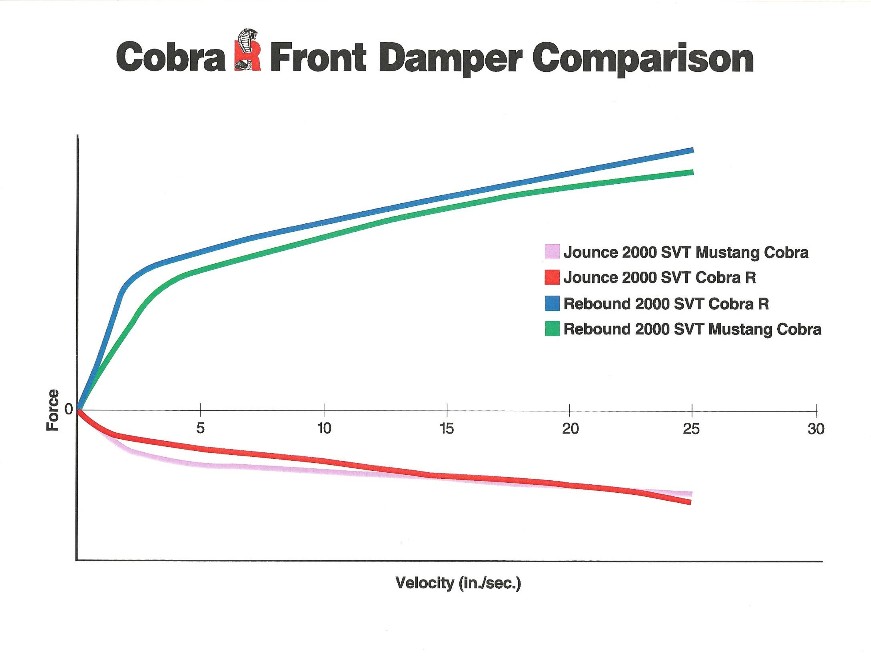
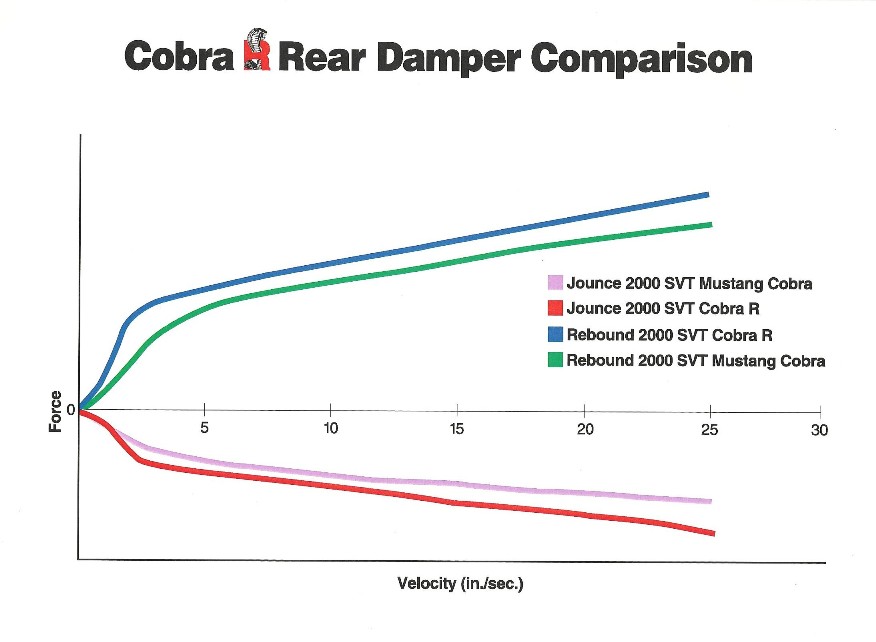
The charts below, which came from the 2000 R press material, offer an interesting look at how the R struts and shocks differ from those that were used on the '99 Cobra (and ultimately the '01), although labeled as a "2000 Cobra". This could also be interpolated as a comparison with the Terminator dampers, but I've never found similar material out there for them. Essentially what the graphs show is that the struts are stiffer in rebound, but slightly softer in compression which helps with under-steer. The shocks, in contrast, are stiffer in both compression and rebound - perfect for the "upgraded" IRS - which helps greatly with wheel hop. For more information, see the 2000R Bilstein page on MM's site.
Another great thing about Bilstein struts and shocks is that they can actually be rebuilt and re-valved - a nice way to save some cash over the purchase of a new set. There is a page on their site with service information, and you can also download the Repair Order form if you plan on going this route. Although the stock Terminator dampers will allow for most spring upgrades, you can't go wrong by having the valves perfectly matched to your exact spring rate.
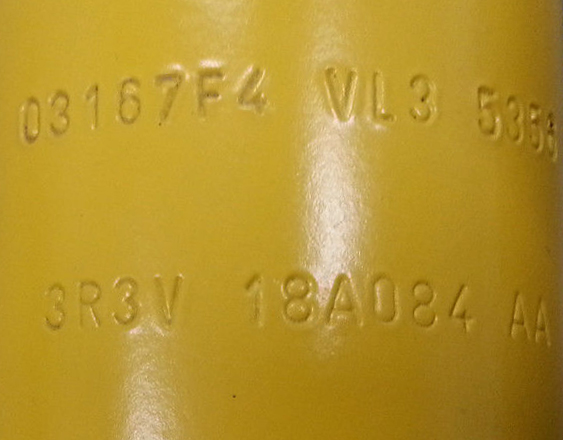
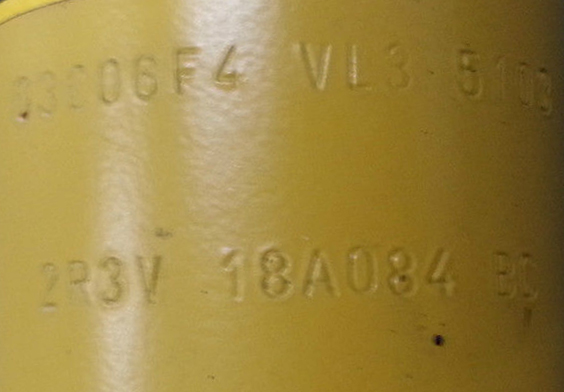
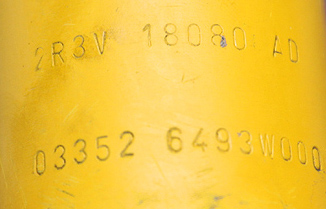
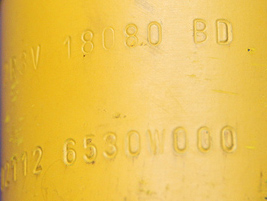
Note: The factory dampers used on the Terminator are different for both versions. The easiest way to discern this is by the labels that are placed on them: CPE for coupes, and CVT for convertibles. If they have come off, you are left sifting through engineering numbers to make sure you have them correct. I'll go out on a limb and state that I probably have them down, but I may not guarantee it 100%. The struts were 3R3V-18A084-AA for coupes, and 2R3V-18A084-BC for convertibles. With the shocks, you have 2R3V-18080-AD for coupes, and 2R3V-18080-BD for convertibles. Also, IRS shocks are not interchangeable with solid axle versions - those for the IRS are much stiffer and have a unique lower mount that is meant to clear the trailing link and control arm mounting pad. It drives me nuts when guys sell these and have no clue what they came from - there is a difference!
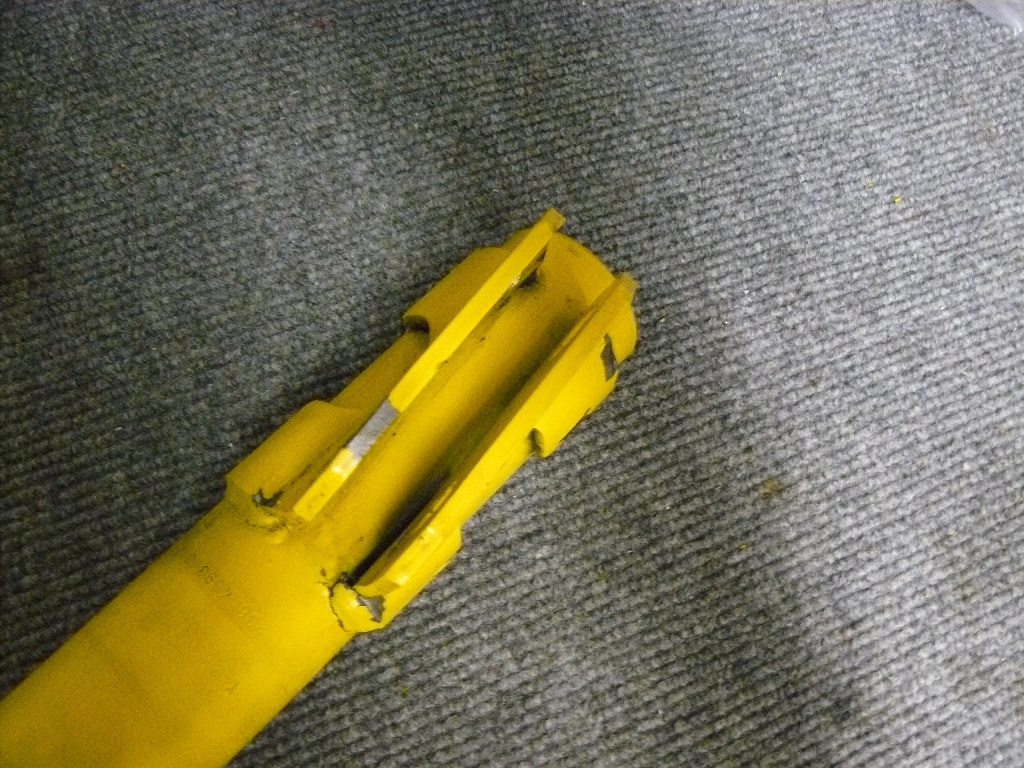
Something else good to know concerns the strut mounting flanges. The original ones on the 2000R versions were a bit on the simple side and consisted of two tabs welded to the housing. When Bilstein produced them for Ford to use on the Terminator, that area had been significantly strengthened and actually wrapped around the entire body. Although the R flanges offer the advantage of an extra degree of camber due to the position of the mounting holes, they are still not as strong as the later versions.
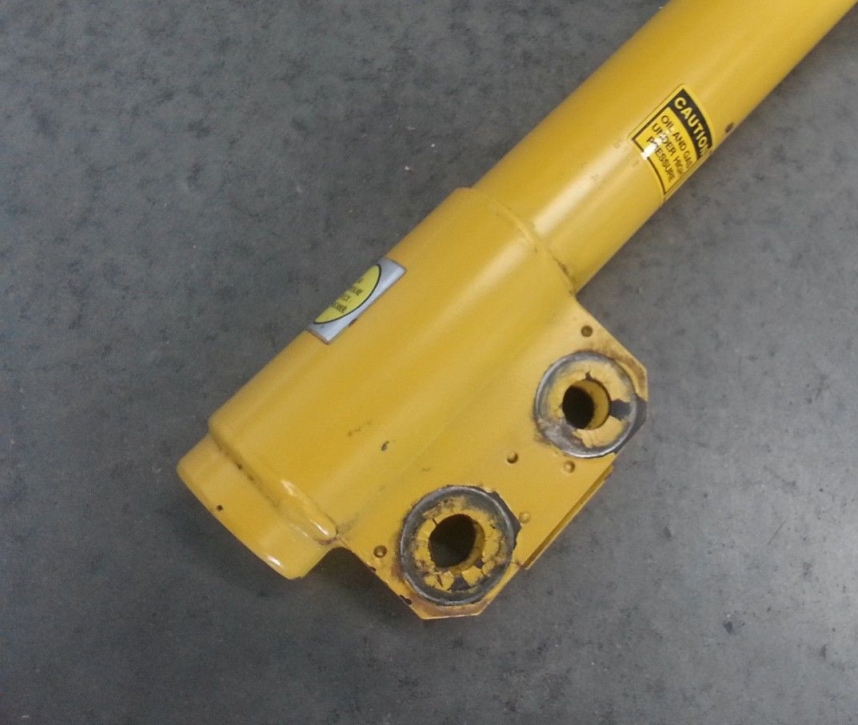
The pictures below are of a strut that came off another R that had a bit of front end damage from a "performance driving" day, which pulled and twisted the mount on the one side. I couldn't resist picking up the pair and actually rebuilt them with new housings to keep as spares. It is very easy to separate the strut body, and from the picture on the right, you can see they are actually mounted upside-down in the housing, which makes them much more solid when loads are placed on them. Also visible is the bump-stop: it is technically "external", but then placed inside the housing where it is out of sight (they are definitely internal for the shocks). As usual, I turned to Maximum Motorsports and bought a set of their proprietary housings, which made these look like new when they went back together.

I didn't bother getting any installation pictures since there is really nothing noteworthy about the process. Besides, there are various shots of them scattered throughout the site that leave no doubt as to their use on my Cobra. Although some guys out there insist on pulling these off and using other brands, I'm convinced they really are some of the best out there. After all, how could you go wrong with dampers that get put through their paces on the Nürburgring!
Note: When replacing or upgrading the shocks, I highly recommend the use of the polyurethane lower eye bushings (also a must with a coil-over conversion). I used them in mine, and like all other bushings in the IRS, they are rock solid. As usual, you can find these on the Maximum Motorsports site for about $20, listed as MMSM-105. They also sell new bushings for the upper shock mounts, but so far my original ones have hung in there just fine.
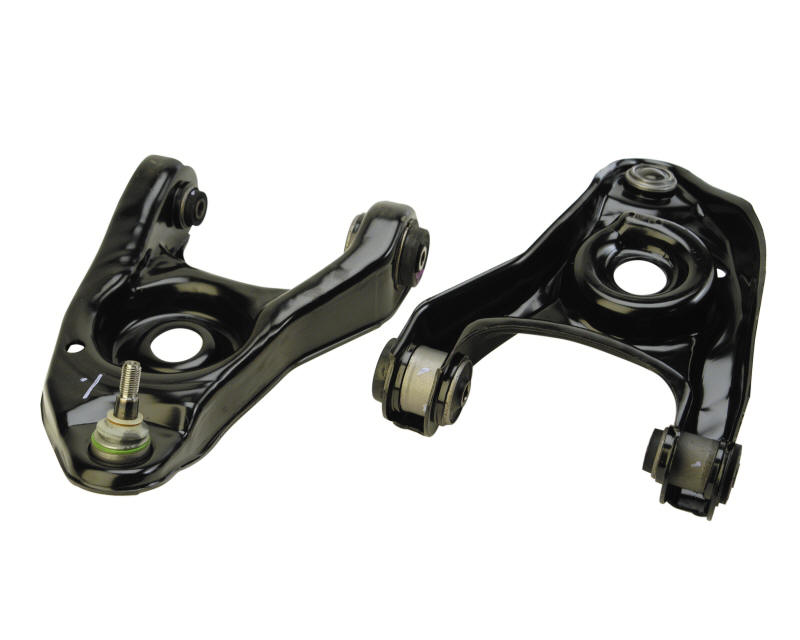
 Terminator
owners are actually lucky
when it comes to the front control arms. They had been tweaked over the years,
and although the SN-95 versions remained unchanged as far as length is
concerned (about 14" from the bushing centerline to the ball-joint centerline), upgraded bushings and a revised geometry became standard. The final revision of arms
were advantageous enough that Ford Racing sold them separately as an upgrade
(M-3075-D) along with them being original
equipment on the '03/'04 Cobra and Mach 1. It's possible that some of the FR sets still
exist out there, but once they are gone, you will be left sourcing them directly
from Ford at a premium price.
Terminator
owners are actually lucky
when it comes to the front control arms. They had been tweaked over the years,
and although the SN-95 versions remained unchanged as far as length is
concerned (about 14" from the bushing centerline to the ball-joint centerline), upgraded bushings and a revised geometry became standard. The final revision of arms
were advantageous enough that Ford Racing sold them separately as an upgrade
(M-3075-D) along with them being original
equipment on the '03/'04 Cobra and Mach 1. It's possible that some of the FR sets still
exist out there, but once they are gone, you will be left sourcing them directly
from Ford at a premium price.
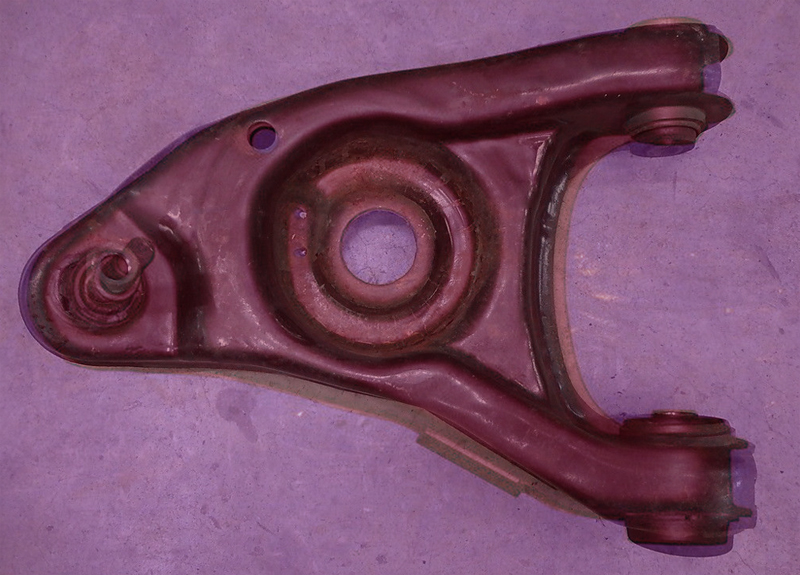
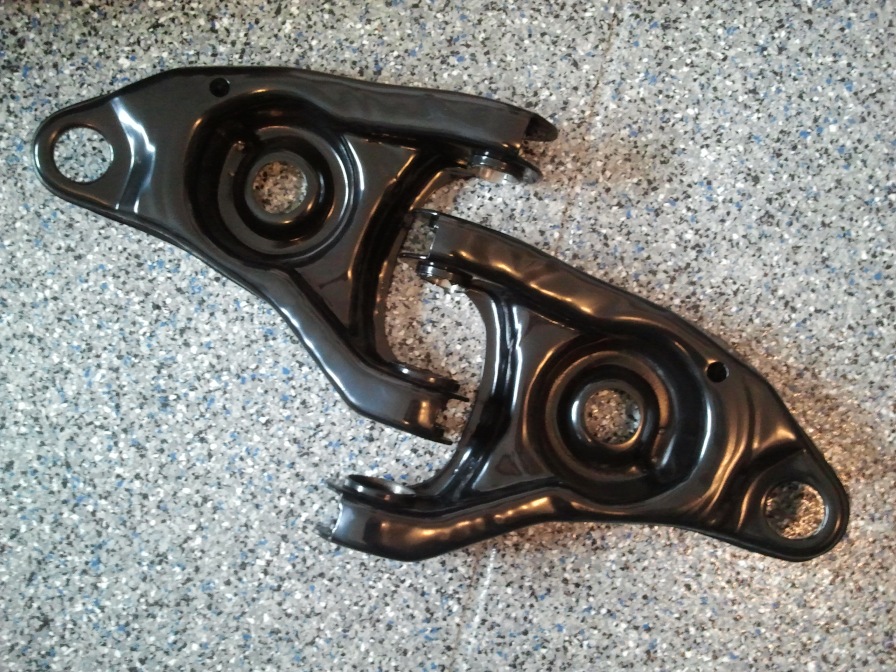
For general reference, the basic shape of the stamping was altered slightly in 1999 to remove a portion along the back edge, which allowed the wheel to turn further without contacting the arm or the reinforcement plate that once resided there. In 2003, the ball joint location was also moved approximately 1/4" forward which lengthened the wheel base slightly. The picture below and to the left shows both versions superimposed, somewhat giving an indication of the material removed along the back of the arm. While it was hard to illustrate the difference in ball joint location due to the parallax of the original images (borrowed from the internet), the picture at the right does a better job. This one is of a 2001 Cobra arm (courtesy of my buddy Tony) - minus the ball joint - laid on top of the new version.
Note: Some '03 and '04 Mustangs had issues with noise in the control arms that led to a "Special Service Message" in late 2003 calling for their replacement. There was not an official TSB, but the details can be referenced by searching the internet for "NHTSA #10004043". The text of it is also here as SSM 17100, which also contains the Ford part numbers for reference.
While the bushings in the newer arms are stiffer rubber than usual (again, "close" to the 2000R), I replaced mine anyway. My choice here, in contrast to the rear control arms, was the Energy Suspension 4-3144 polyurethane set, which comes in between the hardness of the "new" rubber and that of the Prothane poly (see the durometer chart further up the page). No way would I have wanted to add anything harder like Delrin or aluminum since I didn't want the impact harshness to go through the roof. Also, I wanted to stay with the OEM arms, despite their bulk, since I had no intention of switching to a coil-over spring/strut combination.
Since the removal of the bushings and shells is a bit of a hassle (especially since the large ends at the rear are the liquid-filled "Hydro" versions), I had a local machine shop put them in one of their ovens to burn out the rubber first. As an alternative, and especially if you are willing to tolerate firmer polyurethane, the bushings by Prothane won't require as much labor since some of them allow you to retain the original shells. For a complete breakdown of those kits, see the Maximum Motorsports Front Control Arm Bushings page.
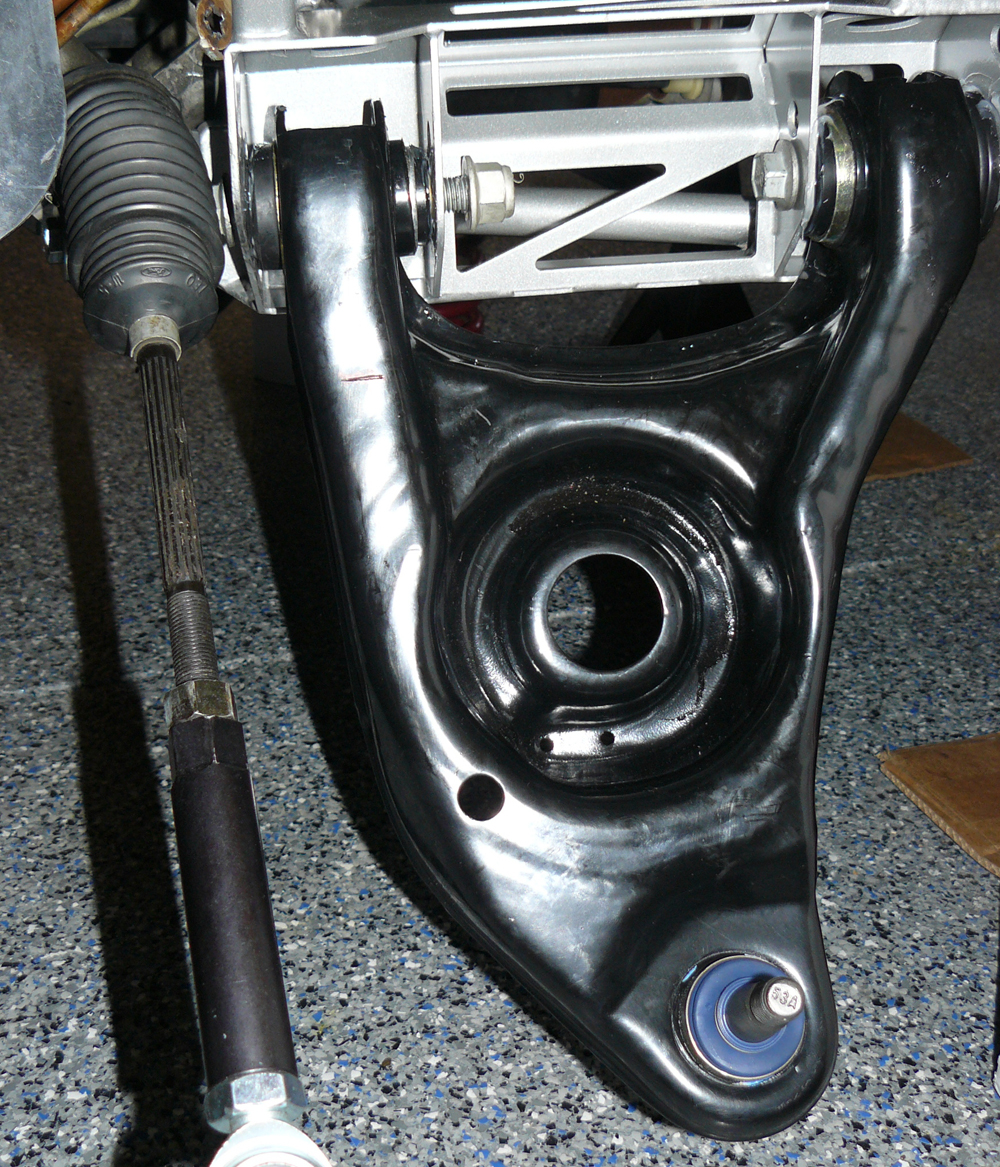
So far, my improved control arms have performed flawlessly: no noise, no overly stiff ride, but a much more planted feeling of the front end. After the trip through the oven most of original coating was burned off, but no worries there, I had them powder coated, and they looked good as new once I worked my own magic on them. The pictures below show the arms hung loosely in the Steeda K-member before the front end was buttoned up.

Note: The wheel-base of the SN-95 Mustang has been listed as 101.3" going way back. Even with the Terminator, the brochure and all literature for the vehicle shows the same figure. One would think that would have changed due to the new ball joint location, but somehow it slipped between the cracks. That number, realistically, is closer to 101.6".
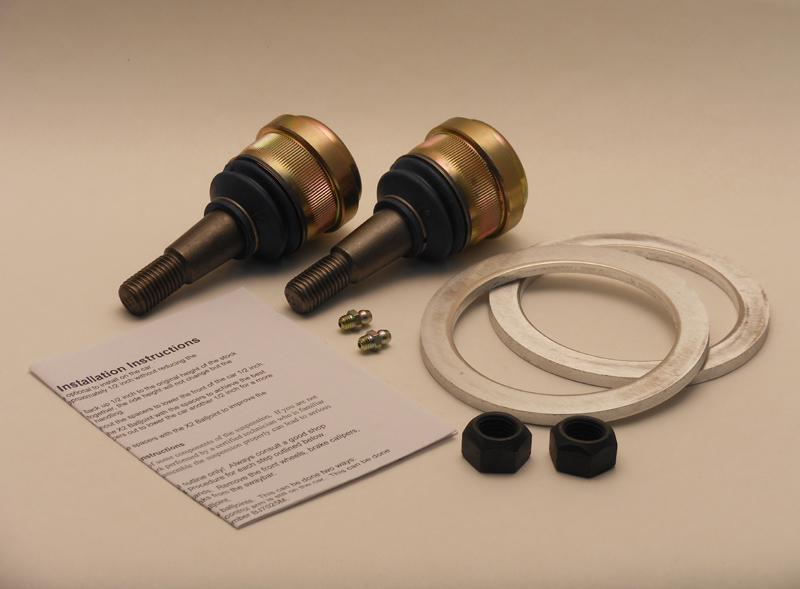
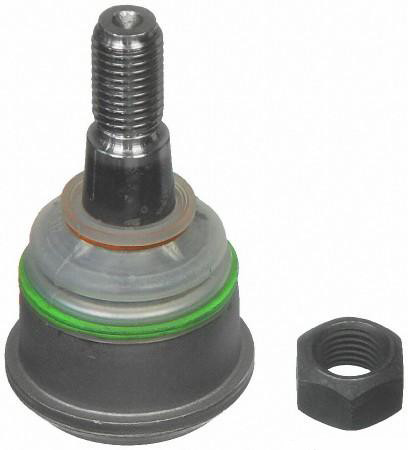
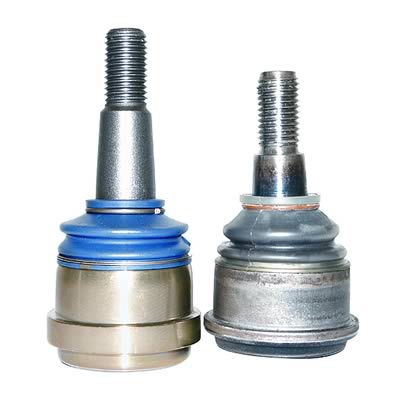 Along with the new bushings in the control
arms, the ball joints were upgraded to the Steeda extended-shank "X-2" version, sold as their part
number 555-8101. While my factory
"low-friction" ball joints were in perfect
shape, I wanted the new ball joints in place to raise the spindle slightly
(click the thumbnail for a comparison of old and new). This
is done to compensate for the change in suspension geometry, altering what is
known as the "Roll Center", which can get dropped too low when adding new
springs.
Along with the new bushings in the control
arms, the ball joints were upgraded to the Steeda extended-shank "X-2" version, sold as their part
number 555-8101. While my factory
"low-friction" ball joints were in perfect
shape, I wanted the new ball joints in place to raise the spindle slightly
(click the thumbnail for a comparison of old and new). This
is done to compensate for the change in suspension geometry, altering what is
known as the "Roll Center", which can get dropped too low when adding new
springs.
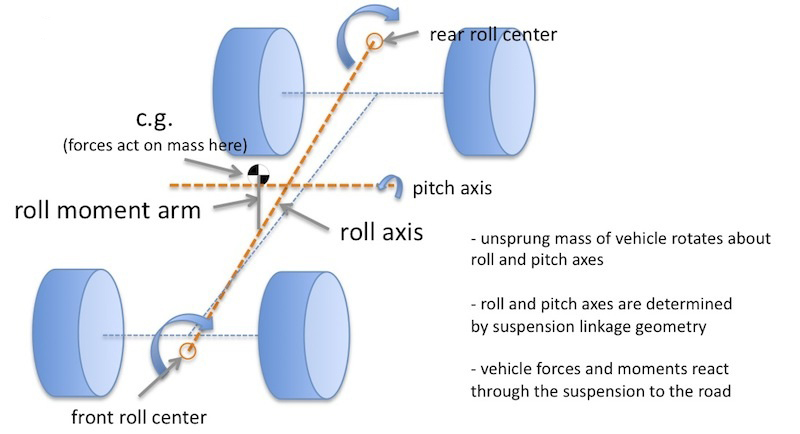
The roll centers are actually calculated for both the front and rear suspensions, and in simplest terms, they are theoretical points - determined by the suspension geometry - about which the chassis rolls. When a car is lowered with aftermarket springs, the roll centers are lowered, along with the center of gravity. Also, when the roll centers are joined, they form what is called the "roll axis" of the vehicle.
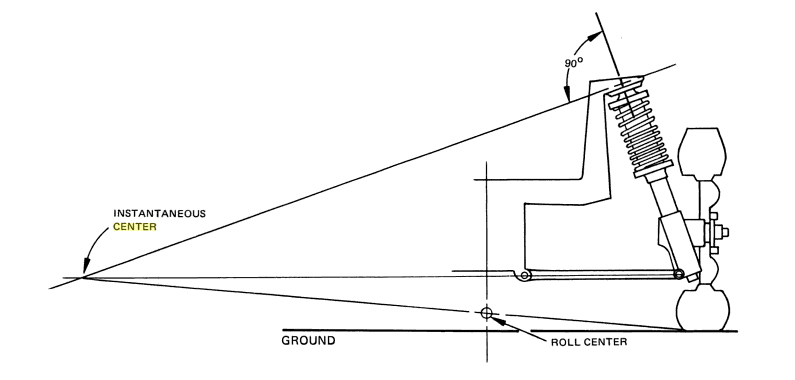
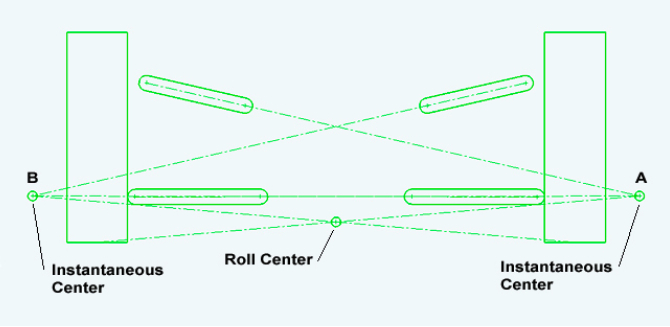
The diagrams below are perfect, and relatively simple illustrations of how the roll centers are determined. The left image shows a McPherson strut and its hypothetical roll center, which is similar for the "Modified McPherson" strut on the Mustang. The right image is actually of a "Short-Long Arm" (SLA) suspension, but is essentially how the roll center would fall with the IRS (for a solid axle rear, the point would be higher - roughly in the center of differential).
Since the roll centers are important, if you decide it is merely "cool" just to slam your car with aftermarket springs, your handling will actually suffer. When the roll centers drop too far, causing the roll axis to pull farther away from the center of gravity, you can actually have more body roll due to the increase in the lever arm. Usually, higher rate springs and fat sway bars will help, but at some point, it will take a change in the control arm position to correct the situation.
 For
another idea of how the roll centers drop, the thumbnail to the left shows an
example of a vehicle that is at the normal position as well as lowered. There is
actually more to it than just bringing the front roll center back up, but for
the sake of simplicity, it is easy to illustrate that a roll center closer to
stock, rather than farther away (i.e., "below the ground"), is going to be more
ideal. Fortunately, it's not hard to fix all this, and the X-2's are a perfect
start.
For
another idea of how the roll centers drop, the thumbnail to the left shows an
example of a vehicle that is at the normal position as well as lowered. There is
actually more to it than just bringing the front roll center back up, but for
the sake of simplicity, it is easy to illustrate that a roll center closer to
stock, rather than farther away (i.e., "below the ground"), is going to be more
ideal. Fortunately, it's not hard to fix all this, and the X-2's are a perfect
start.
One caveat of the new ball joints is that if you stay with the same springs, you'll actually cause the front end to drop slightly again since the control arm has moved farther away from it's original position (raising the spindle, in turn, lowers the control arm). This is the reason Steeda includes 1/4" spacers to stack above the spring to maintain the previous ride height, but I didn't need them since I had added the polyurethane isolators at the same time. Before, I had left one rubber isolator on the bottom and nothing on the top, but the poly added more to the free length of the spring than the spacer. It worked out great, and so far, the X-2's have done exactly what they were meant for. With them, the K-member, and all bump-steer adjustments, my Cobra has really been transformed when taking the curves.
Note: Unlike the factory ball-joints, the X-2's have zerk fittings on the bottom. In simplest terms, this means they will need to be greased and checked periodically. They aren't as loose as the OEM ball-joints, but a little bit of Mobil1 grease gave them a nice smooth movement.
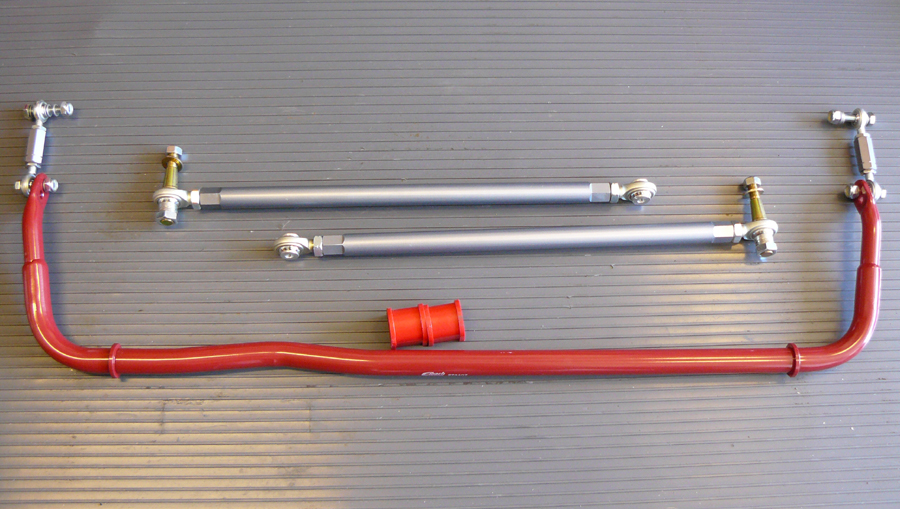
Another important area that can't be overlooked when tuning your suspension are the sway bars. While the factory parts do a decent job of keeping the average driver from swapping ends when driving hard, the reduction of under-steer is important if you really are serious about handling. Although most aftermarket kits simply offer increased-sized bars at both ends, my approach varied. Sure, monster sway bars may help keep your car flatter in turns, but you still are left with a lot of under-steer if you just slap large ones on both ends.
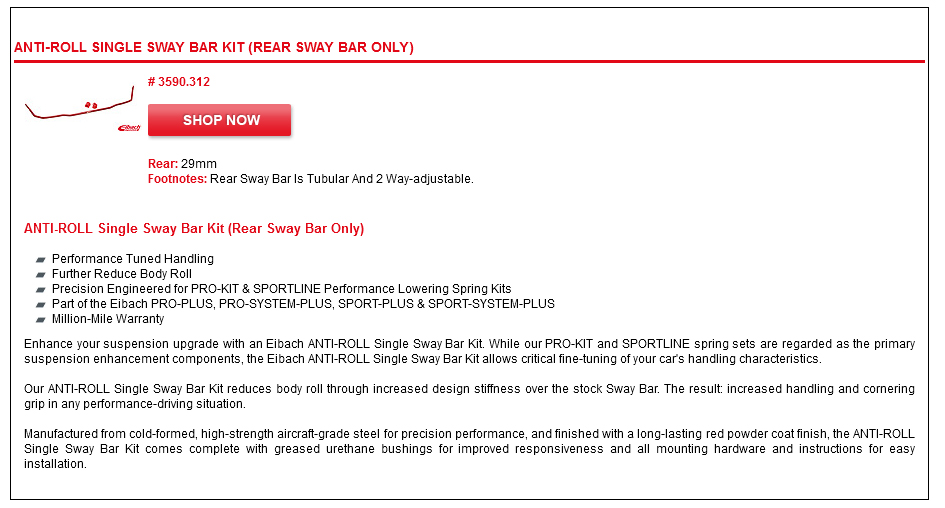
The Terminator came from the factory with a 29mm sway bar up front and a 26mm bar in the rear. Not a bad combination, but some tweaking was in order. I wanted to do as much as I could to make the car more neutral, and in order to accomplish that, an increase in thickness was needed in the rear in conjunction with a decrease in thickness up front. The perfect recipe was the Eibach 3590.312 29mm rear bar, and a 2000 Cobra R 28mm front bar (the same size on the '99/'01 Cobra and the '01 Bullitt). The front bar also went in with new bushings and slightly shorter end links, all of the polyurethane variety thanks to Energy Suspension.
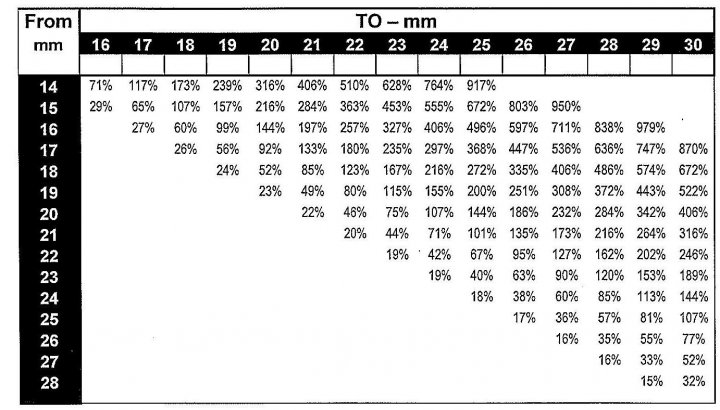 It
probably doesn't sound like a big difference - just a few millimeters - when
changing sway bars, but it really is significant in terms of handling (although
I'll admit that most of my benefit probably has come from just the rear bar).
Generally speaking, small increases in bar stock diameter will lead to
incrementally larger increases in stiffness when using the same material. For a
look at how this can illustrated, the thumbnail chart shows that going from 26mm
to 29mm yields a 55% increase in stiffness. It may not be a complete
apples-to-apples comparison here, but the difference is still significant. There is also a nice
Sway Bar Tech document from
Hotchkis that goes in to this a bit more
and is worth the read.
It
probably doesn't sound like a big difference - just a few millimeters - when
changing sway bars, but it really is significant in terms of handling (although
I'll admit that most of my benefit probably has come from just the rear bar).
Generally speaking, small increases in bar stock diameter will lead to
incrementally larger increases in stiffness when using the same material. For a
look at how this can illustrated, the thumbnail chart shows that going from 26mm
to 29mm yields a 55% increase in stiffness. It may not be a complete
apples-to-apples comparison here, but the difference is still significant. There is also a nice
Sway Bar Tech document from
Hotchkis that goes in to this a bit more
and is worth the read.
Note: Ford has even seen the benefit of putting larger rear sway bars on an IRS car. Since I've already mentioned the 2015, I'll add that it's possible to purchase the newer vehicles with what Ford calls the "Performance Pack" (or Track Package on the GT350). Among many very cool features - a larger rear sway bar.
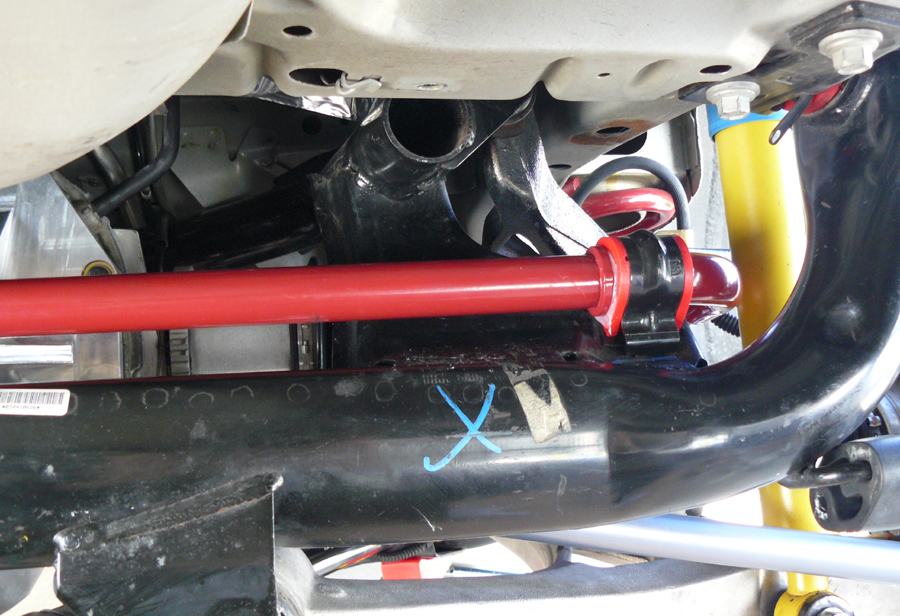
Although suspension tuning can actually get a bit complicated, I tried to keep it as simple as possible by staying with my decrease-the-under-steer recipe. Like most guys, however, I neglected to tackle this particular project when I first had my IRS out for the bushing upgrade. Fortunately, I quickly came to my senses. In order to make this "easy", I decided to remove the fuel tank when the time came, and it actually saved plenty of labor versus dropping the IRS cradle once again. It was definitely a project I was glad to accomplish, and with the great deal I got on the new bar (even with a rebate from Eibach), it made this even sweeter.
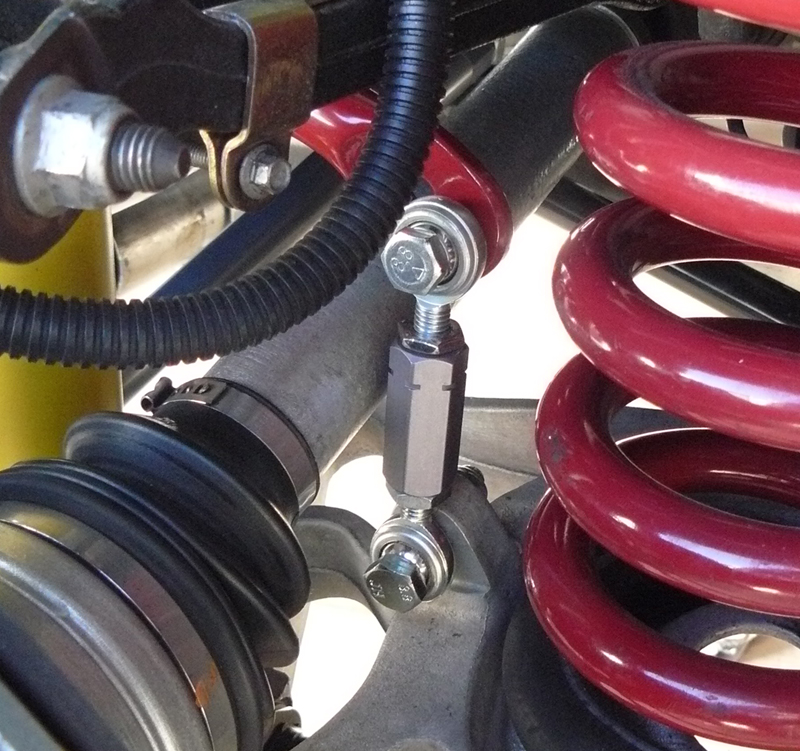
Since I was going all-out to firm up the IRS, I also added the heim-joint adjustable end links, MMRSB-94, from Maximum Motorsports. The Ford end-links are on the flimsy side, and with a heavier bar and an overall stiffer rear, the new end-links are perfect and a cinch to install. The pictures below show all the gear from several years back (including the trailing links) and one install shot - minus the fuel tank. The front bar isn't shown here, but its installation is nothing out of the ordinary.
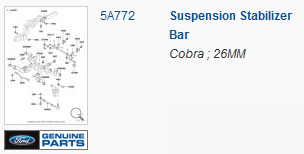
Regarding the rear sway bars, the one on the Terminator, again, is 26mm and [it is my opinion that] the '99/'01 had a diameter of 25mm. Some, however, have disagreed but I'll stand my ground. I came to this conclusion because the Ford parts catalog actually shows different sizes for the '99-'01 versus '03-'04 bars - easy enough. The bars do carry different part numbers, but that is also probably due to the more pronounced bend at the end of the Terminator bar that was necessary to clear the larger half-shafts (the '99/'01 bar has ends that are slightly straighter).
Adding to this, there have been issues with polyurethane bushings in the past since the only ones that were available for the rear bar (Prothane 6-1157) had a 25mm diameter. No surprise, but they fit the '99/'01 cars just fine. Unfortunately for so many Terminator owners that were not paying attention, when these were used on the 26mm bar, it led to terrible binding and even snapped brackets. Once that plague started to spread, it became part of the "poly is junk" hysteria that proliferated certain forums out there.
Yes, Prothane had the bushings labeled to fit '99 through '04, but in the end, it is the owners responsibility to know what parts are correct. The guys at Maximum Motorsports have indicated that these bushings have been recently revised with a 26mm diameter, but I imagine that would make them just a hair over-sized for the '99 & '01 Cobra. In any case, they are still an improvement over the Ford rubber.
Oddly enough, this modification never appeared to be a top priority out there, but that is fine - I will tell you it has made a big difference in handling. If you really want to firm up the IRS, give this big bar a shot. If you are serious about carving the corners, definitely don't overlook tuning of the sway bars, especially on these nose-heavy Cobras!
Note: Maximum Motorsports has a new version of their end links now on the market with a smaller main body to provide more axle shaft clearance. When using the "old" end links, be advised that the dual-adjustment holes on the Eibach bar may not come in to play if you have larger Terminator half-shafts. They will most likely contact the axles if you attempt to use the inner (i.e., stiffer) mounting hole due to their tight fit, but that may not be the case with aftermarket half-shafts. If you want to just stay with an OEM replacement link, there is also a "heavy-duty" version (with grease fittings) made by Deeza Chassis Parts, as FOL746, that are economically priced and a bit less meaty. I've had a set in my hands and will say they are definitely a step up from the Ford version. For around $15 each, they can't be beat.
 For anyone that places a premium on
handling, especially after adding new springs, aftermarket "C/C plates" are a
must-have. While the factory strut mounts may be fine for a grocery-getter or a
simple straight-line car, they are mediocre at best when it comes to really
dialing in an alignment. Typical for so many aftermarket Mustang parts, the
"standard" when it comes to them was largely set by Maximum Motorsports,
especially since theirs have really been the best out there for many years. The MM
plates are perfect and will definitely allow an adjustment range that can be
tweaked to the liking of just about anyone, whether on the street or the track.
For everything you want to know, see the MM
tech
page.
For anyone that places a premium on
handling, especially after adding new springs, aftermarket "C/C plates" are a
must-have. While the factory strut mounts may be fine for a grocery-getter or a
simple straight-line car, they are mediocre at best when it comes to really
dialing in an alignment. Typical for so many aftermarket Mustang parts, the
"standard" when it comes to them was largely set by Maximum Motorsports,
especially since theirs have really been the best out there for many years. The MM
plates are perfect and will definitely allow an adjustment range that can be
tweaked to the liking of just about anyone, whether on the street or the track.
For everything you want to know, see the MM
tech
page.
Once I installed my new springs (among many upgraded suspension parts), I actually decided to leave the stock plates on temporarily and splurge for an "inexpensive" alignment at a local Ford dealer just to see where the numbers would fall. Not surprisingly, the camber on the driver's side wouldn't go any less than -1.9°, and it was only slightly behind on the passenger side. The caster, of course, is essentially non-adjustable and fell way short of where I wanted it.
While some lowered Mustangs are able to settle with the OEM mounts, I had no intention of keeping them. Since I didn't have any desire to hog out (i.e., elongate) any bolt holes or use flimsy "camber adjustment" bolts to force the alignment to work, I wouldn't have wanted to stay with the factory plates anyway. With the MM gear in place, a local performance shop with a laser alignment rack went to work and put the numbers right where I wanted them (see my Chassis & Steering page). The difference is night and day.
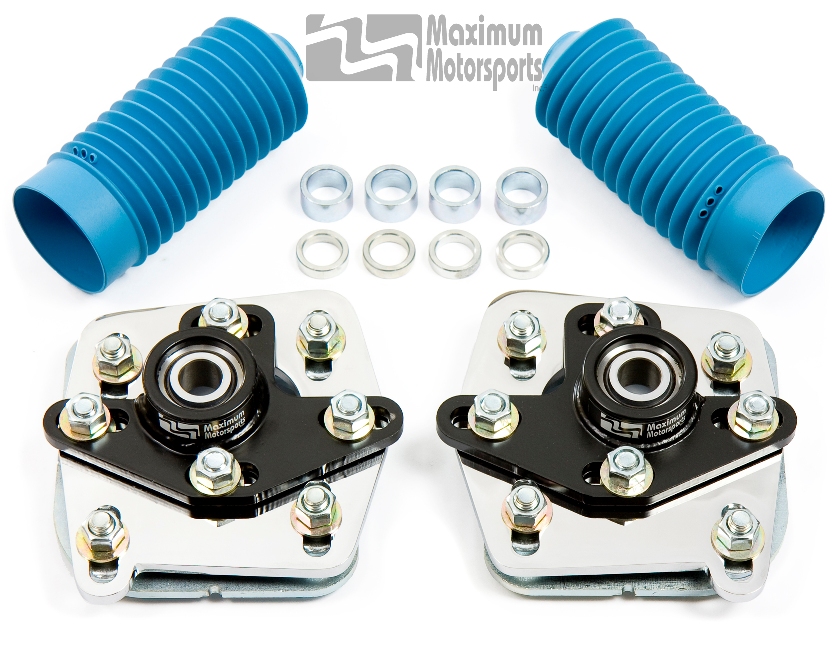
These plates are ridiculously strong, and not only do they spread the load on the strut tower by using four bolts, the strut gets solidly secured in the upper plate by a teflon-lined bearing rather than the factory rubber bushing (if you make the step to a coil-over front suspension, these are a must!). Although the bearing does allow a bit more of an NVH increase, it's a minor trade-off that is not detrimental at all. Additionally, the strut travel is increased by raising the strut shaft back up to compensate for shorter springs - VERY IMPORTANT - and something you cannot do with the stock mounts. Installation of them is straightforward and covered thoroughly in the MM instructions, so I didn't bother to document the process on my car. If you are continually serious in any way about how your Mustang handles, get these plates and find a good alignment shop!
Note: The plates shown in the thumbnail are specific to the Terminator due to their inclusion of the blue boots used on the Bilstein struts (MMCC0304). They can also be used on any other '94-'04 Mustang, especially if you have upgraded to the Bilstein struts, but the other kits for those years would not come with the boots. In addition, if you like bling, they also are available with a chrome lower plate as MMCC0304-C. If you already have the plates on an earlier Mustang and add Bilstein struts later, not to worry, you can also acquire the boots directly from MM.