![]()
![]()
![]()
![]()
![]()
![]()
![]()
![]()
![]()
![]()
![]()
![]()
![]()
![]()
![]()
![]()
![]()
![]()
![]()
![]()
![]()
Electrical
Featured
Most of the items here probably could be slipped in to some other areas, but creating a new page was perfect. Besides, how could I resist adding my $0.02 on some electrical facets of the Terminator? Actually, it's nothing overly shocking, but since I've had decent luck with some original and aftermarket parts (and similarly so with many other Ford vehicles I have owned over the years), certain things are simply worth praising, and others are worth adding.
 The
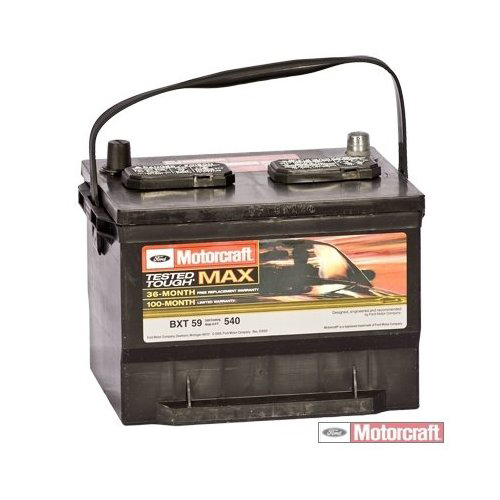
Motorcraft battery, BXT-59 here
(see thumbnail), is one item that is really fantastic: they are unbeatable for
long-term durability, reliability, and cranking power. Mine is actually the
third, but the second lasted almost 11 years (the first was replaced at the
selling dealership since my Cobra originally sat in their showroom for over a
year). The
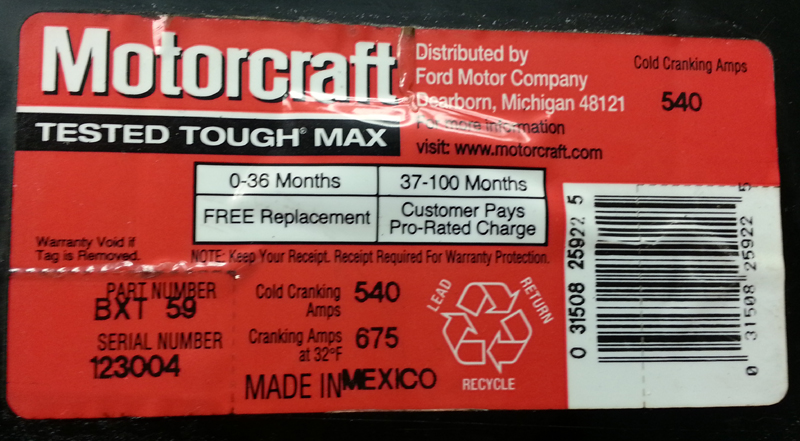
label on my second battery showed a serial
number of "123004", which is also the date of manufacture: 12/30/04. It was just replaced in the spring of 2015, but only as a preventative measure.
I probably
could have gotten more out of it, but I wanted to play it safe.
The
Motorcraft battery, BXT-59 here
(see thumbnail), is one item that is really fantastic: they are unbeatable for
long-term durability, reliability, and cranking power. Mine is actually the
third, but the second lasted almost 11 years (the first was replaced at the
selling dealership since my Cobra originally sat in their showroom for over a
year). The
label on my second battery showed a serial
number of "123004", which is also the date of manufacture: 12/30/04. It was just replaced in the spring of 2015, but only as a preventative measure.
I probably
could have gotten more out of it, but I wanted to play it safe.
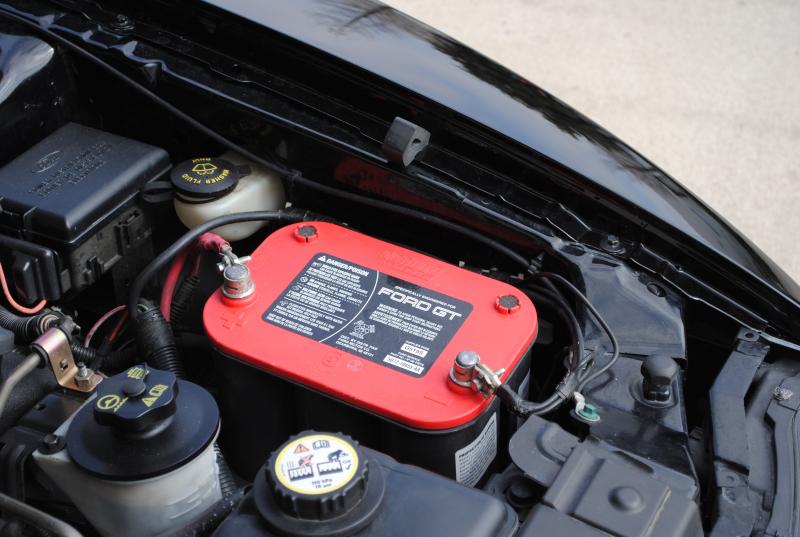
Sure, they don't look glamorous under the hood like the fancy Optima GT battery, but they work very well. Even better, there are no modifications needed for fitment like with the Optima or others. You just cannot go wrong with this battery, and if you want to retain the OEM look, why bother with anything else!
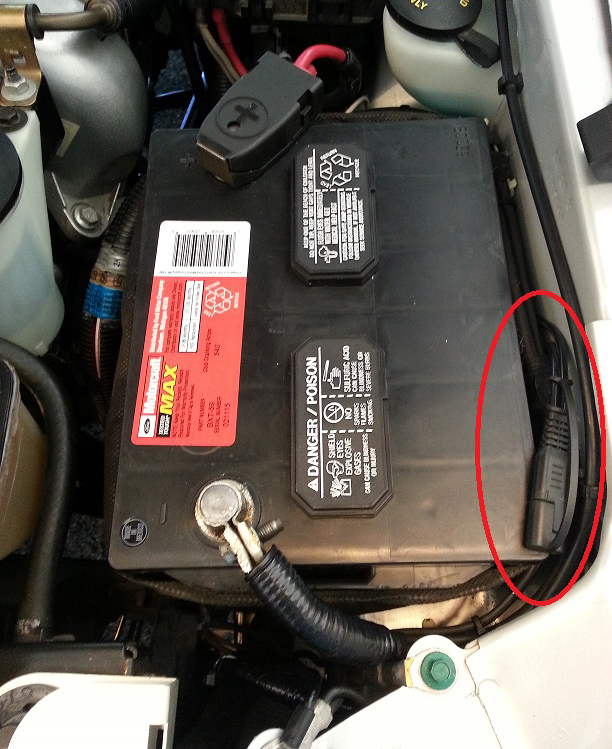
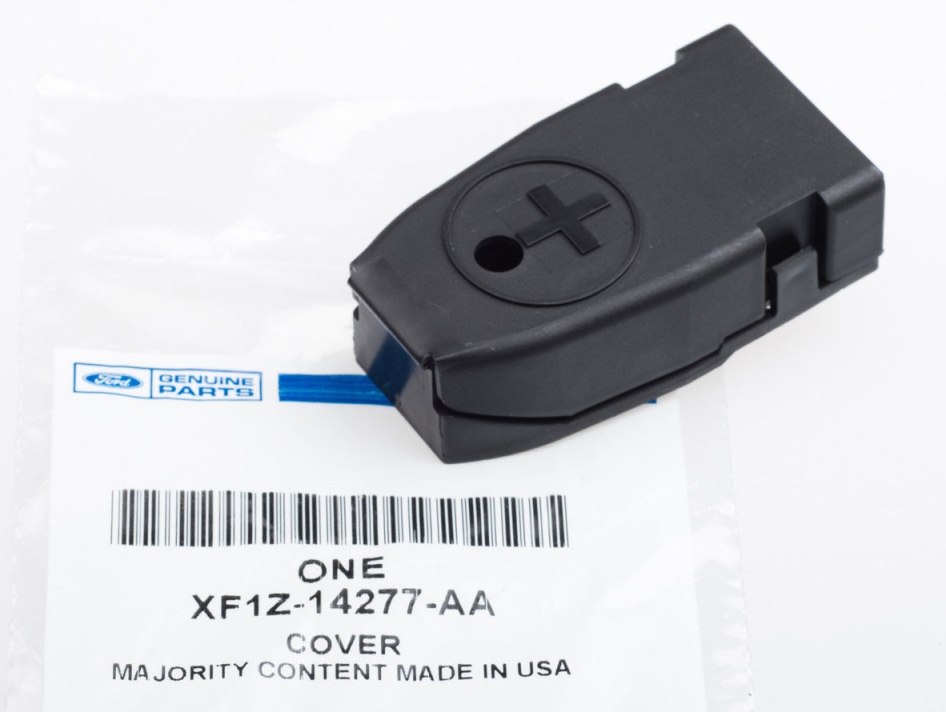
Note: In order to get the most out of your battery, especially for those of us that drive our cars on a limited basis, it's always a good idea to have a trickle charger connected. I like the Battery Tender Junior, especially for its compact size and easy of operation. Mine is actually hard-wired, which makes connecting it a snap, and for the price - about $25 on-line - it's a bargain. I leave it connected all time (when the car is parked, of course!), and if it means extending the life of the battery, you just don't want to be without it. Also, if you do prefer the stealthy wiring, but your car happens to be one that missed out on the positive terminal cover (a great place to connect the tender), you can still score it from Ford as XF1Z-14277-AA.
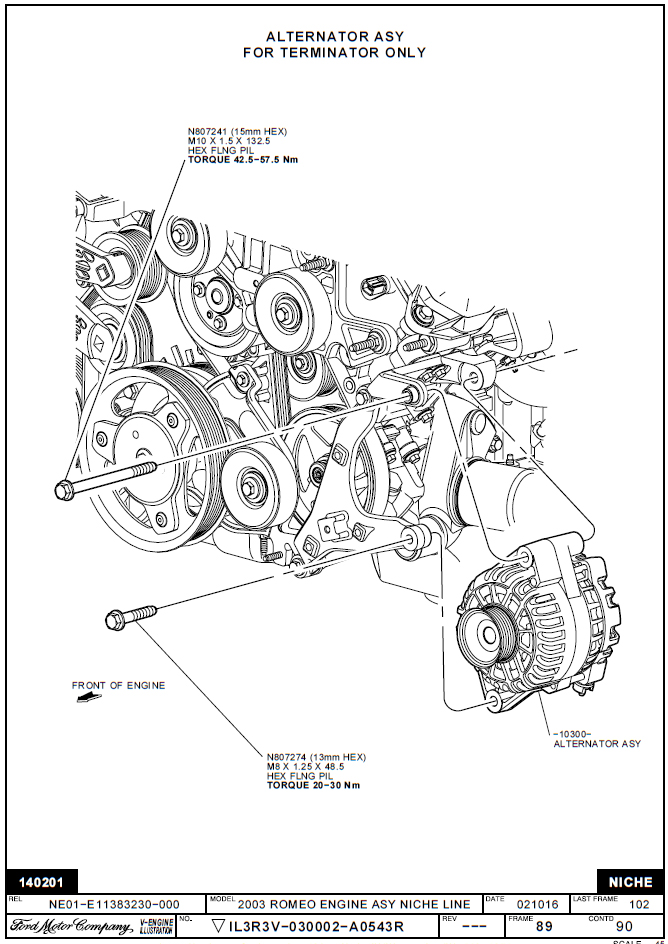
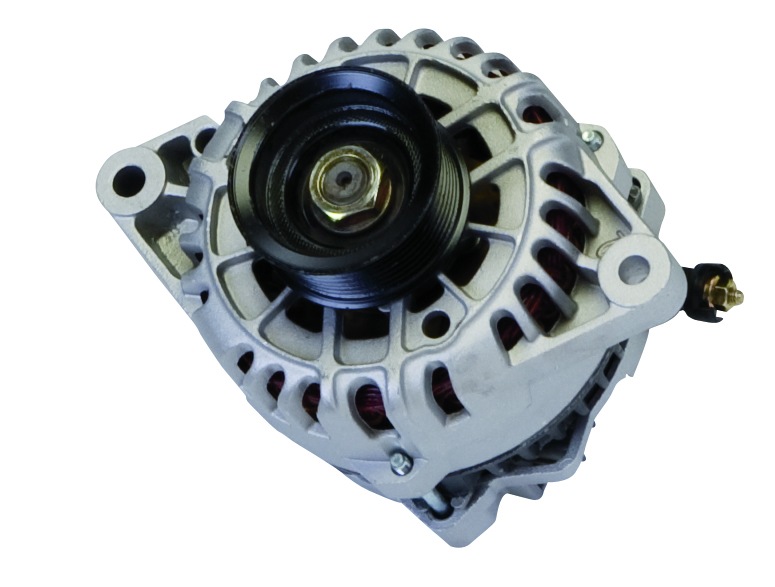
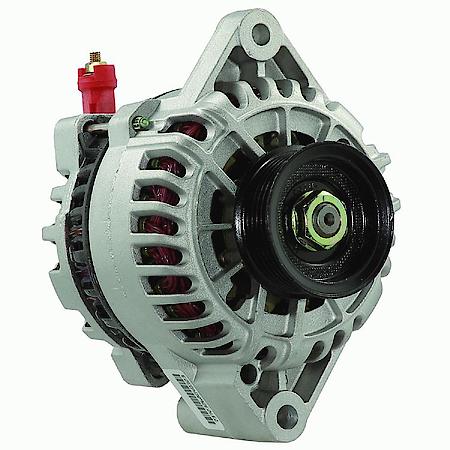
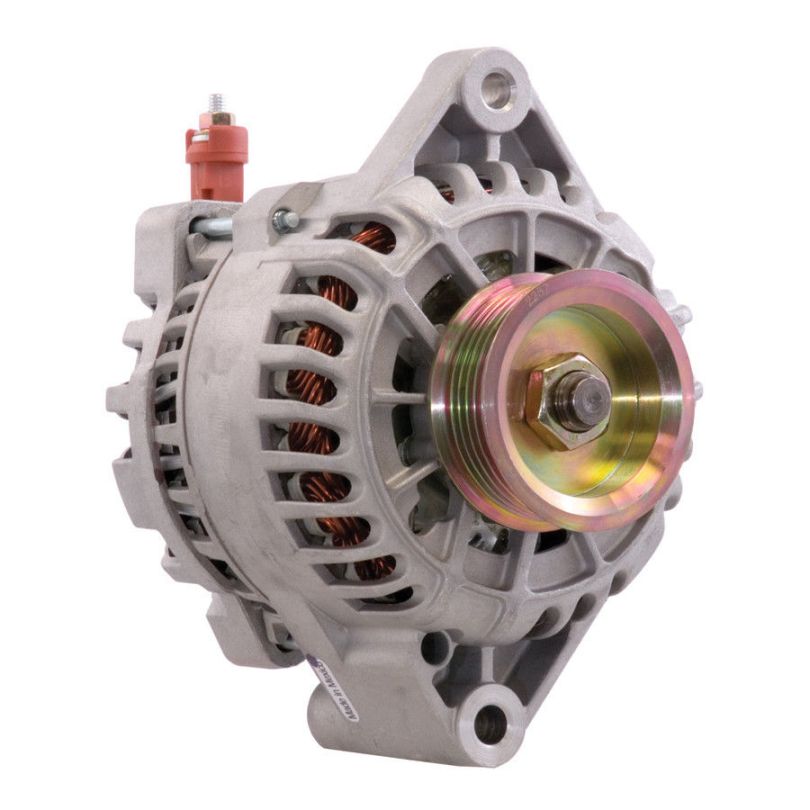
The Terminator has what is known as a Sixth Generation, or "6G" alternator (what Ford calls a generator in the service manual). Unlike previous DOHC Mustangs, it had an unusual mount which led to specific packaging thanks to the tight fit (there is less than an inch between the case and the frame rail). This has also been a source of contention for years: the location low on the engine is not the best for cooling, so they tend to succumb to heat in conjunction with years of abuse. Adding to that, the previous V-8 Mustangs had higher output alternators, but for the Terminator, we were stuck with one that is rated at 105A (commonly referred to as a 105/110). More on that a bit further down.
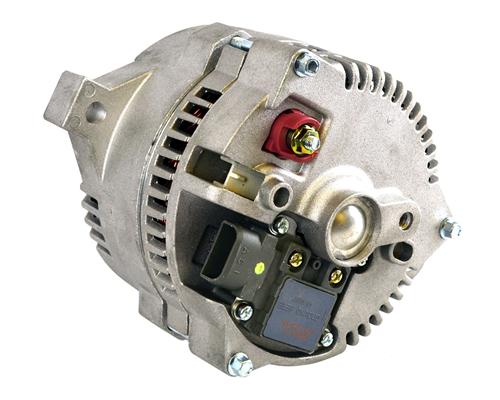
When I originally wrote my Engine page in mid-2015 (where this section had first resided), my OEM alternator had been hanging in there just fine, thus earning high marks for longevity. Unfortunately, all good things must come to an end, and it turns out mine started to go downhill shortly thereafter. Thanks to the Interceptor, I noticed the voltage output gradually dropping, frequently below 13V, but barely hanging on just above 13. Sure enough, once a tester was hooked up, it confirmed an impending failure of one or more diodes (part of the rectifier, which converts the AC power to DC). I figured I did pretty well to get this long of a life out of it, so now it was a matter of where to go from here.
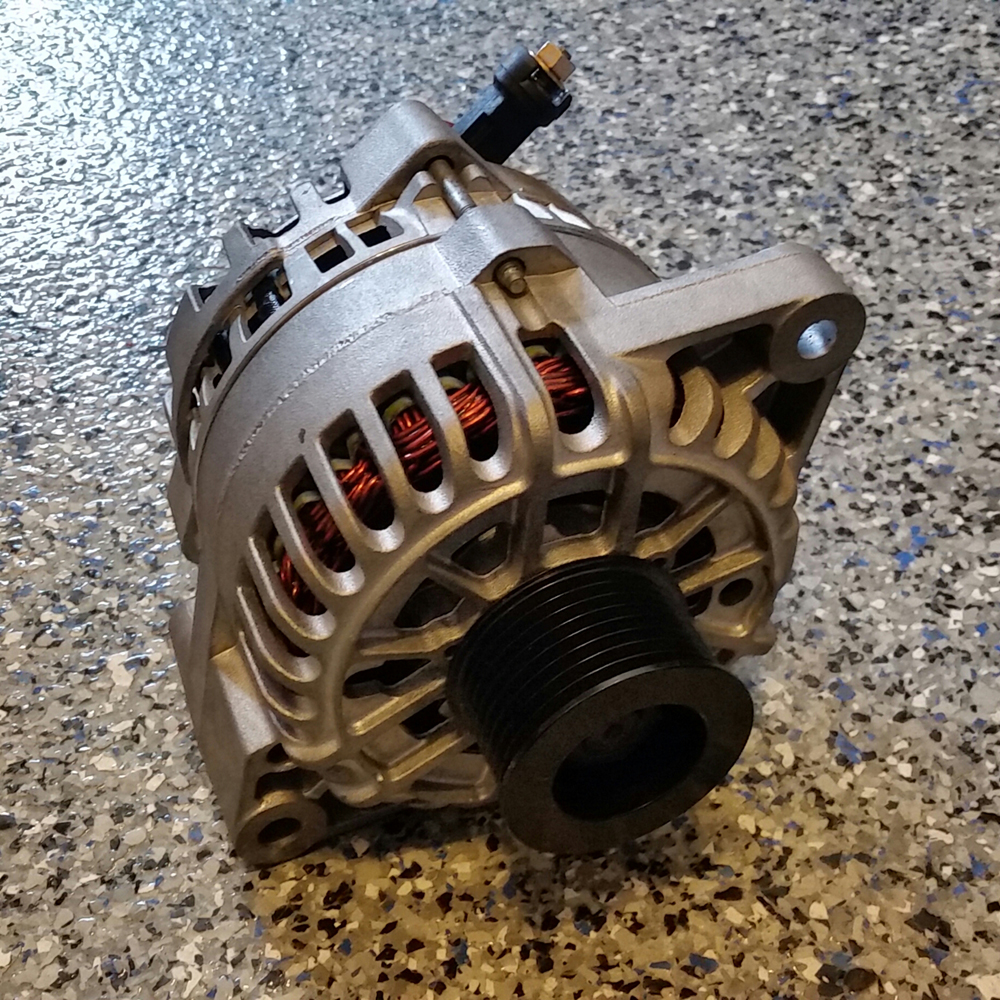
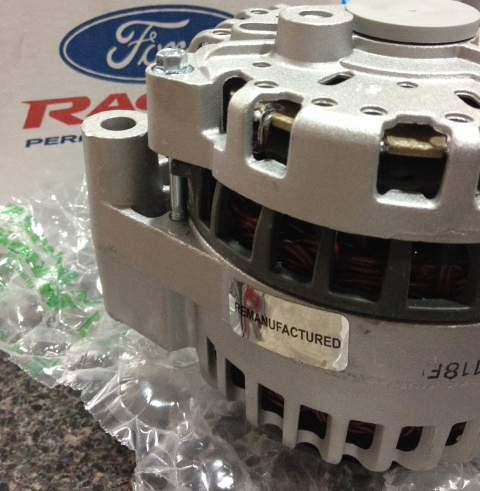
What I decided to do now was relatively simple - and convenient: have mine rebuilt to not only like new status, but upgraded to 160A (with all new internals, of course). There are plenty of these that can also be found on the internet, but after seeing so many mixed reviews of their seemingly limited life spans, I figured it was easy to keep it local in case any problems popped up. Even better, the price I paid was less than what I would have at the dealer or just about anywhere else. If I really wanted to splurge, Mechman or Nations are other sources for "performance" versions, but so far mine had worked out great.
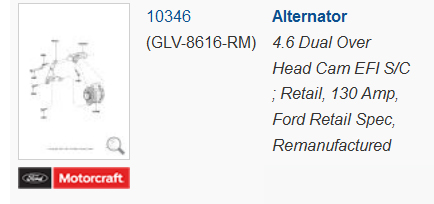
Not too long ago, there was a batch of seemingly new alternators that were available from FRPP as M-10300-SC46, but those came and went quick (most turned out to be remanufactured anyway). That one was listed as a 130 Amp unit - which has never really been confirmed - but if you want an alternator from Ford now, the only option is to acquire one in remanufactured form. Those are available as 2R3Z-10V346-BBRM (Motorcraft GLV-8672-RM), so that is better than nothing. Interestingly, the Ford Parts catalog also lists these replacements as 130A. Since the local dealer was convinced that was the norm from early '02 when the 2003 Ordering Guide was released, I believe this is information that just slipped through the cracks and was never corrected. After even having one tested, I can tell you it did not put out 130 Amps.
Note: The original alternator pulley has a diameter of 2-1/2"". Much speculation and conjecture has arisen as to how the alternator is "over-spun", which has apparently necessitated the use of a larger pulley to slow it down. Once you slow an alternator down and reduce its output, you put more strain on it since the battery voltage will drop, then you are stuck in a vicious cycle leading to the death of an alternator (they aren't meant to charge weak batteries!). I asked my rebuilder about this concept, and he stated he has never seen high RPM's shorten the life (well, not unless the bearings are bad) - it's just a matter of them succumbing to heat and abuse. My new one has a smaller 2-1/8" pulley, and it has worked perfectly - with the stock size crank pulley, of course. If that situation changes, I'll be happy to report back at a later date.
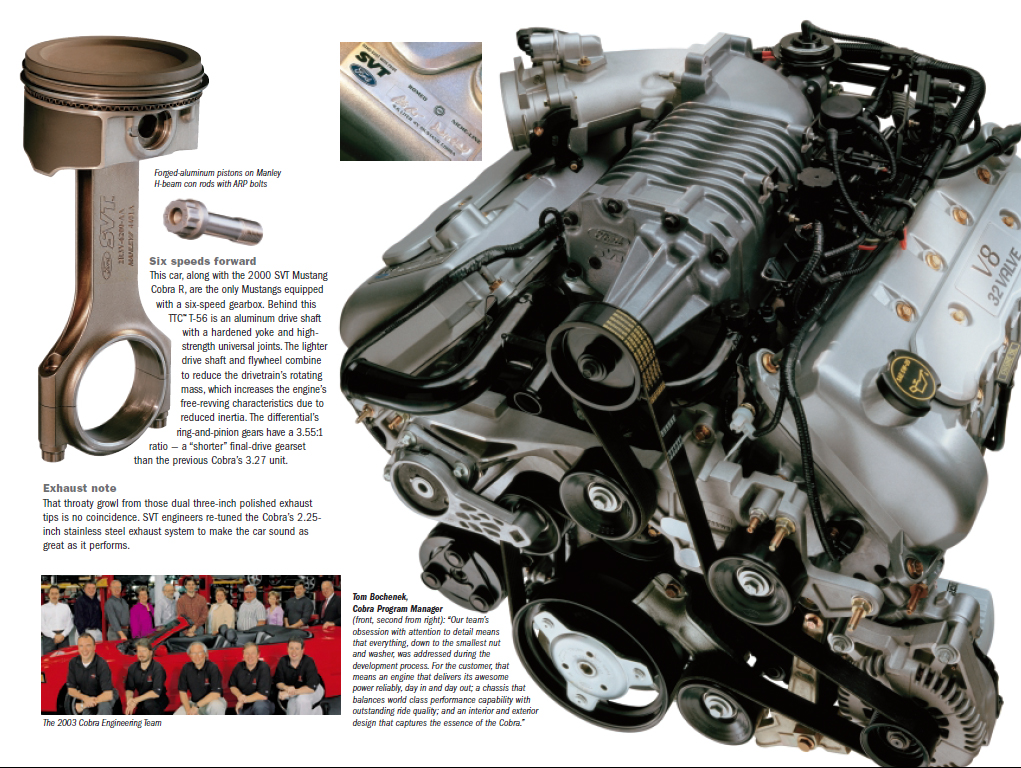
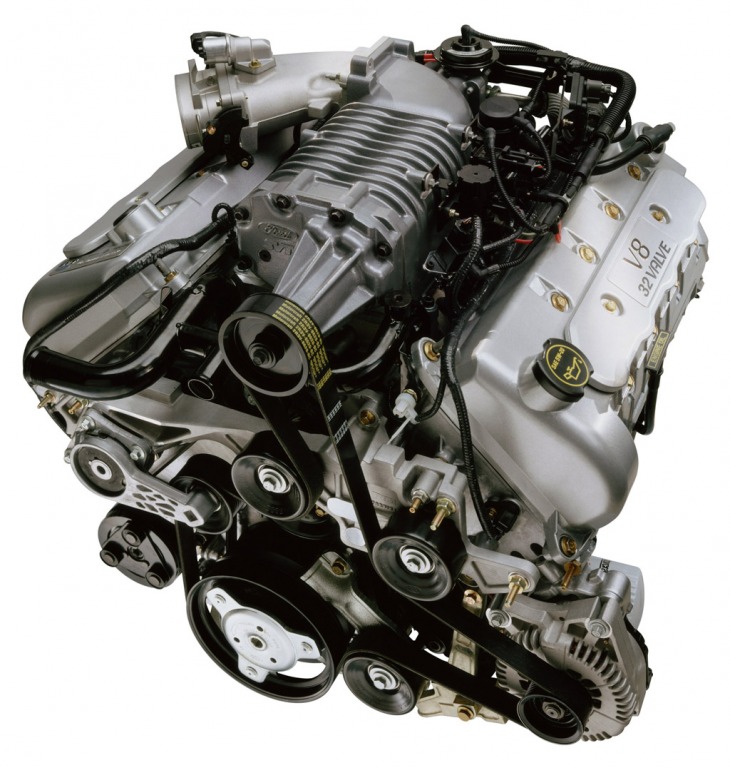
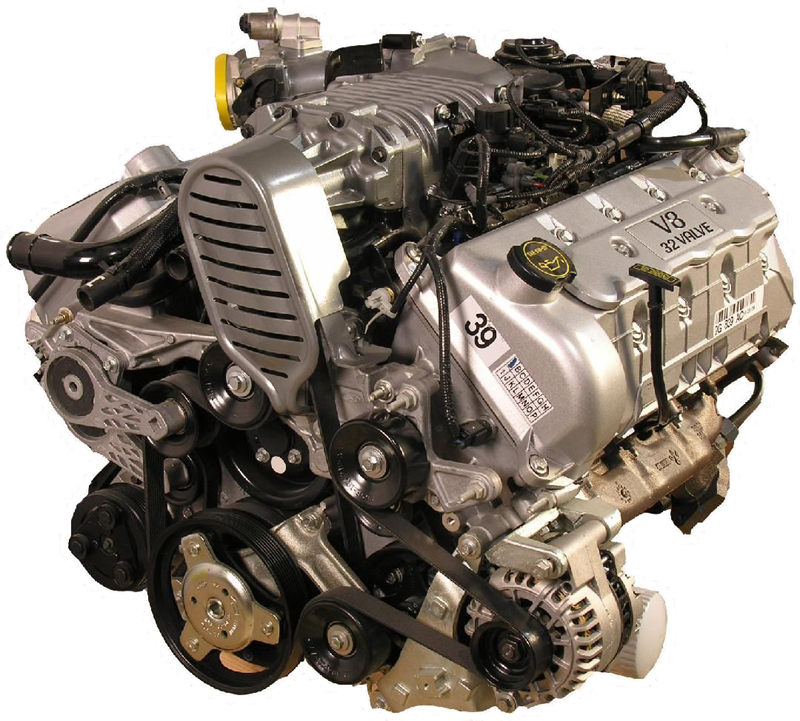
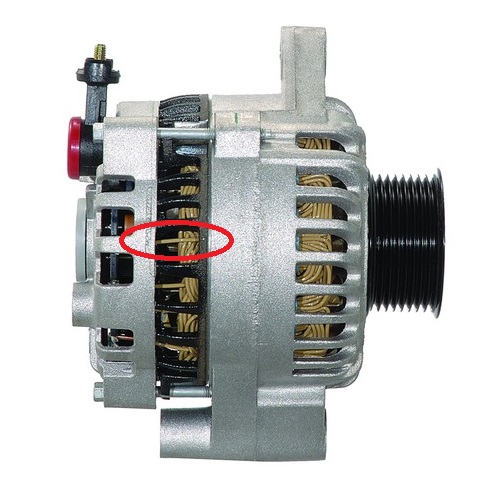
Anyway, regarding the 105/110A rating, the pictures below show two Terminator engines with different alternators. The one on the left is an early development version with a 4G "large-case" 130A alternator (this same picture is from the Press Kit and is also used in the brochure for both years). The other picture shows the production "small-case" alternator - perfect for the space, but the beginning of our woes. While Ford may have intended to use a "Heavy Duty" alternator, it never ultimately happened, and we got what is essentially a tweaked V-6 version instead.
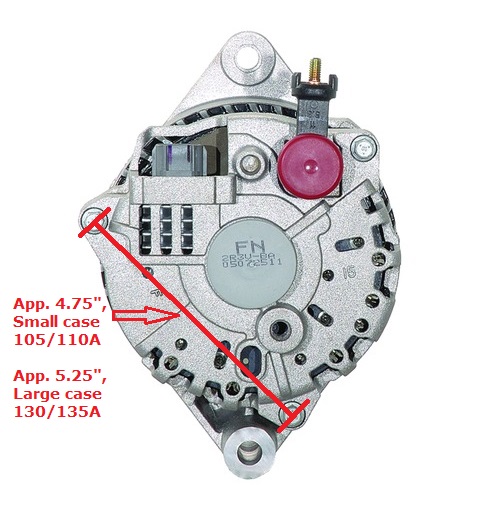
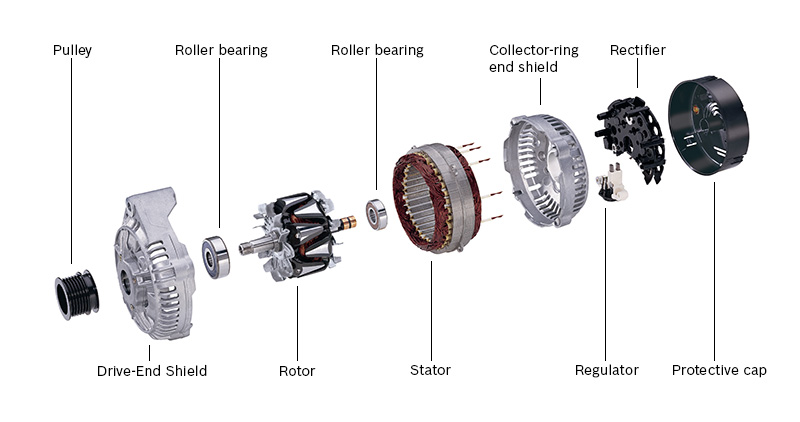
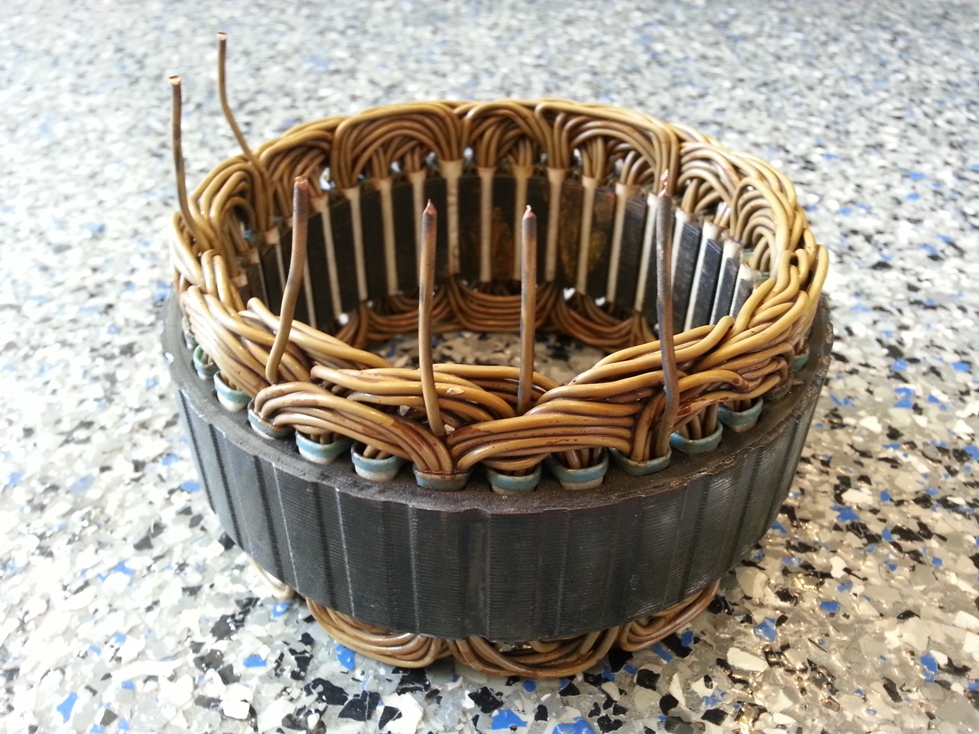
The difference between the case sizes are one indication of the output of these: the small case unit could have a 105 or 110A output, whereas the large case would be 130 or 135A. It's easy enough to tell which one is which by checking the case bolt distance at the back. Also, the "single-feed" wires from the stator to the rectifier are generally indicative of the lower output, whereas the higher amp versions have the same wires in bundles of two or more (although I believe the large case 130A is also a single-feed, however). An exploded view should clear it all up for those that have not seen the guts of an alternator, but I did save my original stator for reference. Additionally, the generic parts diagram & list for 6G alternators shows the appropriate items specific for a Terminator unit if you are still skeptical (this information is a follow-up of a screen-shot courtesy of Alternator & Starter Parts Wholesale).
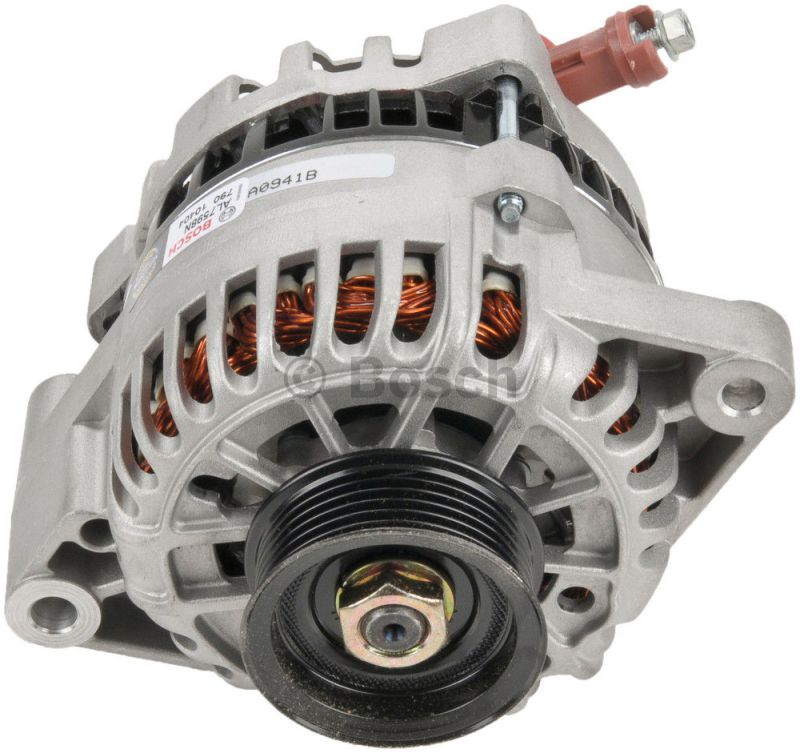
With regards to the parts diagram and screen shot above, there are plenty of shops that sell components and rebuild kits which is something well within the grasp of most DIY types. It's really not that complicated of a process, and for a look at it, check out this YouTube video from another vendor. If a 100% new alternator is the only way for some people, and if you can venture away from the confines of Ford products, here is another tip: you can buy a new V-6 alternator and simply swap the pulley and battery cable post, located on the back (the V-6 has a six-rib pulley, and the battery cable attaches at a 90° angle compared to the Terminator). Two perfect examples of easily acquired new alternators are the Bosch AL7598N and even the ACDelco 335-1143. Not a bad way to go, especially since the V-6 alternator is real easy to come by.
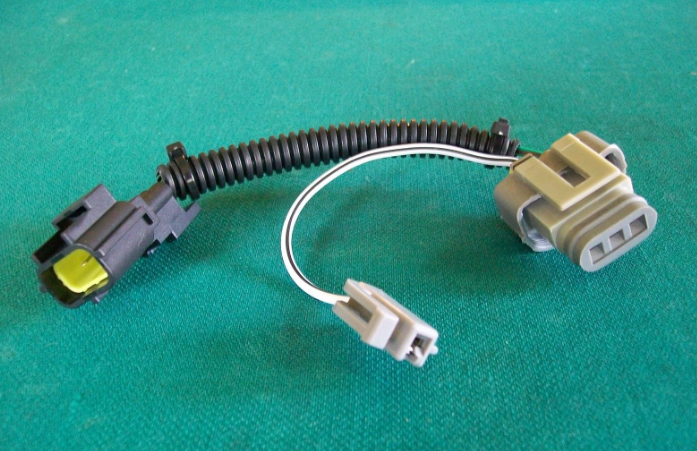
One additional option that has potential is a 6G to 3G conversion. The 3G alternator is a somewhat larger case 130A unit, and a very reliable model that has been around for many years. They had typically been used in the '94-00' V6 (as well as the '87-'93 5.0L and '94-'95 GT), and you'll need one with the grey regulator - supposedly non-PCM controlled. With this, a 6G to 3G harness is required (easily found with an internet search or on eBay), then some material must be removed from the mounting bracket for the alternator to fit - and it will be snug. Like with other V-6 alternator swaps, you also have to re-use the pulley from your Terminator, which is easy enough. While I have not tried this myself, I have heard it is a tight fit, but with the harness adapting perfectly (as seen from a rear view) it could be a great way to go. Thanks again to the V-6!
Note: For those using the AeroForce Interceptor (see further down this page), I noticed that mine consistently reads about 0.5V on the low side. If you rely on this reading solely to monitor the output of your alternator, you may think it is going bad, when it may be just fine. I have confirmed this with a voltmeter as well as monitoring the digital readout on the capacitor mounted in my trunk. It's definitely something to be aware of, since unnecessarily replacing an alternator is a real drag!
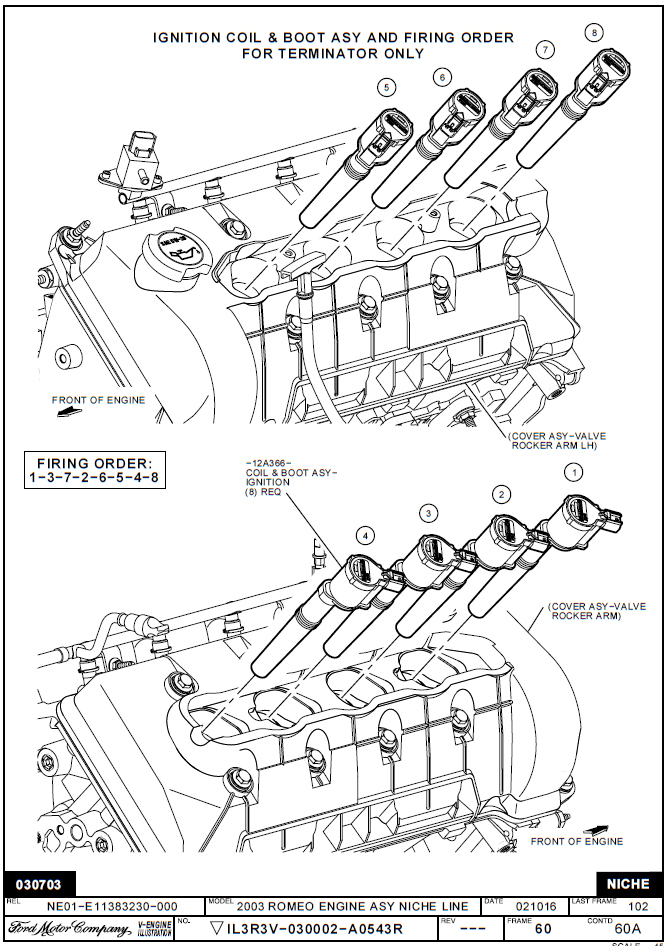
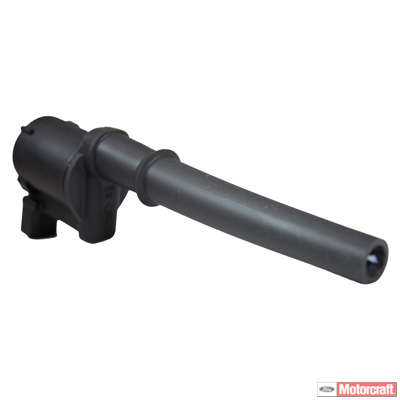
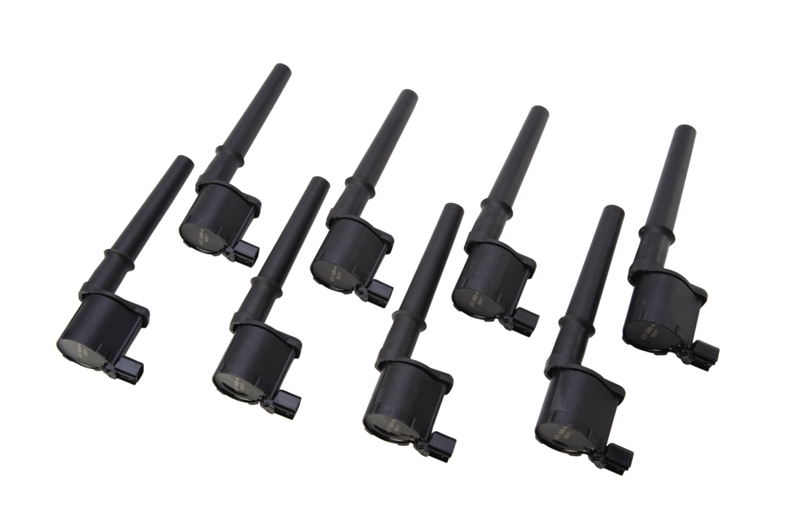 The
ignition coils,
commonly referred to as "COP's", for Coil-On-Plug, are quite
outstanding right from Ford. While there are a few out there from the
aftermarket, I have never heard of any that beat the OEM quality. These have
been know to not only last, but support engines with ridiculously high power
levels - something many Terminator owners can appreciate. Fortunately, you can
still buy them from Ford as 4L7Z-12029-AB (Motorcraft
DG-543).
The
ignition coils,
commonly referred to as "COP's", for Coil-On-Plug, are quite
outstanding right from Ford. While there are a few out there from the
aftermarket, I have never heard of any that beat the OEM quality. These have
been know to not only last, but support engines with ridiculously high power
levels - something many Terminator owners can appreciate. Fortunately, you can
still buy them from Ford as 4L7Z-12029-AB (Motorcraft
DG-543).
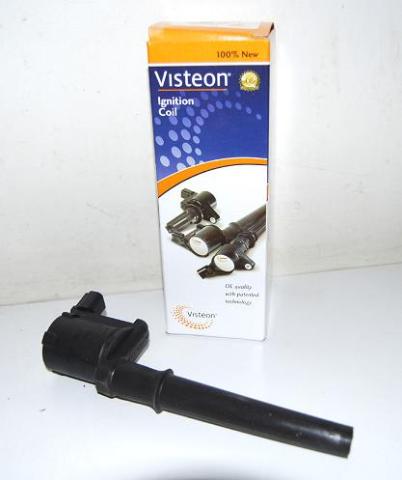
Another set is from Ford supplier Visteon, who I believe made these originally before production went to China. Their 60-1001 (made in Hungary, by the way) is more reasonably priced than those from Ford, and although I haven't had them in my hands, I have been told they are every bit as good as the original set - just an FYI. In any case, if you find yourself with a car that is starting to sputter a bit under power, chances are one or more COP's is about to check out. Rather than fool around with all kinds of diagnosis, throw in a new set and be done.
Note: If you want a nice deal on COP's, look to FRPP for M-12029-4V (shown in the thumbnail), which contains all eight. They are actually listed for the 5.4L Shelby, but are the same for the DOHC 4.6L. The last time I checked, this kit was about $280, which is a much better price than $50 each for the actual Ford part. Everyone should definitely have a spare set on hand!
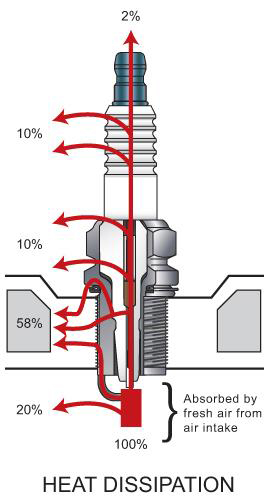
![]() An
automotive spark plug has two basic functions. The first is that it develops a
spark to start combustion. Second, it needs to remove heat from the combustion
chamber. This makes the "heat range" one important factor when choosing a plug.
That value, whether "hot" or "cold", does not directly dictate the temperature
of operation for any plug, rather is a measure of how fast the plug dissipates
heat in the combustion chamber (although a cold plug still technically operates
at a colder temperature than a hot plug!).
An
automotive spark plug has two basic functions. The first is that it develops a
spark to start combustion. Second, it needs to remove heat from the combustion
chamber. This makes the "heat range" one important factor when choosing a plug.
That value, whether "hot" or "cold", does not directly dictate the temperature
of operation for any plug, rather is a measure of how fast the plug dissipates
heat in the combustion chamber (although a cold plug still technically operates
at a colder temperature than a hot plug!).
With regards to heat, a spark plug dissipates about two-thirds of it through the cylinder head. Within the combustion chamber, the heat developed there is directly effected by the tip of the plug, more specifically, the insulator, to determine the best operating range of the plug (see the thumbnail above). While optimum spark temperatures are typically between 450 - 850°C, it is important to know the ramifications of where your plug falls. When it comes to performance upgrades, a good rule of thumb is one step colder for every 100HP increase (as usual, your mileage may vary!).
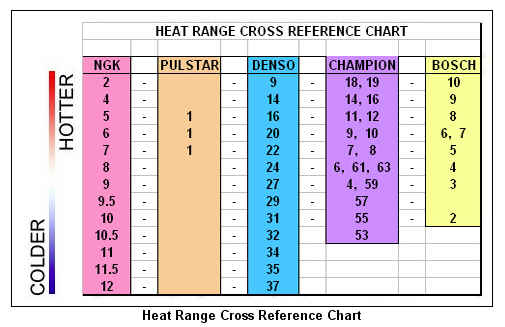
Note: While the terms are fairly standard, it is important to realize that numbering systems are all different when determining the heat range. With some manufacturers, the numbering system will go low-to-high for coldest to hottest, whereas it is the opposite with others (this heat range chart is a good example). Definitely important!
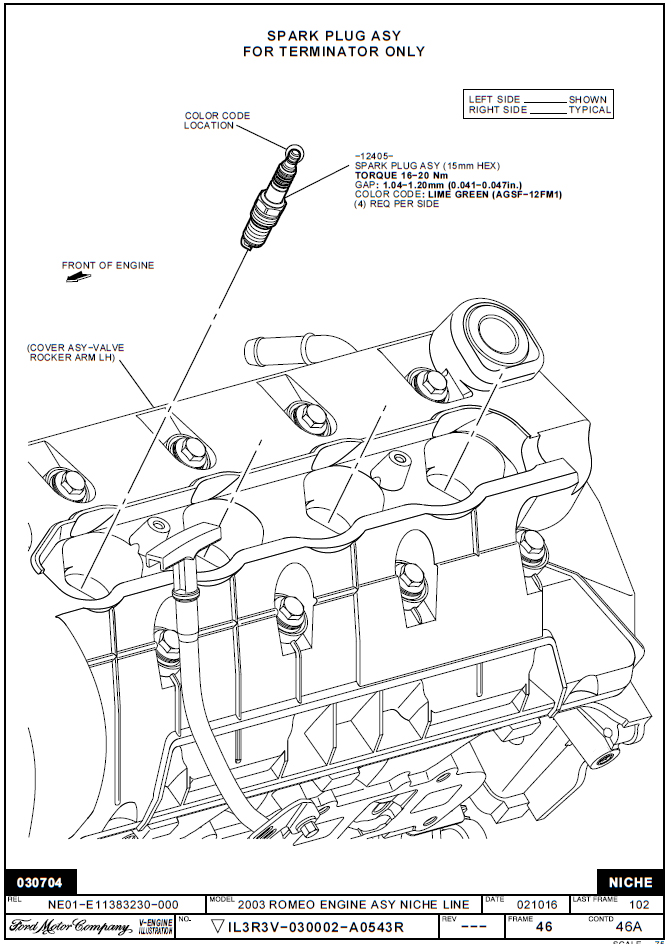
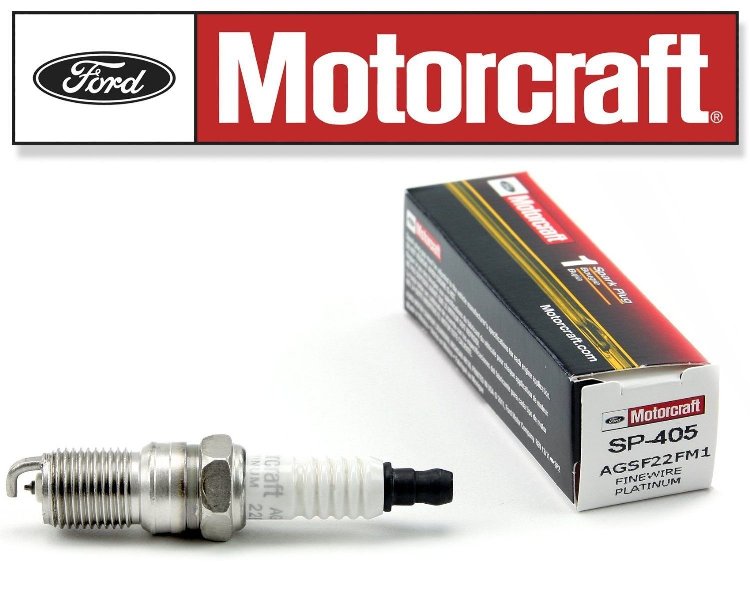
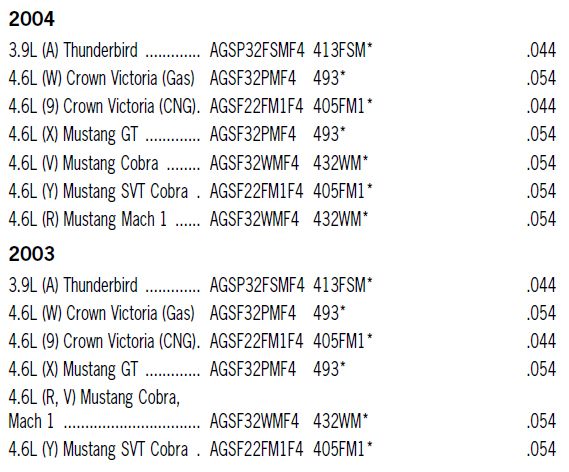
On to the Terminator, it was originally equipped with Motorcraft AGSF-12FM1 (SP-471) long-life platinum-tipped spark plugs. Towards the mid-point of the 2003 run and continuing in to 2004, they were changed to the AGSF-22FM1 (SP-405) version. While these two plugs are still in the "Cold" range for Motorcraft, the "22" is a step hotter (reference their Identification Chart). I have also heard rumors that there was even an AGSF-32FM1, but I have never been able to confirm that and didn't bother digging further. The "22" is also listed as the service replacement for both years.
In any case, if you ask ten different people, you'll probably get ten different answers as to what spark plugs are the "best" for your Cobra (and there is a ton of information on the internet). Many that have upgraded power and boost levels will swear that an inexpensive NGK copper plug is the way to go, especially since the conductive properties of copper really are excellent. The downside (if it can be considered that), is that you'll probably want to change them every year or so if you've gone this route. Fortunately they don't cost much, and if you don't mind the job, it's a decent way to go.
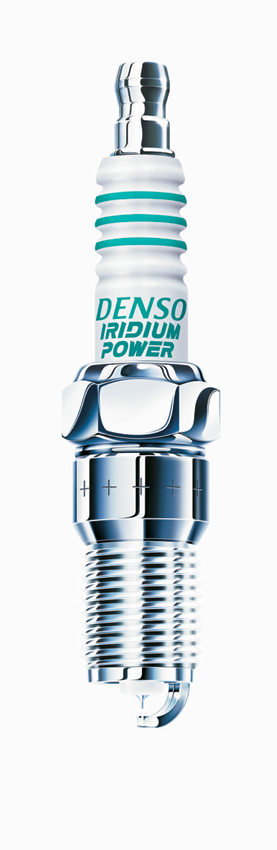
Rather than follow the masses, my plug choice is the iridium-tipped IT-22, made by Denso. This plug is also recommended by the guys at Kenne Bell and Whipple, and for good reason since they really are fantastic. The Denso plug has an ultra fine-wire tip and a "U-groove" electrode for outstanding combustion - something I will agree with (see their brochure for more information). Even better, they last much longer than copper plugs. While I'll admit that I tried an NGK copper plug, I never noticed any stellar performance that would make me prefer them over the Denso offerings, especially with their short lifespan. With the new Aluminator engine up and running, the idle is perfect so far with the Denso plugs - just what I wanted.
Whatever your plug choice, there is another important consideration: gap. The original plugs were gapped at between 0.041 - 0.047", and the replacement specification is actually 0.054". Since most Terminators end up with different superchargers and upgraded boost levels, gaps typically around 0.028 - 0.032" seem to work just fine. Remember, higher compression means a smaller gap is needed to ensure sufficient ignition with a denser fuel/air mixture. However it turns out, always analyze your plugs to determine what is going on in your engine, and have the tune adjusted accordingly. For as small as they are, their importance just can't be overlooked.
Note: As mentioned on my Castings page, spark plug torque is important, especially with earlier four-thread cylinder heads. I never tighten mine to more than 8-10 ft/lbs (with a beam-style wrench), and there is always anti-seize on the threads. Even though my original engine was sold off, it never had any problems in this area. If you crank on the plugs when you change them, especially if you do it on a regular basis, the threads really can take a beating. It's never a good thing to have a plug blow out thanks to damaged threads!
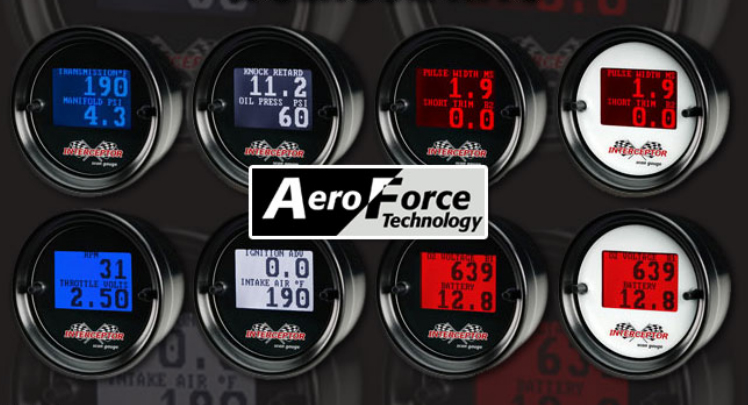
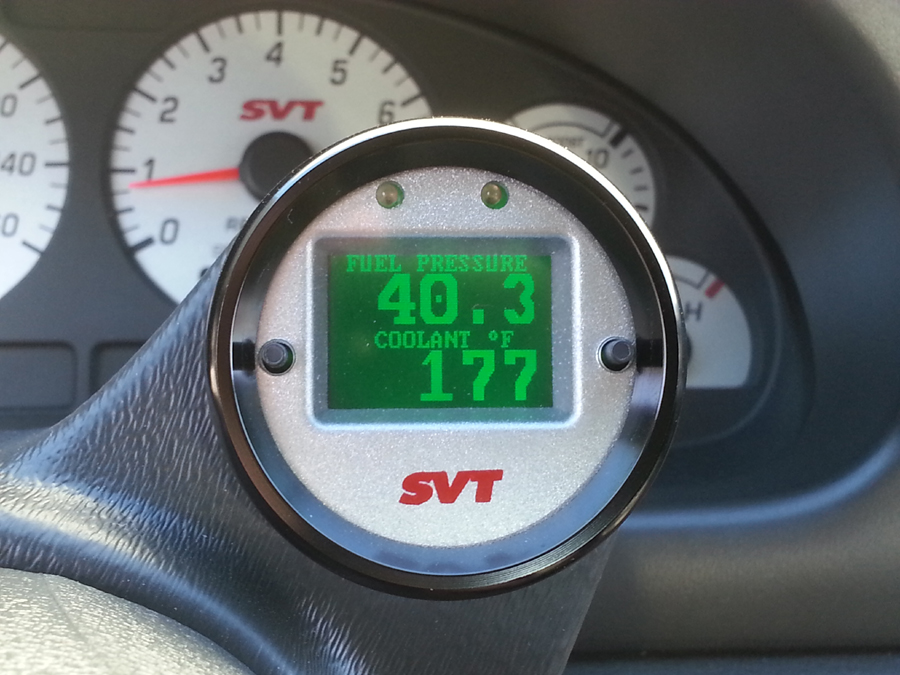 In
the early stages of tinkering, I had installed just a single gauge, which suited my tastes just fine. If you
go this route, you are limited to what that gauge displays, which probably isn't
much, especially if it is analog. As just about everyone that modifies their Mustang knows, a great option
here is the Interceptor, by
AeroForce
Technology. With this gauge, it's simply a matter of plugging it in to the
OBD port, then setting up the display to your liking to show many different
parameters now - very cool.
In
the early stages of tinkering, I had installed just a single gauge, which suited my tastes just fine. If you
go this route, you are limited to what that gauge displays, which probably isn't
much, especially if it is analog. As just about everyone that modifies their Mustang knows, a great option
here is the Interceptor, by
AeroForce
Technology. With this gauge, it's simply a matter of plugging it in to the
OBD port, then setting up the display to your liking to show many different
parameters now - very cool.
Although the thumbnail shows the old position on the steering column, the gauge was moved to a pod on the A-pillar (see my Interior page), along with the new wideband gauge shown below. My preference for the display had typically just been fuel pressure and coolant temperature, but I now set it to cycle through Fuel Pressure, Oil Pressure (see further down the page), Coolant Temperature, and Volts, with several other readings thrown in for good measure. It has performed flawlessly so far, and is definitely a great addition to keep an eye on the vehicles functions, or even scan for trouble codes. If you have yet to add one - or more - of these to your interior, you don't know what you are missing!
Note: One of the many nice features of the Interceptor is the ability to purchase it with different display colors and even custom faces. Mine had been green to somewhat match the backlighting of the factory gauges , but I wanted to change that to a simple black & white screen. Lucky for me, the company is right down the road, so they had me bring the gauge in so they could swap the display. Talk about excellent customer service - even more the reason to recommend having one.
 Once
the new - and expensive - Aluminator was
installed in the early part of 2016, I decided it would be prudent to use
Wideband oxygen sensors in both exhaust banks. A wideband sensor is a step
up from the original sensors that just indicate a mixture that is too rich or
too lean, but measure the oxygen content, or Air/Fuel Ratio, of the exhaust
precisely. When it comes to both tuning, and spirited driving, it's definitely
important to make sure the AFR is in check to get the most out of the engine (or
to simply keep from destroying it!).
Once
the new - and expensive - Aluminator was
installed in the early part of 2016, I decided it would be prudent to use
Wideband oxygen sensors in both exhaust banks. A wideband sensor is a step
up from the original sensors that just indicate a mixture that is too rich or
too lean, but measure the oxygen content, or Air/Fuel Ratio, of the exhaust
precisely. When it comes to both tuning, and spirited driving, it's definitely
important to make sure the AFR is in check to get the most out of the engine (or
to simply keep from destroying it!).
Additionally, a good wideband kit should also read in Lambda, which is a measurement of the ratio of oxygen present compared to the amount required to obtain ideal combustion, known as the Stoichiometric point. Where this is important is when the type of fuel varies (i.e., the inclusion of ethanol), which will also change the "Stoich" point. Since most pump gas today isn't 100% gasoline, it's definitely prudent to know what it is before you decide what an ideal WOT (wide-open-throttle) AFR will be for your engine.
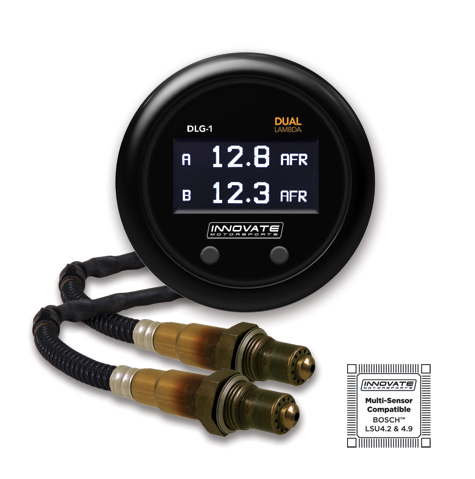
Until recently, the original AeroForce wideband kit I had been using worked great, but consisted of just the single sensor (no sense in only monitoring half of your engine!). Now, I'd be adding another, which entailed buying a new kit: the Innovate Motorsports 38910, or their "DLG-1". Innovate did a great job with this, making it a simple plug-and-play setup, with sensors now in both banks that read simultaneously on the included gauge (in AFR or Lambda). In a nutshell, one sensor is fed directly to the gauge, and the other to a small add-on controller (their "LC-2") which then sends its signal to the gauge where both readings are displayed. It just doesn't get any easier.
On a downside, I dove in to this after the new engine was up and running already, so that meant removing the mid-pipe - again - and having a new sensor bung added to the right side. Fortunately, I had an extra in stainless steel that was pre-curved on the inner side for a perfect fit (Innovate does supply two, but I had a matching pair already). Otherwise, this kit was very easy to wire in, and should keep a watchful eye on both exhaust banks. If you are spending big money on an engine, or just wanting to get the most out of your upgrades, having these sensors on both sides is a real plus.
Note: When it comes to wideband sensors, there are two versions out there, the LSU 4.2 and the LSU 4.9. Innovate supplies theirs with the 4.9, which is regarded as a better sensor (many if not most aftermarket kits use the same one). For whatever reason, this kit can also use a 4.2, with one of the differences being the plug end. Since the 4.9 is the more accurate of the two, it's always the one to look out for in whatever kit you decide to purchase.
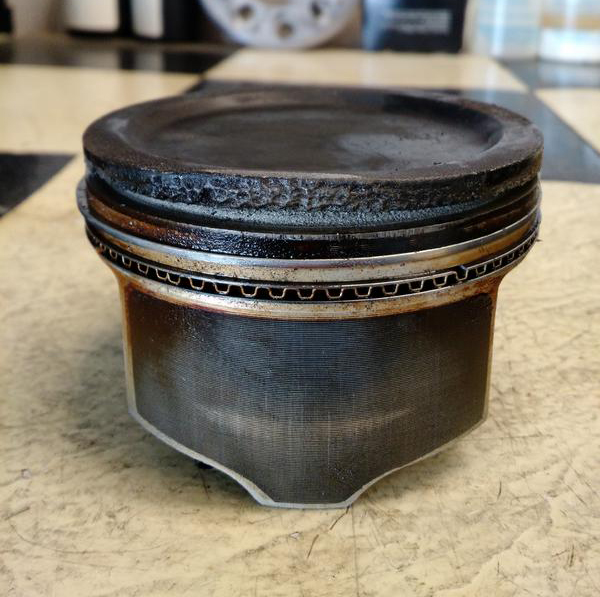
One item that Terminator owners really lost out on was a set of knock sensors. Thanks to the limited space beneath the "bathtub" intake, as well as the lack of sensor bosses on the iron block, Ford tossed them (they are present on the aluminum blocks, however). If there ever was a need for a certain vehicle to have the ability to warn us of detonation, this one is it.
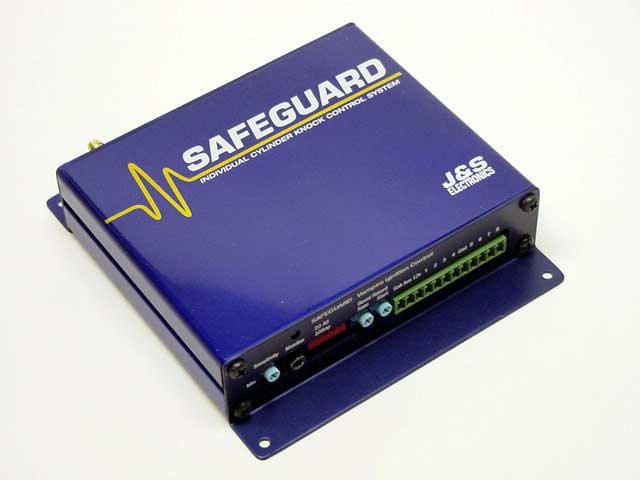
Thanks to the aftermarket, however, there is a solution: the J&S Safeguard, also known as the "Vampire" for the DOHC Ford engines. This device has actually been around for over 20 years and has developed quite the following. If you want to protect your expensive engine, there is no better way to do so than with this.
In a nutshell, the Vampire detects knock, also known as "pre-ignition" or "detonation", in any cylinder, then will reduce timing the next crank rotation. Even if there is knock present that we can't hear with our own ears, this will prove invaluable to keep the engine running in safe limits. Since detonation is cumulative, continued exposure will lead to piston damage (at the very least), even if you think your AFR is always where it needs to be. Not that a good tune won't generally do the trick, but unforeseen circumstances can always arise that throw a wrench in to the best laid plans.
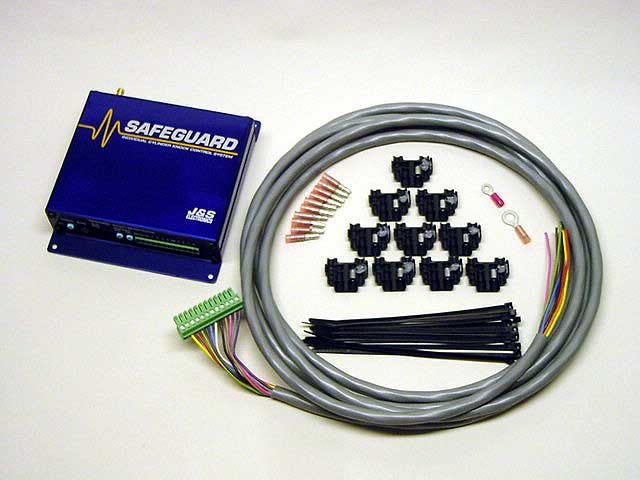
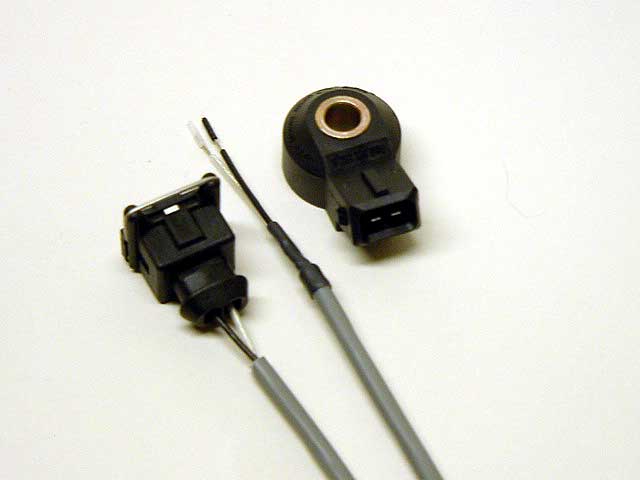
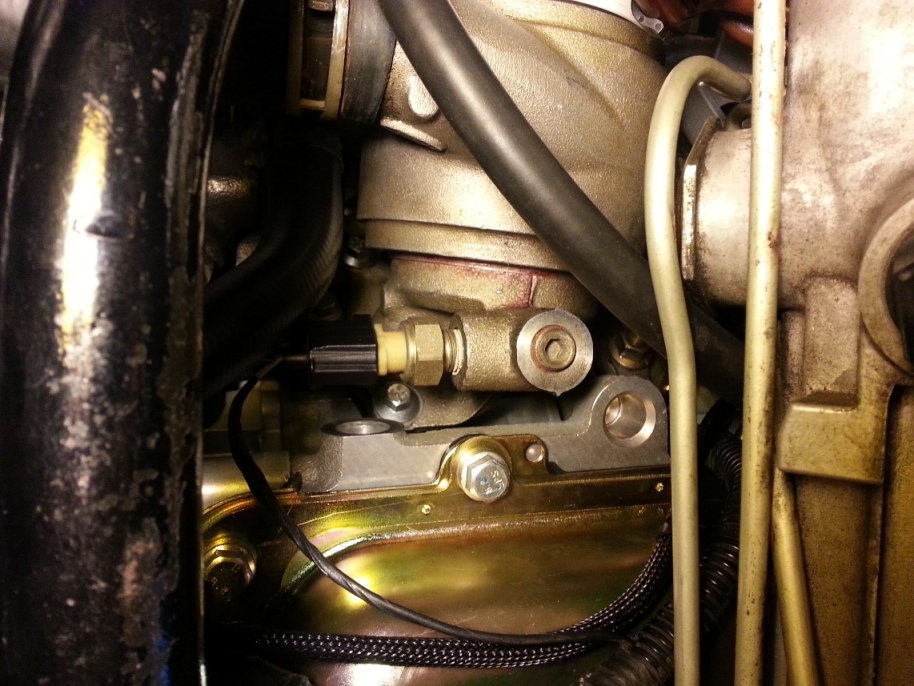
As I initially wrote this page, my own unit was in the process of being wired in, and fortunately, installation was very straightforward. Once the box receives switched power and ground, the included harness is tapped in to each COP signal (doing so at the ECM connector in the passenger side footwell is easiest), and a vacuum line is plugged in to the boost gauge line behind the glovebox. The knock sensor is an add-on here, and it plugs right in to the main harness easily enough. Even better, the new Aluminator block has the perfect mounting boss on the driver's side for it.
With 2018 fading away, the Vampire has performed flawlessly, not only with the initial temporary tune, numerous dyno pulls, and then the final tune (actually, the tuning went so well that the add-on LED monitor never made a peep!). Who knows, I could luck out and never have any issues that would require the timing to pull back. No matter what, I know it will be well worth it, especially since these always have received nothing but praise. There is simply no better way to protect your engine currently available on the market. Many thanks go out to J&S's owner, John Pizzuto for making boost a bit safer for all of us!
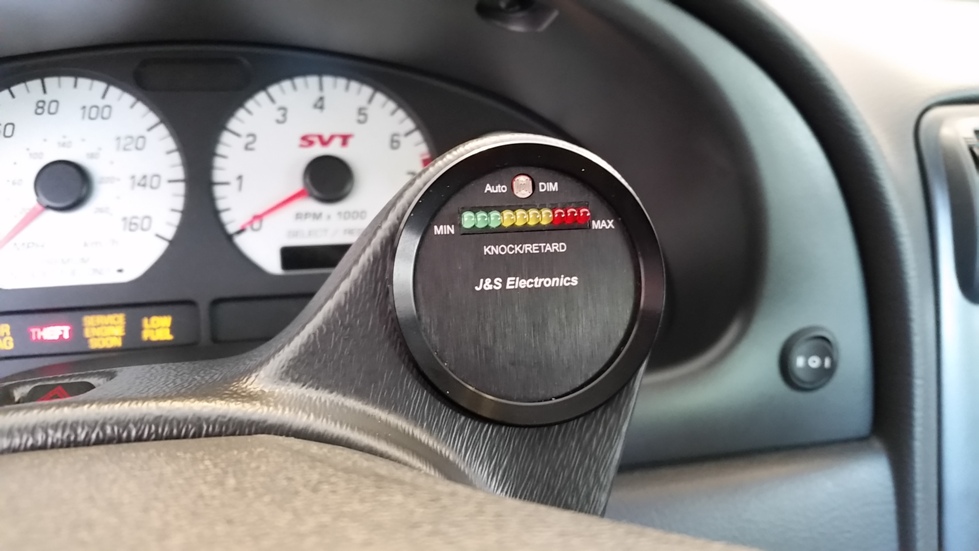
Note: Since I just mentioned the LED monitor, it's worth adding that mine found a perfect home on the steering gauge pod. With my other two gauges comfortably residing in the A-pillar pod now, the steering column was ideal for this stealthy "gauge". I can't spell out every detail as to what it is indicating, but it does run a test sequence at start-up, and if any knock is detected while the engine is running, an LED flash or series of flashes will let the user know. My engine is running so well that I hardly ever see anything other than a brief flicker, but I'm glad it is telling me the Vampire is keeping my hard work all in check!
 With
the new, and expensive engine running well, another important
parameter I wanted to keep tabs on was oil pressure. Actually, this is something
that all Terminator owners should be cognizant of, especially with the fragile
factory oil pump gears. Unfortunately, Ford only supplies us with an on/off sensor to
drive the factory gauge, which definitely is not enough. The solution is easy
though: an aftermarket add-on sending unit, with this one coming, again, from AeroForce. Even
better, the new sensor connects right to one of the analog pins on the
Interceptor, alleviating the need for another gauge. While there are kits
out there that are both electric or mechanical, it made sense since to go with
the former since it was essentially a plug-and-play operation.
With
the new, and expensive engine running well, another important
parameter I wanted to keep tabs on was oil pressure. Actually, this is something
that all Terminator owners should be cognizant of, especially with the fragile
factory oil pump gears. Unfortunately, Ford only supplies us with an on/off sensor to
drive the factory gauge, which definitely is not enough. The solution is easy
though: an aftermarket add-on sending unit, with this one coming, again, from AeroForce. Even
better, the new sensor connects right to one of the analog pins on the
Interceptor, alleviating the need for another gauge. While there are kits
out there that are both electric or mechanical, it made sense since to go with
the former since it was essentially a plug-and-play operation.

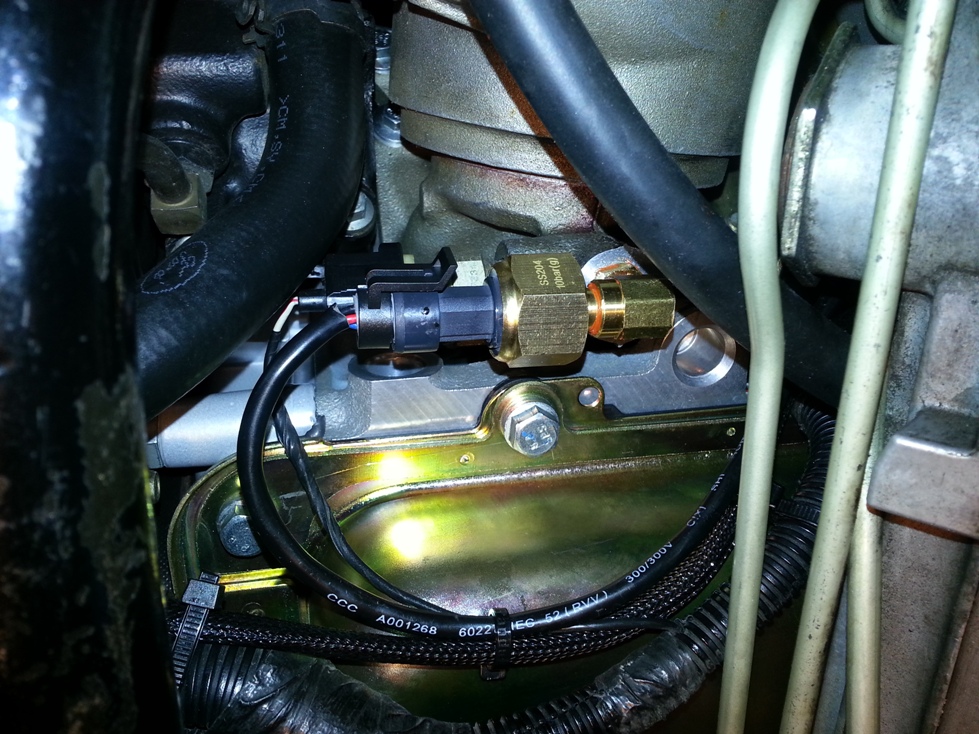
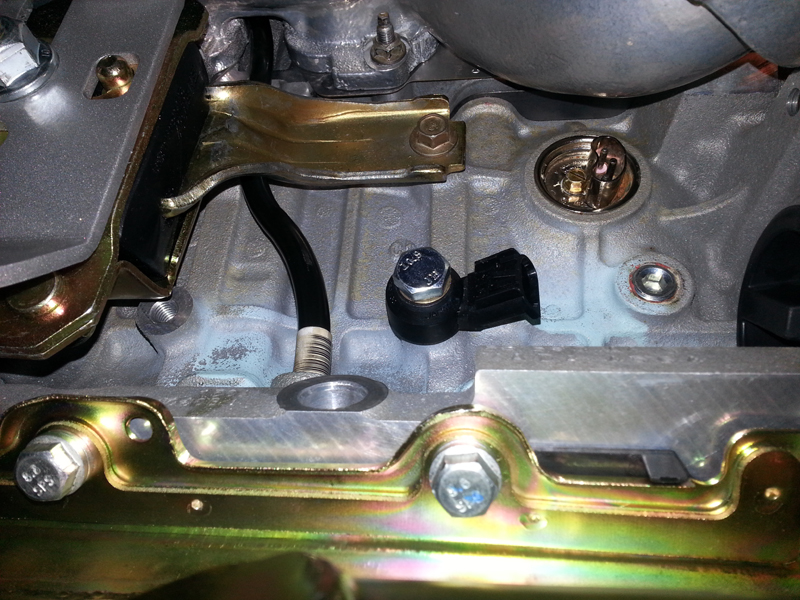
The sensor itself fits in the empty port beneath the oil filter, adjacent to the OEM sensor, and from there it is a mater of running the harness (I fished it through the small boot adjacent to the brake booster), connecting to power, and plugging it in to the back of the gauge. You will have to get somewhat creative with how you install it, but essentially, all you need are adapters for the 1/4" pipe thread in the port, stepped down to the 1/8" pipe thread on the sensor. I have seen this in many combinations using a Tee on the factory sensor, exchanging their positions, or just adding the new sensor to the existing port as I did. The pictures above, from left to right, show my sensor mocked up (1/4 MIP to 1/8 FIP reducer and a 1/8 FIP/MIP tee), the un-used plugged port, then the new sensor installed.
Being such an easy feature to add, there really is no excuse not to have one, especially if you drive your car like it was meant to be driven! I have heard there are ways to actually convert the original factory gauge to read true pressure, but the hassle of modifying the gauge and doing whatever else it takes doesn't compare to how simple it is to add this. Also, having an accurate digital readout just can't be beat. For less than $100, it is chump change when you are talking about saving one of these engines.
Note: When purchasing this kit from AeroForce, be advised that you will also need a 12V to 5V transformer. If you are handy enough, it's probably simple to fabricate this yourself, but buying it is just as easy. Not only are there DIY plans on the internet, there are plenty out there that can be found inexpensively. Coincidentally, AeroForce also sells one that will take any hassles out, making this a great package deal with a wiring job that anyone can handle.
 Not
that I'd ever admit to driving like a maniac, but every so often you just find
yourself drifting over the published speed limits, no matter what you drive.
Thanks to modern technology, most police forces out there have gotten creative -
and aggressive - when it comes to dealing with those that have a heavy right
foot. In my state, most of the speed traps are manned by LiDAR,
commonly referred to simply as "laser". If you are hit, they
have you.
Not
that I'd ever admit to driving like a maniac, but every so often you just find
yourself drifting over the published speed limits, no matter what you drive.
Thanks to modern technology, most police forces out there have gotten creative -
and aggressive - when it comes to dealing with those that have a heavy right
foot. In my state, most of the speed traps are manned by LiDAR,
commonly referred to simply as "laser". If you are hit, they
have you.
Again, I'm not confessing to having a lead foot, but sometimes you just have to enjoy your vehicle, even if you are just a few MPH beyond the speed limit (no speeding tickets in over 30 years, knock on wood). Enter the Blinder M-27 X-Treme laser jammer, which does exactly that: jams the laser. This device works by having two small sensors in the front grille (see the thumbnail) that absorb the laser and jam the signal back to the device, making it impossible for speed to be determined. If you are hard core, extra sensors can be mounted on the back of the vehicle to prevent a reading from the other direction.
I won't necessarily suggest that everyone should go out and buy a jammer (check your local laws!), but face it, you could get nailed for doing just a small amount over the speed limit and that is a real drag. As much as I do not advocate any kind of street racing either, sometimes it is just nice to really enjoy our cars, even if it involves being a bit frisky. In any case, there is a relatively informative YouTube video that shows the basics of how these contraptions work, so check it out and decide if one is right for you!
Note: Although I can attest to the effectiveness of the now-discontinued Blinder (so far!), another popular system is made by Laser Interceptor. I don't have any knowledge of this unit, but a friend that used it at one time gave it plenty of praise. There is also another brand mentioned in the above video (RIP Radar Roy), so if anything, one has some freedom of choice here if going this route.
 Although
the above mentioned jammer is a necessity in the Cobra, I figured it was also
worth having a good radar detector to complement it. Despite laser being more of
the norm where I live, there are times when I take road trips where other speed
detection methods are used for various reasons. Better safe than sorry, and even
with popular apps such as Waze, there is no
sense in being completely blind to speed traps and traffic cameras. Enter the
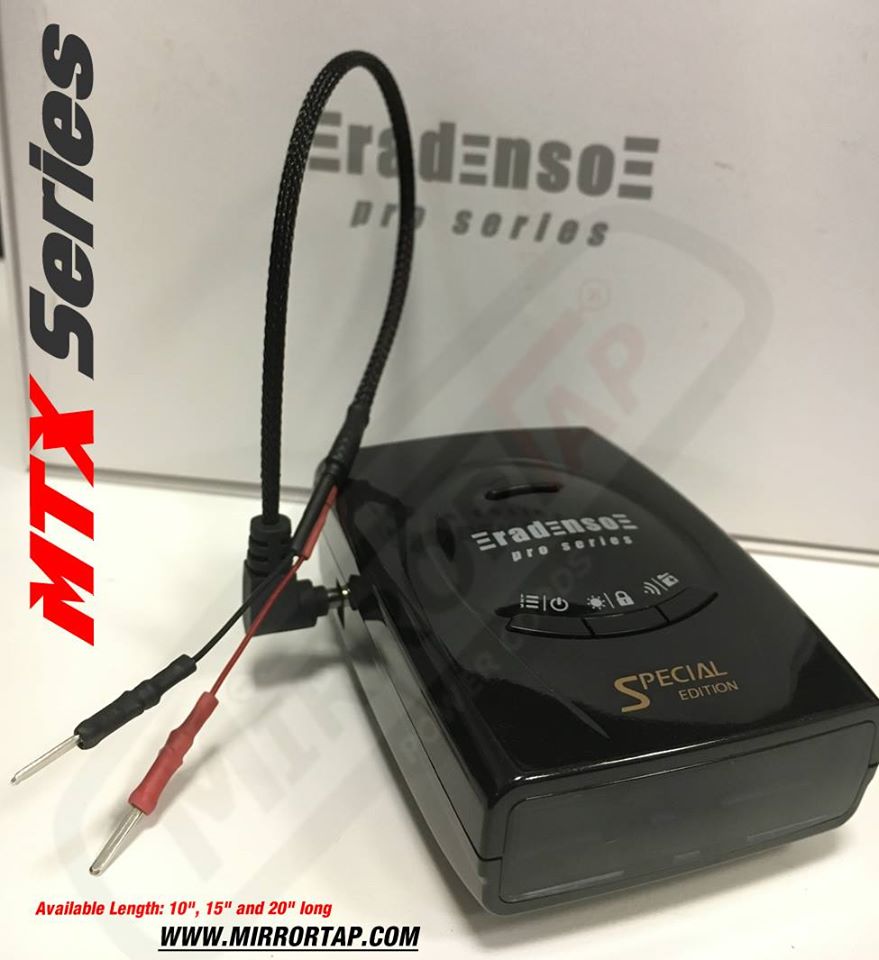
best radar detector you have probably never heard of:
Radenso. The company actually originated in
Germany (known there as Genevo), and
branched out to the US for a good reason: stellar performance. Actually, their
build quality is fantastic as well, but everything about them is just top-notch
and on par with the priciest detectors out there.
Although
the above mentioned jammer is a necessity in the Cobra, I figured it was also
worth having a good radar detector to complement it. Despite laser being more of
the norm where I live, there are times when I take road trips where other speed
detection methods are used for various reasons. Better safe than sorry, and even
with popular apps such as Waze, there is no
sense in being completely blind to speed traps and traffic cameras. Enter the
best radar detector you have probably never heard of:
Radenso. The company actually originated in
Germany (known there as Genevo), and
branched out to the US for a good reason: stellar performance. Actually, their
build quality is fantastic as well, but everything about them is just top-notch
and on par with the priciest detectors out there.
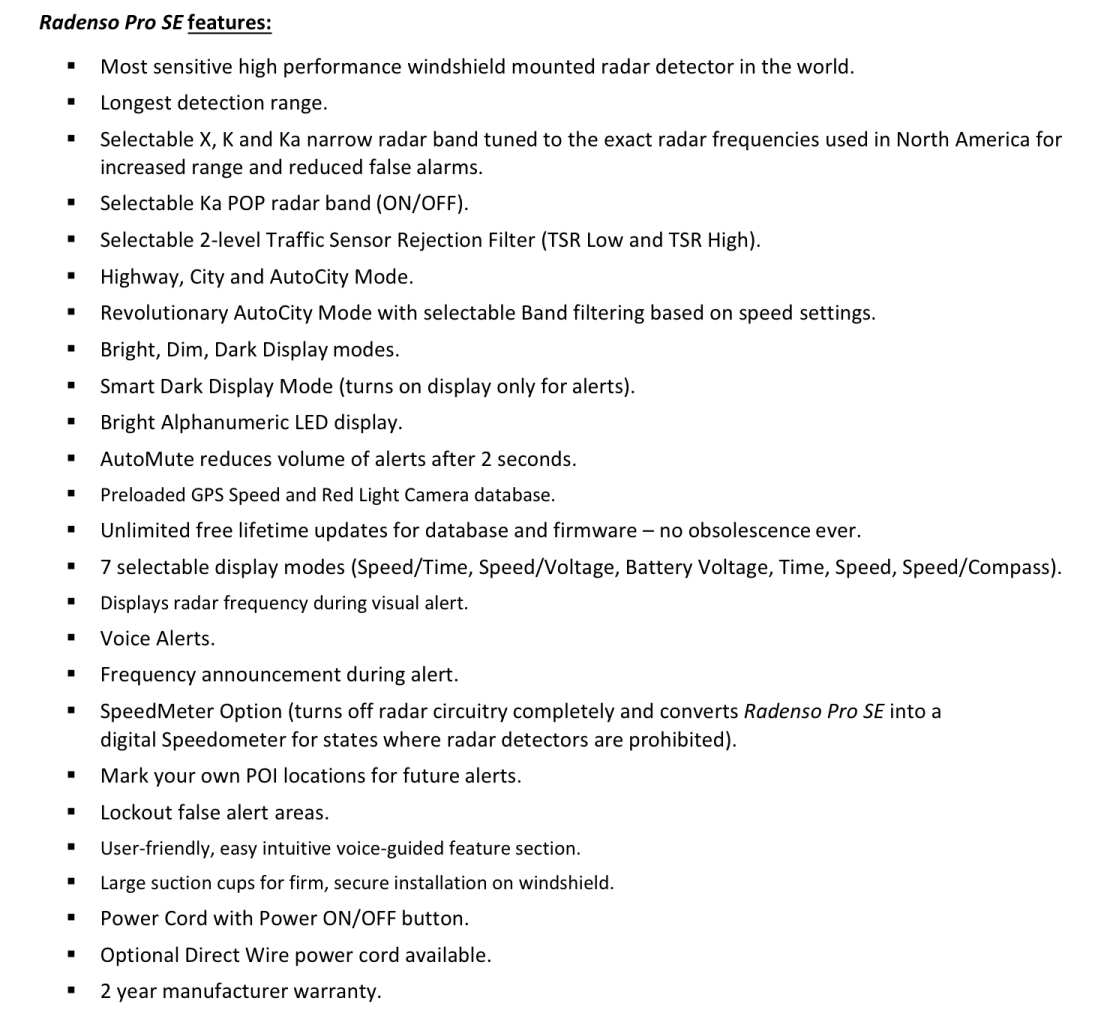
For the highest performance in conjunction with the bang-for-the-buck factor, I picked up the long-range, GPS equipped Pro SE model (now the "Pro M"), which offers a ton of features in quite the small package. Truth be told, a buddy of mine is a vendor, so I did get a great deal, but I wouldn't have hesitated to snag this once I learned more about it. There is plenty of information on their site, but check out Vortex Radar and their YouTube channel for real-world tests and comparisons that will give additional insight as to how good they really are.
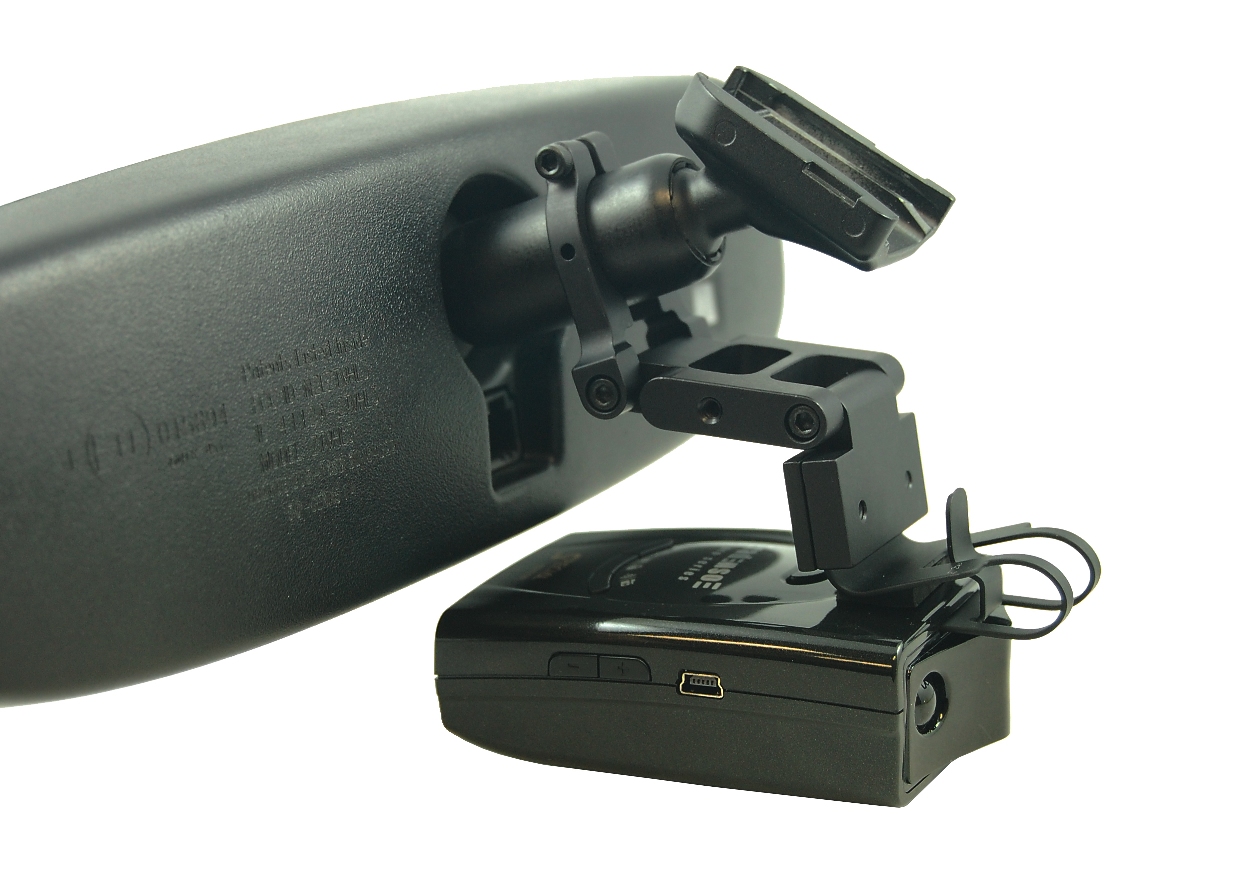
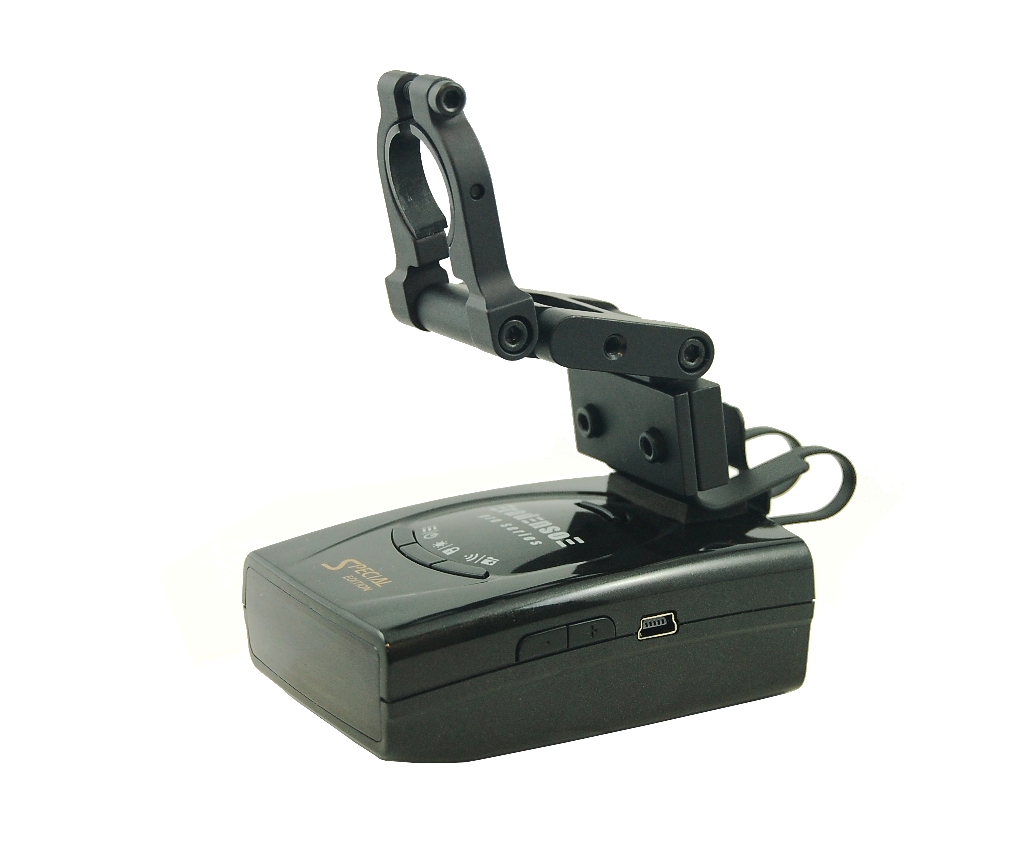
In any case, this radar detector is so good, I bought two. One for occasional jaunts in the Cobra, and the other in my daily-driver, a 2020 Explorer ST. Just to give props to some other quality gear out there, I had to mention mounting options other than the typical window suction cups and accessory-outlet cords (some of us hate external wires). For the Explorer, I picked up a nice rearview mirror kit from BlendMount, shown above, whereas the Cobra gets a simple visor clip. In both vehicles, the power cords are hard-wired, with the Explorer using taps in the lane keeping circuit that is under a cover in front of the rear-view mirror for a clean look (I had previously run another harness in the Cobra headliner before I installed its power mirror). An example of a tap kit from MirrorTap is above right, but they can be found easily through an internet search or simply fabricated from existing hard-wire harnesses.
Overall, I'm glad to keep this stuff relatively out of sight while it does what it does. Again, I swear I don't draw the attention of local law-enforcement officials! Still, I do like to enjoy my drives without any hassles, and am glad to have some good gear to keep me out of trouble, especially when unknowingly creeping over posted speed limits. If you are in the market for a great radar detector as well, don't hesitate to check out Radenso. Otherwise, feel free to meander along on leisurely cruises in no rush whatsoever!
Note: Along the same lines as the laser jammer, be sure to check your local laws when it comes to using a radar detector. While some out there are undetectable by police radar (Spectre RDD), some are not. Definitely be aware of where you can make use of them, as there is no sense in getting yourself in hot water for more than just going too fast!
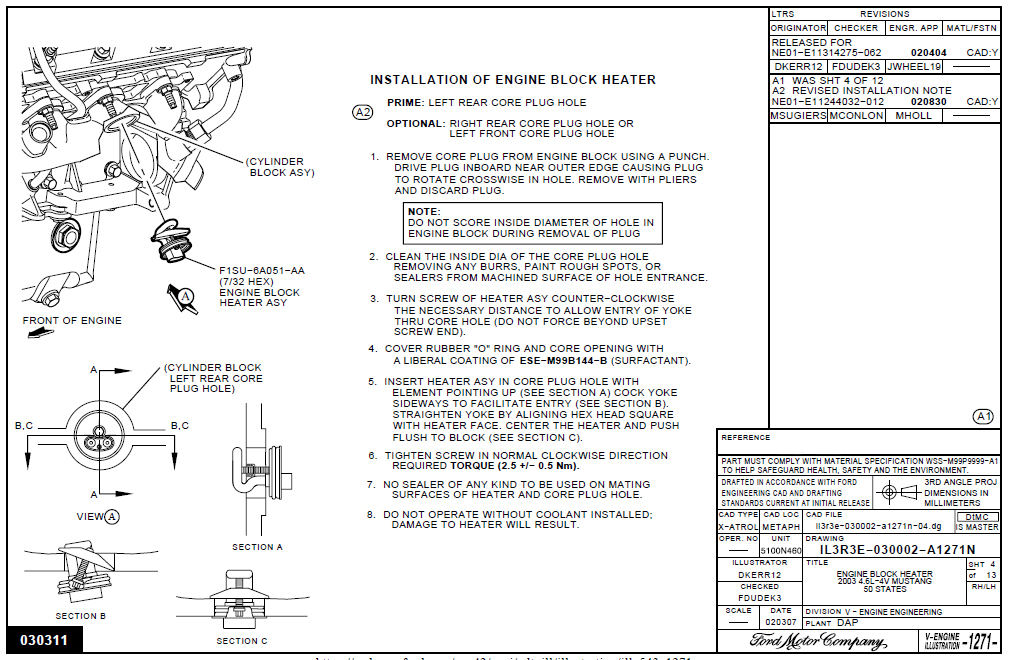
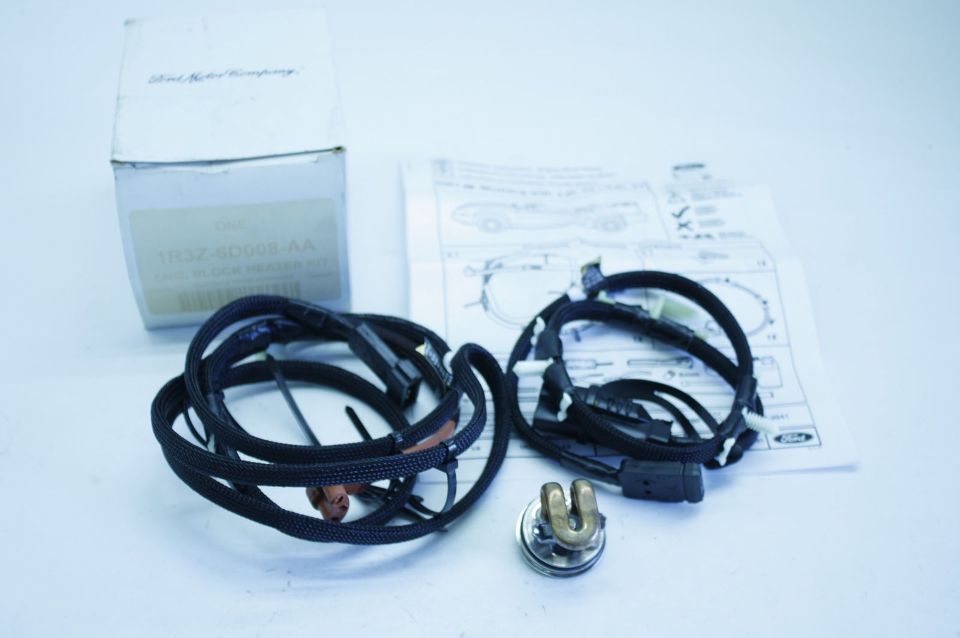
 For
anyone across the northern border of the U.S., or in any states adjacent to it,
an electric engine block heater was a standard feature added when the vehicles
were built. Although you couldn't order it for inclusion with a new Terminator
back then, it was available from Ford as a accessory that could be installed
later. For extremely cold starts, the coolant temp would be brought up to around
100°F within just a few hours, which would aid in cranking and warm-up time (the
600W heating element is powered from a household 110V circuit). As most people
know, a cold start is
just plain abusive, so having some warmth in the block to help circulate the oil is always
beneficial.
For
anyone across the northern border of the U.S., or in any states adjacent to it,
an electric engine block heater was a standard feature added when the vehicles
were built. Although you couldn't order it for inclusion with a new Terminator
back then, it was available from Ford as a accessory that could be installed
later. For extremely cold starts, the coolant temp would be brought up to around
100°F within just a few hours, which would aid in cranking and warm-up time (the
600W heating element is powered from a household 110V circuit). As most people
know, a cold start is
just plain abusive, so having some warmth in the block to help circulate the oil is always
beneficial.
Although I don't live in a real northern state, and especially since I don't drive my car in the winter, this wasn't absolutely necessary. Still, I do start the engine every week or so in the winter and let it idle for about 30 minutes each time. Since I happened to get my hands on a "New Old-Stock" kit, I figured it was just one more thing to add that would keep a bit of wear down. Adding to that, with the money I just dropped on the new engine, there was no question that something as simple as this would come in handy, especially to keep the oil pressure from going through the roof when ice cold (check out the billet oil filter on my Engine page).
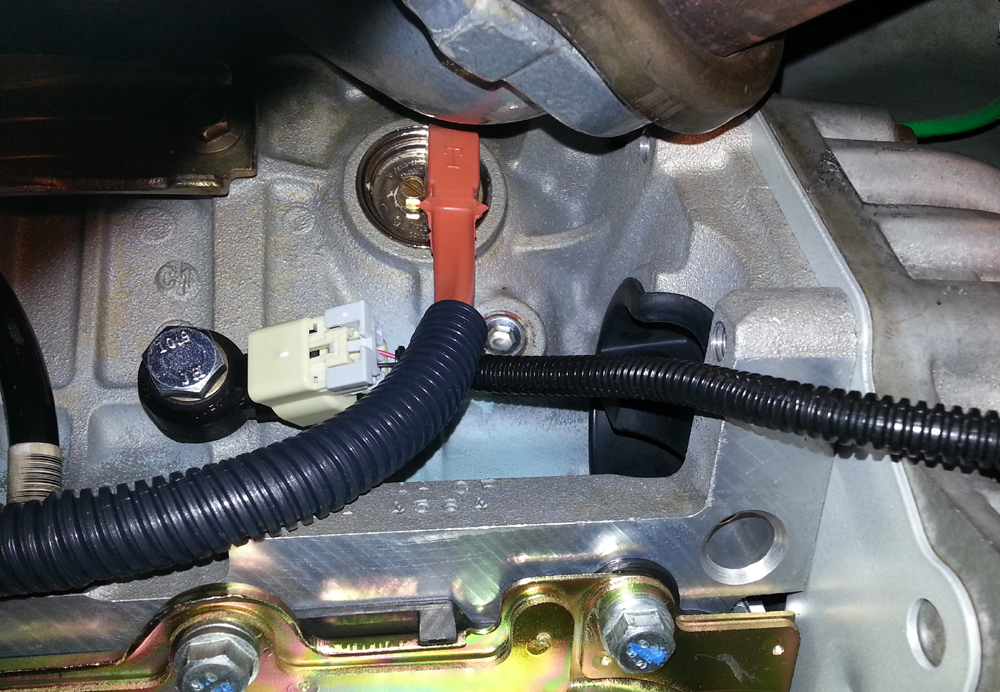
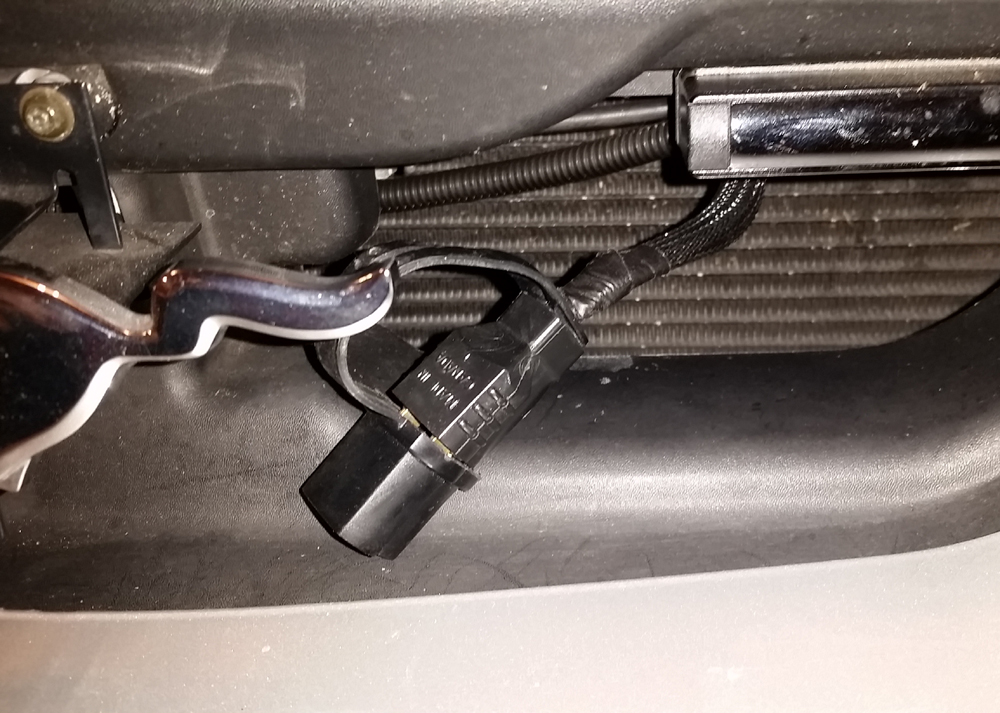
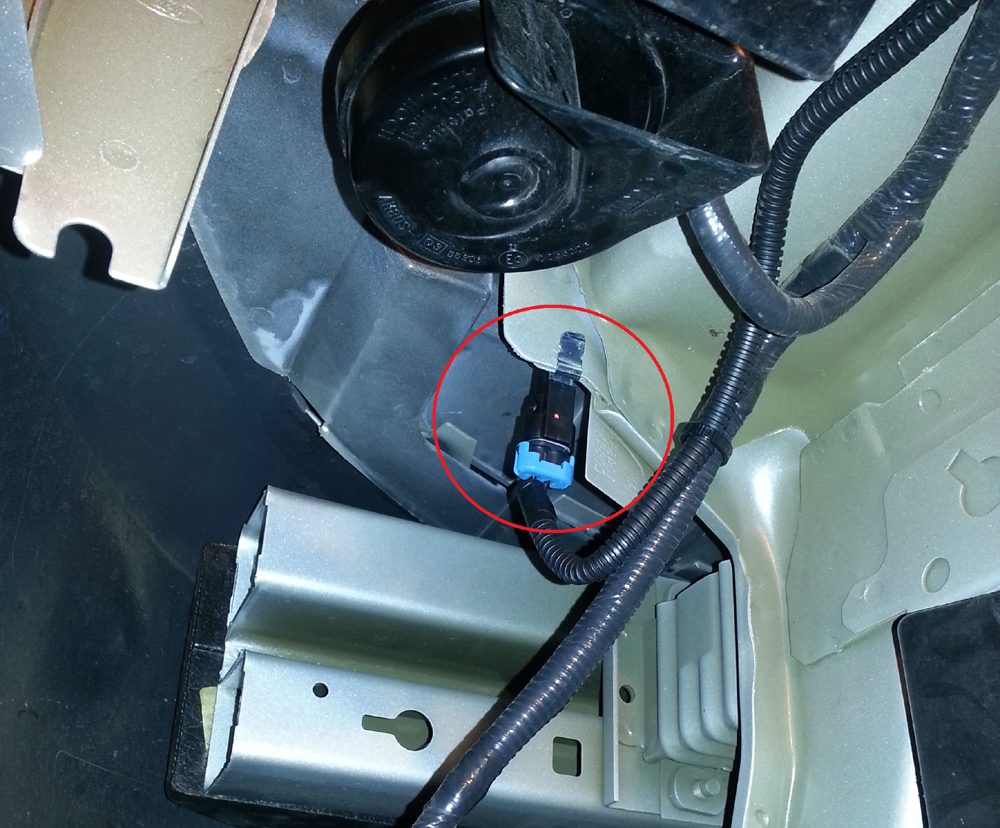
While the engine was on the stand prior to installation, it was simple to install the the heating element (also shown in the thumbnail courtesy of Tasca Ford). The Aluminator block only has one freeze plug, towards the back of the driver's side, so there was no question where it would get installed (shown above). After that - and once the engine was in - the cable was routed forward adjacent to the oil pan, up along the main harness, below the battery then through the headlight opening where it was fastened to the core support. The cord end is ultimately hidden under the radiator cover and drops in to the grille opening where the plug can be accessed easily when necessary.
Fortunately, the harness has zip ties and push pins pre-installed, so it literally fit like it came from the factory. The pictures above show the cord as it leads from the block (over the new knock sensor), as well as the plug, which has been lifted from behind the grille insert (it's totally hidden when not in use). When starting the engine a few times this winter, not only was it nice to have the coolant almost immediately up to a reasonable temperature, the oil pressure was just over 90 PSI, compared to 100+ PSI during a completely cold start. Since the engine warmed up in short order, the oil pressure also came down to a reasonable level (approximately 40 PSI) in less time. In my book this extra feature added to help with the oil flow, ultimately cutting down wear, is a total win.
Note: The original Ford block heater kit, 1R3Z-6D008-AA, has been obsolete for quite a while (the heating element is still available, for whatever it is worth). Fortunately, they turn up on eBay from time to time, or generic kits are easily sourced through most aftermarket auto parts chains from Phillips & Temro under their "ZeroStart" line. While these may not look factory, everything is essentially hidden anyway, and still something that is well worth having to cut down engine wear.
![]() This
definitely ranks high on the low-priority modifications list, but since I was
under the dash working with a lot of wires thanks to the new gauge pod, I
couldn't resist throwing a powered rear-view mirror in to the mix. Besides,
manual-dimming mirrors are so 20th Century - why not upgrade when it is so easy?
Since the kits are essentially plug-and-play, it makes adding a bit of modern
technology a no-brainer. If you've gotten used to one of these in a newer
vehicle, it's definitely nice to add it to something that has been around a bit
longer, such as the Terminator. This still fell well short of some of the real
high-tech mirrors out there, but it was a nice step up, nonetheless.
This
definitely ranks high on the low-priority modifications list, but since I was
under the dash working with a lot of wires thanks to the new gauge pod, I
couldn't resist throwing a powered rear-view mirror in to the mix. Besides,
manual-dimming mirrors are so 20th Century - why not upgrade when it is so easy?
Since the kits are essentially plug-and-play, it makes adding a bit of modern
technology a no-brainer. If you've gotten used to one of these in a newer
vehicle, it's definitely nice to add it to something that has been around a bit
longer, such as the Terminator. This still fell well short of some of the real
high-tech mirrors out there, but it was a nice step up, nonetheless.
My intent here actually was to wire in a mirror from a convertible with the map lights under it (especially since the lighting in these cars kind of stinks), but I never got around to acquiring one of those and made a slight detour instead. Since Ford used to sell this as an accessory kit, and it was simple to pop it in, I figured what the heck. Along with the auto dimming feature, the model I have also includes a digital compass and temperature reading in the small window at the upper right corner. Relatively useful stuff at a glance!
The original Ford Accessories kit actually still exists, and although its retail price is around $300, I found this one brand new for just over $100 (the p/n is XF2Z-17700-A, shown in the thumbnail above). These are actually made by Gentex, but sold through Mito Corporation under their part number 50-GENK20A (in this case, the version I have), and can generally be found cheaper than the Ford price - no surprise. As usual, there is always eBay, which is where I found this one, brand new in the original box.
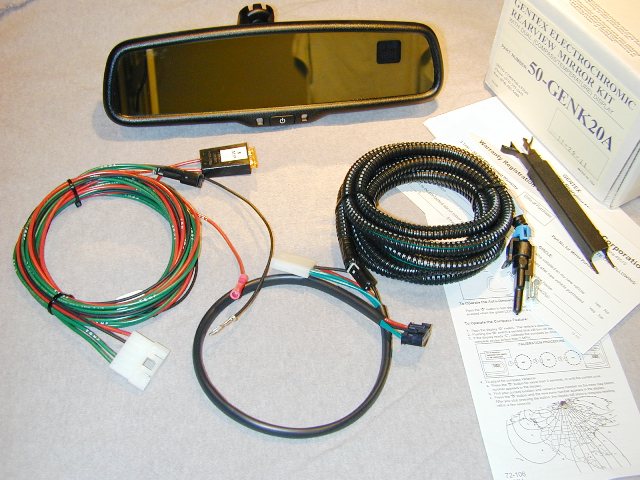

In any case, swapping the mirror head was a cinch, and the main power was tapped in to 12V switched power under the dash along with the rest of the stuff I have hard wired. Since it also comes with a temperature sensor, you have to find a place for that, then feed its two wires in to the cabin, so they can be pinned to the plug in the back of the mirror. I had to remove my driver's side fender liner to replace a chronically leaking windshield washer reservoir, so this was the perfect time to make this happen. The sensor was clipped to the sheet metal just behind the bumper, and the wire was run in to the cabin through the door-jamb grommet that is also shared with the power cable for my sub/amp combo (both pictures shown above). The wires themselves are then fed up the A-pillar and than can be tucked under the headliner, where they will drop in front of the mirror and are then concealed with a handy cover that is included. When finished, it looked like it came there from the factory. Another simple upgrade, done!